kubeadm介紹
kubeadm概述
參考《附003.Kubeadm部署Kubernetes》。
kubeadm功能
參考《附003.Kubeadm部署Kubernetes》。
本方案描述
- 本方案採用kubeadm部署Kubernetes 1.18.3版本;
- etcd採用混部方式;
- KeepAlived:實現VIP高可用;
- HAProxy:以系統systemd形式運行,提供反向代理至3個master 6443端口;
- 其他主要部署組件包括:
- Metrics:度量;
- Dashboard:Kubernetes 圖形UI界面;
- Helm:Kubernetes Helm包管理工具;
- Ingress:Kubernetes 服務暴露;
- Longhorn:Kubernetes 動態存儲組件。
部署規劃
節點規劃
| 節點主機名 | IP | 類型 | 運行服務 |
|---|---|---|---|
| master01 | 172.24.8.71 | Kubernetes master節點 | docker、etcd、kube-apiserver、kube-scheduler、kube-controller-manager、 kubectl、kubelet、metrics、calico、HAProxy、KeepAlived |
| master02 | 172.24.8.72 | Kubernetes master節點 | docker、etcd、kube-apiserver、kube-scheduler、kube-controller-manager、 kubectl、kubelet、metrics、calico、HAProxy、KeepAlived |
| master03 | 172.24.8.73 | Kubernetes master節點 | docker、etcd、kube-apiserver、kube-scheduler、kube-controller-manager、 kubectl、kubelet、metrics、calico、HAProxy、KeepAlived |
| worker01 | 172.24.8.74 | Kubernetes node節點1 | docker、kubelet、proxy、calico |
| worker02 | 172.24.8.75 | Kubernetes node節點2 | docker、kubelet、proxy、calico |
| worker03 | 172.24.8.76 | Kubernetes node節點3 | docker、kubelet、proxy、calico |
| VIP | 172.24.8.100 |
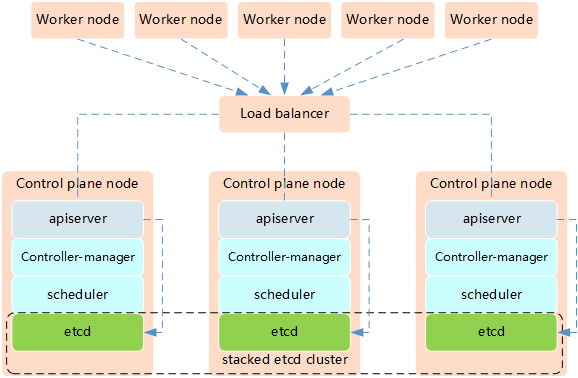
Kubernetes的高可用主要指的是控制平面的高可用,即指多套Master節點組件和Etcd組件,工作節點通過負載均衡連接到各Master。
Kubernetes高可用架構中etcd與Master節點組件混布方式特點:
- 所需機器資源少
- 部署簡單,利於管理
- 容易進行橫向擴展
- 風險大,一台宿主機掛了,master和etcd就都少了一套,集群冗餘度受到的影響比較大。
提示:本實驗使用Keepalived+HAProxy架構實現Kubernetes的高可用。
初始準備
[root@master01 ~]# hostnamectl set-hostname master01			#其他節點依次修改
[root@master01 ~]# cat >> /etc/hosts << EOF
172.24.8.71 master01
172.24.8.72 master02
172.24.8.73 master03
172.24.8.74 worker01
172.24.8.75 worker02
172.24.8.76 worker03
EOF
[root@master01 ~]# vi k8sinit.sh
# Initialize the machine. This needs to be executed on every machine.

# Install docker
useradd -m docker
yum -y install yum-utils device-mapper-persistent-data lvm2
yum-config-manager --add-repo http://mirrors.aliyun.com/docker-ce/linux/centos/docker-ce.repo
yum -y install docker-ce
mkdir /etc/docker
cat > /etc/docker/daemon.json <<EOF
{
  "registry-mirrors": ["https://dbzucv6w.mirror.aliyuncs.com"],
  "exec-opts": ["native.cgroupdriver=systemd"],
  "log-driver": "json-file",
  "log-opts": {
    "max-size": "100m"
  },
  "storage-driver": "overlay2",
  "storage-opts": [
    "overlay2.override_kernel_check=true"
  ]
}
EOF
systemctl restart docker
systemctl enable docker
systemctl status docker

# Disable the SELinux.
sed -i 's/^SELINUX=.*/SELINUX=disabled/' /etc/selinux/config

# Turn off and disable the firewalld.
systemctl stop firewalld
systemctl disable firewalld

# Modify related kernel parameters & Disable the swap.
cat > /etc/sysctl.d/k8s.conf << EOF
net.ipv4.ip_forward = 1
net.bridge.bridge-nf-call-ip6tables = 1
net.bridge.bridge-nf-call-iptables = 1
net.ipv4.tcp_tw_recycle = 0
vm.swappiness = 0
vm.overcommit_memory = 1
vm.panic_on_oom = 0
net.ipv6.conf.all.disable_ipv6 = 1
EOF
sysctl -p /etc/sysctl.d/k8s.conf >&/dev/null
swapoff -a
sed -i '/ swap / s/^\(.*\)$/#\1/g' /etc/fstab
modprobe br_netfilter

# Add ipvs modules
cat > /etc/sysconfig/modules/ipvs.modules <<EOF
#!/bin/bash
modprobe -- ip_vs
modprobe -- ip_vs_rr
modprobe -- ip_vs_wrr
modprobe -- ip_vs_sh
modprobe -- nf_conntrack_ipv4
modprobe -- nf_conntrack
EOF

chmod 755 /etc/sysconfig/modules/ipvs.modules
bash /etc/sysconfig/modules/ipvs.modules

# Install rpm
yum install -y conntrack ntpdate ntp ipvsadm ipset jq iptables curl sysstat libseccomp wget

# Update kernel
rpm --import http://down.linuxsb.com:8888/RPM-GPG-KEY-elrepo.org
rpm -Uvh http://down.linuxsb.com:8888/elrepo-release-7.0-4.el7.elrepo.noarch.rpm
yum --disablerepo="*" --enablerepo="elrepo-kernel" install -y kernel-ml
sed -i 's/^GRUB_DEFAULT=.*/GRUB_DEFAULT=0/' /etc/default/grub
grub2-mkconfig -o /boot/grub2/grub.cfg
yum update -y

# Reboot the machine.
# reboot
提示:對於某些特性,可能需要升級內核,內核升級操作見《018.Linux升級內核》。
4.19版及以上內核nf_conntrack_ipv4已經改為nf_conntrack。
互信配置
為了更方便遠程分發文件和執行命令,本實驗配置master01節點到其它節點的 ssh 信任關係。
[root@master01 ~]# ssh-keygen -f ~/.ssh/id_rsa -N ''
[root@master01 ~]# ssh-copy-id -i ~/.ssh/id_rsa.pub root@master01
[root@master01 ~]# ssh-copy-id -i ~/.ssh/id_rsa.pub root@master02
[root@master01 ~]# ssh-copy-id -i ~/.ssh/id_rsa.pub root@master03
[root@master01 ~]# ssh-copy-id -i ~/.ssh/id_rsa.pub root@worker01
[root@master01 ~]# ssh-copy-id -i ~/.ssh/id_rsa.pub root@worker02
[root@master01 ~]# ssh-copy-id -i ~/.ssh/id_rsa.pub root@worker03
提示:此操作僅需要在master節點操作。
其他準備
[root@master01 ~]# vi environment.sh
#!/bin/sh
#****************************************************************#
# ScriptName: environment.sh
# Author: xhy
# Create Date: 2020-05-30 16:30
# Modify Author: xhy
# Modify Date: 2020-06-15 17:55
# Version:
#***************************************************************#
# 集群 MASTER 機器 IP 數組
export MASTER_IPS=(172.24.8.71 172.24.8.72 172.24.8.73)

# 集群 MASTER IP 對應的主機名數組
export MASTER_NAMES=(master01 master02 master03)

# 集群 NODE 機器 IP 數組
export NODE_IPS=(172.24.8.74 172.24.8.75 172.24.8.76)

# 集群 NODE IP 對應的主機名數組
export NODE_NAMES=(worker01 worker02 worker03)

# 集群所有機器 IP 數組
export ALL_IPS=(172.24.8.71 172.24.8.72 172.24.8.73 172.24.8.74 172.24.8.75 172.24.8.76)

# 集群所有IP 對應的主機名數組
export ALL_NAMES=(master01 master02 master03 worker01 worker02 worker03)
[root@master01 ~]# source environment.sh
[root@master01 ~]# chmod +x *.sh
[root@master01 ~]# for all_ip in ${ALL_IPS[@]}
  do
    echo ">>> ${all_ip}"
    scp -rp /etc/hosts root@${all_ip}:/etc/hosts
    scp -rp k8sinit.sh root@${all_ip}:/root/
    ssh root@${all_ip} "bash /root/k8sinit.sh"
  done
集群部署
相關組件包
需要在每台機器上都安裝以下的軟件包:
- kubeadm: 用來初始化集群的指令;
- kubelet: 在集群中的每個節點上用來啟動 pod 和 container 等;
- kubectl: 用來與集群通信的命令行工具。
kubeadm不能安裝或管理 kubelet 或 kubectl ,所以得保證他們滿足通過 kubeadm 安裝的 Kubernetes 控制層對版本的要求。如果版本沒有滿足要求,可能導致一些意外錯誤或問題。
具體相關組件安裝見《附001.kubectl介紹及使用》。
提示:Kubernetes 1.18版本所有兼容相應組件的版本參考:https://github.com/kubernetes/kubernetes/blob/master/CHANGELOG/CHANGELOG-1.18.md。
正式安裝
[root@master01 ~]# for all_ip in ${ALL_IPS[@]}
  do
    echo ">>> ${all_ip}"
    ssh root@${all_ip} "cat <<EOF > /etc/yum.repos.d/kubernetes.repo
[kubernetes]
name=Kubernetes
baseurl=https://mirrors.aliyun.com/kubernetes/yum/repos/kubernetes-el7-x86_64/
enabled=1
gpgcheck=1
repo_gpgcheck=1
gpgkey=https://mirrors.aliyun.com/kubernetes/yum/doc/yum-key.gpg https://mirrors.aliyun.com/kubernetes/yum/doc/rpm-package-key.gpg
EOF"
    ssh root@${all_ip} "yum install -y kubeadm-1.18.3-0.x86_64 kubelet-1.18.3-0.x86_64 kubectl-1.18.3-0.x86_64 --disableexcludes=kubernetes"
    ssh root@${all_ip} "systemctl enable kubelet"
done
[root@master01 ~]# yum search -y kubelet --showduplicates		#查看相應版本
提示:如上僅需Master01節點操作,從而實現所有節點自動化安裝,同時此時不需要啟動kubelet,初始化的過程中會自動啟動的,如果此時啟動了會出現報錯,忽略即可。
說明:同時安裝了cri-tools, kubernetes-cni, socat三個依賴:
socat:kubelet的依賴;
cri-tools:即CRI(Container Runtime Interface)容器運行時接口的命令行工具。
部署高可用組件
HAProxy安裝
[root@master01 ~]# for master_ip in ${MASTER_IPS[@]}
  do
    echo ">>> ${master_ip}"
    ssh root@${master_ip} "yum -y install gcc gcc-c++ make libnl libnl-devel libnfnetlink-devel openssl-devel wget openssh-clients systemd-devel zlib-devel pcre-devel libnl3-devel"
    ssh root@${master_ip} "wget http://down.linuxsb.com:8888/software/haproxy-2.1.6.tar.gz"
    ssh root@${master_ip} "tar -zxvf haproxy-2.1.6.tar.gz"
    ssh root@${master_ip} "cd haproxy-2.1.6/ && make ARCH=x86_64 TARGET=linux-glibc USE_PCRE=1 USE_OPENSSL=1 USE_ZLIB=1 USE_SYSTEMD=1 PREFIX=/usr/local/haprpxy && make install PREFIX=/usr/local/haproxy"
    ssh root@${master_ip} "cp /usr/local/haproxy/sbin/haproxy /usr/sbin/"
    ssh root@${master_ip} "useradd -r haproxy && usermod -G haproxy haproxy"
    ssh root@${master_ip} "mkdir -p /etc/haproxy && cp -r /root/haproxy-2.1.6/examples/errorfiles/ /usr/local/haproxy/"
  done
Keepalived安裝
[root@master01 ~]# for master_ip in ${MASTER_IPS[@]}
  do
    echo ">>> ${master_ip}"
    ssh root@${master_ip} "yum -y install gcc gcc-c++ make libnl libnl-devel libnfnetlink-devel openssl-devel"
    ssh root@${master_ip} "wget http://down.linuxsb.com:8888/software/keepalived-2.0.20.tar.gz"
    ssh root@${master_ip} "tar -zxvf keepalived-2.0.20.tar.gz"
    ssh root@${master_ip} "cd keepalived-2.0.20/ && ./configure --sysconf=/etc --prefix=/usr/local/keepalived && make && make install"
  done
提示:如上僅需Master01節點操作,從而實現所有節點自動化安裝。
創建配置文件
[root@master01 ~]# wget http://down.linuxsb.com:8888/hakek8s.sh		#拉取自動部署腳本
[root@master01 ~]# chmod u+x hakek8s.sh
[root@master01 ~]# vi hakek8s.sh
#!/bin/sh
#****************************************************************#
# ScriptName: hakek8s.sh
# Author: xhy
# Create Date: 2020-06-08 20:00
# Modify Author: xhy
# Modify Date: 2020-06-15 18:15
# Version: v2
#***************************************************************#

#######################################
# set variables below to create the config files, all files will create at ./config directory
#######################################

# master keepalived virtual ip address
export K8SHA_VIP=172.24.8.100

# master01 ip address
export K8SHA_IP1=172.24.8.71

# master02 ip address
export K8SHA_IP2=172.24.8.72

# master03 ip address
export K8SHA_IP3=172.24.8.73

# master01 hostname
export K8SHA_HOST1=master01

# master02 hostname
export K8SHA_HOST2=master02

# master03 hostname
export K8SHA_HOST3=master03

# master01 network interface name
export K8SHA_NETINF1=eth0

# master02 network interface name
export K8SHA_NETINF2=eth0

# master03 network interface name
export K8SHA_NETINF3=eth0

# keepalived auth_pass config
export K8SHA_KEEPALIVED_AUTH=412f7dc3bfed32194d1600c483e10ad1d

# kubernetes CIDR pod subnet
export K8SHA_PODCIDR=10.10.0.0

# kubernetes CIDR svc subnet
export K8SHA_SVCCIDR=10.20.0.0
[root@master01 ~]# ./hakek8s.sh
解釋:如上僅需Master01節點操作。執行hakek8s.sh腳本後會生產如下配置文件清單:
- kubeadm-config.yaml:kubeadm初始化配置文件,位於當前目錄
- keepalived:keepalived配置文件,位於各個master節點的/etc/keepalived目錄
- haproxy:haproxy的配置文件,位於各個master節點的/etc/haproxy/目錄
- calico.yaml:calico網絡組件部署文件,位於config/calico/目錄
[root@master01 ~]# cat kubeadm-config.yaml #檢查集群初始化配置
apiVersion: kubeadm.k8s.io/v1beta2
kind: ClusterConfiguration
networking:
  serviceSubnet: "10.20.0.0/16"				#設置svc網段
  podSubnet: "10.10.0.0/16"				#設置Pod網段
  dnsDomain: "cluster.local"
kubernetesVersion: "v1.18.3"				#設置安裝版本
controlPlaneEndpoint: "172.24.11.254:16443"		#設置相關API VIP地址
apiServer:
  certSANs:
  - master01
  - master02
  - master03
  - 127.0.0.1
  - 192.168.2.11
  - 192.168.2.12
  - 192.168.2.13
  - 192.168.2.200
  timeoutForControlPlane: 4m0s
certificatesDir: "/etc/kubernetes/pki"
imageRepository: "k8s.gcr.io"

---
apiVersion: kubeproxy.config.k8s.io/v1alpha1
kind: KubeProxyConfiguration
featureGates:
  SupportIPVSProxyMode: true
mode: ipvs
提示:如上僅需Master01節點操作,更多config文件參考:https://godoc.org/k8s.io/kubernetes/cmd/kubeadm/app/apis/kubeadm/v1beta2。
此kubeadm部署初始化配置更多參考:https://pkg.go.dev/k8s.io/kubernetes/cmd/kubeadm/app/apis/kubeadm/v1beta2?tab=doc。
啟動服務
[root@master01 ~]# cat /etc/keepalived/keepalived.conf
[root@master01 ~]# cat /etc/keepalived/check_apiserver.sh	確認Keepalived配置
[root@master01 ~]# for master_ip in ${MASTER_IPS[@]}
  do
    echo ">>> ${master_ip}"
    ssh root@${master_ip} "systemctl start haproxy.service && systemctl enable haproxy.service"
    ssh root@${master_ip} "systemctl start keepalived.service && systemctl enable keepalived.service"
    ssh root@${master_ip} "systemctl status keepalived.service | grep Active"
    ssh root@${master_ip} "systemctl status haproxy.service | grep Active"
  done
[root@master01 ~]# for all_ip in ${ALL_IPS[@]}
  do
    echo ">>> ${all_ip}"
    ssh root@${all_ip} "ping -c1 172.24.8.100"
  done								#等待30s執行檢查
提示:如上僅需Master01節點操作,從而實現所有節點自動啟動服務。
初始化集群
拉取鏡像
[root@master01 ~]# kubeadm --kubernetes-version=v1.18.3 config images list	#列出所需鏡像
[root@master01 ~]# cat config/downimage.sh			#確認版本
#!/bin/sh
#****************************************************************#
# ScriptName: downimage.sh
# Author: xhy
# Create Date: 2020-05-29 19:55
# Modify Author: xhy
# Modify Date: 2020-06-10 19:15
# Version: v2
#***************************************************************#

KUBE_VERSION=v1.18.3
CALICO_VERSION=v3.14.1
CALICO_URL=calico
KUBE_PAUSE_VERSION=3.2
ETCD_VERSION=3.4.3-0
CORE_DNS_VERSION=1.6.7
GCR_URL=k8s.gcr.io
METRICS_SERVER_VERSION=v0.3.6
INGRESS_VERSION=0.32.0
CSI_PROVISIONER_VERSION=v1.4.0
CSI_NODE_DRIVER_VERSION=v1.2.0
CSI_ATTACHER_VERSION=v2.0.0
CSI_RESIZER_VERSION=v0.3.0
ALIYUN_URL=registry.cn-hangzhou.aliyuncs.com/google_containers
UCLOUD_URL=uhub.service.ucloud.cn/uxhy
QUAY_URL=quay.io

kubeimages=(kube-proxy:${KUBE_VERSION}
kube-scheduler:${KUBE_VERSION}
kube-controller-manager:${KUBE_VERSION}
kube-apiserver:${KUBE_VERSION}
pause:${KUBE_PAUSE_VERSION}
etcd:${ETCD_VERSION}
coredns:${CORE_DNS_VERSION}
metrics-server-amd64:${METRICS_SERVER_VERSION}
)

for kubeimageName in ${kubeimages[@]} ; do
docker pull $UCLOUD_URL/$kubeimageName
docker tag $UCLOUD_URL/$kubeimageName $GCR_URL/$kubeimageName
docker rmi $UCLOUD_URL/$kubeimageName
done

calimages=(cni:${CALICO_VERSION}
pod2daemon-flexvol:${CALICO_VERSION}
node:${CALICO_VERSION}
kube-controllers:${CALICO_VERSION})

for calimageName in ${calimages[@]} ; do
docker pull $UCLOUD_URL/$calimageName
docker tag $UCLOUD_URL/$calimageName $CALICO_URL/$calimageName
docker rmi $UCLOUD_URL/$calimageName
done

ingressimages=(nginx-ingress-controller:${INGRESS_VERSION})

for ingressimageName in ${ingressimages[@]} ; do
docker pull $UCLOUD_URL/$ingressimageName
docker tag $UCLOUD_URL/$ingressimageName $QUAY_URL/kubernetes-ingress-controller/$ingressimageName
docker rmi $UCLOUD_URL/$ingressimageName
done

csiimages=(csi-provisioner:${CSI_PROVISIONER_VERSION}
csi-node-driver-registrar:${CSI_NODE_DRIVER_VERSION}
csi-attacher:${CSI_ATTACHER_VERSION}
csi-resizer:${CSI_RESIZER_VERSION}
)

for csiimageName in ${csiimages[@]} ; do
docker pull $UCLOUD_URL/$csiimageName
docker tag $UCLOUD_URL/$csiimageName $QUAY_URL/k8scsi/$csiimageName
docker rmi $UCLOUD_URL/$csiimageName
done
[root@master01 ~]# for all_ip in ${ALL_IPS[@]}
  do
    echo ">>> ${all_ip}"
    scp -rp config/downimage.sh root@${all_ip}:/root/
    ssh root@${all_ip} "bash downimage.sh &"
  done
提示:如上僅需Master01節點操作,從而實現所有節點自動拉取鏡像。
[root@master01 ~]# docker images #確認驗證
Master上初始化
[root@master01 ~]# kubeadm init --config=kubeadm-config.yaml --upload-certs
You can now join any number of the control-plane node running the following command on each as root:

  kubeadm join 172.24.8.100:16443 --token xifg5c.3mvph3nwx1srdf7l \
    --discovery-token-ca-cert-hash sha256:031a8758ddad5431be4132ecd6445f33b17c2192c11e010209705816a4a53afd \
    --control-plane --certificate-key 560c926e508ed6011cd35fe120a5163d3ca32e16b745cf1877da970e3e0982f0

Please note that the certificate-key gives access to cluster sensitive data, keep it secret!
As a safeguard, uploaded-certs will be deleted in two hours; If necessary, you can use
"kubeadm init phase upload-certs --upload-certs" to reload certs afterward.

Then you can join any number of worker nodes by running the following on each as root:

kubeadm join 172.24.8.100:16443 --token xifg5c.3mvph3nwx1srdf7l \
    --discovery-token-ca-cert-hash sha256:031a8758ddad5431be4132ecd6445f33b17c2192c11e010209705816a4a53afd
注意:如上token具有默認24小時的有效期,token和hash值可通過如下方式獲取:
kubeadm token list
如果 Token 過期以後,可以輸入以下命令,生成新的 Token:
kubeadm token create
openssl x509 -pubkey -in /etc/kubernetes/pki/ca.crt | openssl rsa -pubin -outform der 2>/dev/null | openssl dgst -sha256 -hex | sed 's/^.* //'
[root@master01 ~]# mkdir -p $HOME/.kube
[root@master01 ~]# sudo cp -i /etc/kubernetes/admin.conf $HOME/.kube/config
[root@master01 ~]# sudo chown $(id -u):$(id -g) $HOME/.kube/config
[root@master01 ~]# cat << EOF >> ~/.bashrc
export KUBECONFIG=$HOME/.kube/config
EOF							#設置KUBECONFIG環境變量
[root@master01 ~]# echo "source <(kubectl completion bash)" >> ~/.bashrc
[root@master01 ~]# source ~/.bashrc
附加:初始化過程大致步驟如下:
- [kubelet-start] 生成kubelet的配置文件”/var/lib/kubelet/config.yaml”
- [certificates]生成相關的各種證書
- [kubeconfig]生成相關的kubeconfig文件
- [bootstraptoken]生成token記錄下來,後邊使用kubeadm join往集群中添加節點時會用到
提示:初始化僅需要在master01上執行,若初始化異常可通過kubeadm reset && rm -rf $HOME/.kube重置。
添加其他master節點
[root@master02 ~]# kubeadm join 172.24.8.100:16443 --token xifg5c.3mvph3nwx1srdf7l \
    --discovery-token-ca-cert-hash sha256:031a8758ddad5431be4132ecd6445f33b17c2192c11e010209705816a4a53afd \
    --control-plane --certificate-key 560c926e508ed6011cd35fe120a5163d3ca32e16b745cf1877da970e3e0982f0

[root@master02 ~]# mkdir -p $HOME/.kube
[root@master02 ~]# sudo cp -i /etc/kubernetes/admin.conf $HOME/.kube/config
[root@master02 ~]# sudo chown $(id -u):$(id -g) $HOME/.kube/config
[root@master02 ~]# cat << EOF >> ~/.bashrc
export KUBECONFIG=$HOME/.kube/config
EOF							#設置KUBECONFIG環境變量
[root@master02 ~]# echo "source <(kubectl completion bash)" >> ~/.bashrc
[root@master02 ~]# source ~/.bashrc
提示:master03也如上執行添加至集群的controlplane。
提示:若添加異常可通過kubeadm reset && rm -rf $HOME/.kube重置。
安裝NIC插件
NIC插件介紹
- Calico 是一個安全的 L3 網絡和網絡策略提供者。
- Canal 結合 Flannel 和 Calico, 提供網絡和網絡策略。
- Cilium 是一個 L3 網絡和網絡策略插件, 能夠透明的實施 HTTP/API/L7 策略。 同時支持路由(routing)和疊加/封裝( overlay/encapsulation)模式。
- Contiv 為多種用例提供可配置網絡(使用 BGP 的原生 L3,使用 vxlan 的 overlay,經典 L2 和 Cisco-SDN/ACI)和豐富的策略框架。Contiv 項目完全開源。安裝工具同時提供基於和不基於 kubeadm 的安裝選項。
- Flannel 是一個可以用於 Kubernetes 的 overlay 網絡提供者。
- Romana 是一個 pod 網絡的層 3 解決方案,並且支持 NetworkPolicy API。Kubeadm add-on 安裝細節可以在這裏找到。
- Weave Net 提供了在網絡分組兩端參与工作的網絡和網絡策略,並且不需要額外的數據庫。
- CNI-Genie 使 Kubernetes 無縫連接到一種 CNI 插件,例如:Flannel、Calico、Canal、Romana 或者 Weave。
提示:本方案使用Calico插件。
設置標籤
[root@master01 ~]# kubectl taint nodes --all node-role.kubernetes.io/master- #允許master部署應用
提示:部署完內部應用后可使用kubectl taint node master01 node-role.kubernetes.io/master=””:NoSchedule重新設置Master為Master Only 狀態。
部署calico
[root@master01 ~]# cat config/calico/calico.yaml			#檢查配置
……
            - name: CALICO_IPV4POOL_CIDR
              value: "10.10.0.0/16"					#檢查Pod網段
……
            - name: IP_AUTODETECTION_METHOD
              value: "interface=eth.*"					#檢查節點之間的網卡
# Auto-detect the BGP IP address.
            - name: IP
              value: "autodetect"
……
[root@master01 ~]# kubectl apply -f config/calico/calico.yaml
[root@master01 ~]# kubectl get pods --all-namespaces -o wide		#查看部署
[root@master01 ~]# kubectl get nodes
修改node端口範圍
[root@master01 ~]# vi /etc/kubernetes/manifests/kube-apiserver.yaml
……
    - --service-node-port-range=1-65535
……
提示:如上僅需在所有Master節點操作。
添加Worker節點
添加Worker節點
[root@master01 ~]# for node_ip in ${NODE_IPS[@]}
  do
    echo ">>> ${node_ip}"
    ssh root@${node_ip} "kubeadm join 172.24.8.100:16443 --token xifg5c.3mvph3nwx1srdf7l \
    --discovery-token-ca-cert-hash sha256:031a8758ddad5431be4132ecd6445f33b17c2192c11e010209705816a4a53afd"
    ssh root@${node_ip} "systemctl enable kubelet.service"
  done
提示:如上僅需Master01節點操作,從而實現所有Worker節點添加至集群,若添加異常可通過如下方式重置:
[root@node01 ~]# kubeadm reset
[root@node01 ~]# ifconfig cni0 down
[root@node01 ~]# ip link delete cni0
[root@node01 ~]# ifconfig flannel.1 down
[root@node01 ~]# ip link delete flannel.1
[root@node01 ~]# rm -rf /var/lib/cni/
確認驗證
[root@master01 ~]# kubectl get nodes					#節點狀態
[root@master01 ~]# kubectl get cs					#組件狀態
[root@master01 ~]# kubectl get serviceaccount				#服務賬戶
[root@master01 ~]# kubectl cluster-info					#集群信息
[root@master01 ~]# kubectl get pod -n kube-system -o wide		#所有服務狀態
提示:更多Kubetcl使用參考:https://kubernetes.io/docs/reference/kubectl/kubectl/
https://kubernetes.io/docs/reference/kubectl/overview/
更多kubeadm使用參考:https://kubernetes.io/docs/reference/setup-tools/kubeadm/kubeadm/
Metrics部署
Metrics介紹
Kubernetes的早期版本依靠Heapster來實現完整的性能數據採集和監控功能,Kubernetes從1.8版本開始,性能數據開始以Metrics API的方式提供標準化接口,並且從1.10版本開始將Heapster替換為Metrics Server。在Kubernetes新的監控體系中,Metrics Server用於提供核心指標(Core Metrics),包括Node、Pod的CPU和內存使用指標。
對其他自定義指標(Custom Metrics)的監控則由Prometheus等組件來完成。
開啟聚合層
有關聚合層知識參考:https://blog.csdn.net/liukuan73/article/details/81352637
kubeadm方式部署默認已開啟。
獲取部署文件
[root@master01 ~]# mkdir metrics
[root@master01 ~]# cd metrics/
[root@master01 metrics]# wget https://github.com/kubernetes-sigs/metrics-server/releases/download/v0.3.6/components.yaml
[root@master01 metrics]# vi components.yaml
……
apiVersion: apps/v1
kind: Deployment
……
spec:
  replicas: 3						#根據集群規模調整副本數
……
    spec:
      hostNetwork: true
……
      - name: metrics-server
        image: k8s.gcr.io/metrics-server-amd64:v0.3.6
        imagePullPolicy: IfNotPresent
        args:
          - --cert-dir=/tmp
          - --secure-port=4443
          - --kubelet-insecure-tls
          - --kubelet-preferred-address-types=InternalIP,Hostname,InternalDNS,ExternalDNS,ExternalIP	#追加此args
……
正式部署
[root@master01 metrics]# kubectl apply -f components.yaml
[root@master01 metrics]# kubectl -n kube-system get pods -l k8s-app=metrics-server
NAME                              READY   STATUS    RESTARTS   AGE
metrics-server-7b97647899-8txt4   1/1     Running   0          53s
metrics-server-7b97647899-btdwp   1/1     Running   0          53s
metrics-server-7b97647899-kbr8b   1/1     Running   0          53s
查看資源監控
[root@k8smaster01 ~]# kubectl top nodes
[root@master01 metrics]# kubectl top pods --all-namespaces
提示:Metrics Server提供的數據也可以供HPA控制器使用,以實現基於CPU使用率或內存使用值的Pod自動擴縮容功能。
部署參考:https://linux48.com/container/2019-11-13-metrics-server.html
有關metrics更多部署參考:
https://kubernetes.io/docs/tasks/debug-application-cluster/resource-metrics-pipeline/
開啟開啟API Aggregation參考:
https://kubernetes.io/docs/concepts/extend-kubernetes/api-extension/apiserver-aggregation/
API Aggregation介紹參考:
https://kubernetes.io/docs/tasks/access-kubernetes-api/configure-aggregation-layer/
Nginx ingress部署
參考《附020.Nginx-ingress部署及使用》
Dashboard部署
設置標籤
[root@master01 ~]# kubectl label nodes master01 dashboard=yes
[root@master01 ~]# kubectl label nodes master02 dashboard=yes
[root@master01 ~]# kubectl label nodes master03 dashboard=yes
創建證書
本實驗已獲取免費一年的證書,免費證書獲取可參考:https://freessl.cn。
[root@master01 ~]# mkdir -p /root/dashboard/certs
[root@master01 ~]# cd /root/dashboard/certs
[root@master01 certs]# mv k8s.odocker.com tls.crt
[root@master01 certs]# mv k8s.odocker.com tls.crt
[root@master01 certs]# ll
total 8.0K
-rw-r--r-- 1 root root 1.9K Jun  8 11:46 tls.crt
-rw-r--r-- 1 root root 1.7K Jun  8 11:46 tls.ke
提示:也可手動如下操作創建自簽證書:
[root@master01 ~]# openssl req -x509 -nodes -days 365 -newkey rsa:2048 -keyout tls.key -out tls.crt -subj "/C=CN/ST=ZheJiang/L=HangZhou/O=Xianghy/OU=Xianghy/CN=k8s.odocker.com"
手動創建secret
[root@master01 ~]# kubectl create ns kubernetes-dashboard							#v2版本dashboard獨立ns
[root@master01 ~]# kubectl create secret generic kubernetes-dashboard-certs --from-file=$HOME/dashboard/certs/ -n kubernetes-dashboard
[root@master01 ~]# kubectl get secret kubernetes-dashboard-certs -n kubernetes-dashboard -o yaml		#查看新證書
NAME                         TYPE     DATA   AGE
kubernetes-dashboard-certs   Opaque   2      4s
下載yaml
[root@master01 ~]# cd /root/dashboard
[root@master01 dashboard]# wget https://raw.githubusercontent.com/kubernetes/dashboard/v2.0.1/aio/deploy/recommended.yaml
修改為yaml
[root@master01 dashboard]# vi recommended.yaml
……
kind: Service
apiVersion: v1
metadata:
  labels:
    k8s-app: kubernetes-dashboard
  name: kubernetes-dashboard
  namespace: kubernetes-dashboard
spec:
  type: NodePort				#新增
  ports:
    - port: 443
      targetPort: 8443
      nodePort: 30001				#新增
  selector:
    k8s-app: kubernetes-dashboard
---
……						#如下全部註釋
#apiVersion: v1
#kind: Secret
#metadata:
#  labels:
#    k8s-app: kubernetes-dashboard
#  name: kubernetes-dashboard-certs
#  namespace: kubernetes-dashboard
#type: Opaque
……
kind: Deployment
……
  replicas: 3					#適當調整為3副本
……
          imagePullPolicy: IfNotPresent		#修改鏡像下載策略
          ports:
            - containerPort: 8443
              protocol: TCP
          args:
            - --auto-generate-certificates
            - --namespace=kubernetes-dashboard
            - --tls-key-file=tls.key
            - --tls-cert-file=tls.crt
            - --token-ttl=3600    #追加如上args
……
      nodeSelector:
        "beta.kubernetes.io/os": linux
        "dashboard": "yes"			#部署在master節點
……
kind: Service
apiVersion: v1
metadata:
  labels:
    k8s-app: dashboard-metrics-scraper
  name: dashboard-metrics-scraper
  namespace: kubernetes-dashboard
spec:
  type: NodePort				#新增
  ports:
    - port: 8000
      nodePort: 30000				#新增
      targetPort: 8000
  selector:
    k8s-app: dashboard-metrics-scraper
……
   replicas: 3					#適當調整為3副本
……
      nodeSelector:
        "beta.kubernetes.io/os": linux
        "dashboard": "yes"			#部署在master節點
……
正式部署
[root@master01 dashboard]# kubectl apply -f recommended.yaml
[root@master01 dashboard]# kubectl get deployment kubernetes-dashboard -n kubernetes-dashboard
[root@master01 dashboard]# kubectl get services -n kubernetes-dashboard
[root@master01 dashboard]# kubectl get pods -o wide -n kubernetes-dashboard
提示:master01 NodePort 30001/TCP映射到 dashboard pod 443 端口。
創建管理員賬戶
提示:dashboard v2版本默認沒有創建具有管理員權限的賬戶,可如下操作創建。
[root@master01 dashboard]# vi dashboard-admin.yaml
---
apiVersion: v1
kind: ServiceAccount
metadata:
  name: admin-user
  namespace: kubernetes-dashboard

---
apiVersion: rbac.authorization.k8s.io/v1
kind: ClusterRoleBinding
metadata:
  name: admin-user
roleRef:
  apiGroup: rbac.authorization.k8s.io
  kind: ClusterRole
  name: cluster-admin
subjects:
- kind: ServiceAccount
  name: admin-user
  namespace: kubernetes-dashboard
[root@master01 dashboard]# kubectl apply -f dashboard-admin.yaml
Ingress暴露Dashboard
創建Ingress tls
[root@master01 ~]# cd /root/dashboard/certs
[root@master01 certs]# kubectl -n kubernetes-dashboard create secret tls kubernetes-dashboard-tls --cert=tls.crt --key=tls.key
[root@master01 certs]# kubectl -n kubernetes-dashboard describe secrets kubernetes-dashboard-tls
創建ingress策略
[root@master01 ~]# cd /root/dashboard/
[root@master01 dashboard]# vi dashboard-ingress.yaml
apiVersion: networking.k8s.io/v1beta1
kind: Ingress
metadata:
  name: kubernetes-dashboard-ingress
  namespace: kubernetes-dashboard
  annotations:
    kubernetes.io/ingress.class: "nginx"
    nginx.ingress.kubernetes.io/use-regex: "true"
    nginx.ingress.kubernetes.io/ssl-passthrough: "true"
    nginx.ingress.kubernetes.io/rewrite-target: /
    nginx.ingress.kubernetes.io/ssl-redirect: "true"
    #nginx.ingress.kubernetes.io/secure-backends: "true"
    nginx.ingress.kubernetes.io/backend-protocol: "HTTPS"
    nginx.ingress.kubernetes.io/proxy-connect-timeout: "600"
    nginx.ingress.kubernetes.io/proxy-read-timeout: "600"
    nginx.ingress.kubernetes.io/proxy-send-timeout: "600"
    nginx.ingress.kubernetes.io/configuration-snippet: |
      proxy_ssl_session_reuse off;
spec:
  rules:
  - host: k8s.odocker.com
    http:
      paths:
      - path: /
        backend:
          serviceName: kubernetes-dashboard
          servicePort: 443
  tls:
  - hosts:
    - k8s.odocker.com
    secretName: kubernetes-dashboard-tls
[root@master01 dashboard]# kubectl apply -f dashboard-ingress.yaml
[root@master01 dashboard]# kubectl -n kubernetes-dashboard get ingress
訪問Dashboard
導入證書
將k8s.odocker.com導入瀏覽器,並設置為信任,導入操作略。
創建kubeconfig文件
使用token相對複雜,可將token添加至kubeconfig文件中,使用KubeConfig文件訪問dashboard。
[root@master01 dashboard]# ADMIN_SECRET=$(kubectl -n kubernetes-dashboard get secret | grep admin-user | awk '{print $1}')
[root@master01 dashboard]# DASHBOARD_LOGIN_TOKEN=$(kubectl describe secret -n kubernetes-dashboard ${ADMIN_SECRET} | grep -E '^token' | awk '{print $2}')
[root@master01 dashboard]# kubectl config set-cluster kubernetes \
  --certificate-authority=/etc/kubernetes/pki/ca.crt \
  --embed-certs=true \
  --server=172.24.8.100:16443 \
  --kubeconfig=local-hakek8s-dashboard-admin.kubeconfig								# 設置集群參數
[root@master01 dashboard]# kubectl config set-credentials dashboard_user \
  --token=${DASHBOARD_LOGIN_TOKEN} \
  --kubeconfig=local-hakek8s-dashboard-admin.kubeconfig								# 設置客戶端認證參數,使用上面創建的 Token
[root@master01 dashboard]# kubectl config set-context default \
  --cluster=kubernetes \
  --user=dashboard_user \
  --kubeconfig=local-hakek8s-dashboard-admin.kubeconfig								# 設置上下文參數
[root@master01 dashboard]# kubectl config use-context default --kubeconfig=local-hakek8s-dashboard-admin.kubeconfig		# 設置默認上下文
測試訪問Dashboard
本實驗採用ingress所暴露的域名:https://k8s.odocker.com 方式訪問。
使用local-hakek8s-dashboard-admin.kubeconfig文件訪問:
提示:更多dashboard訪問方式及認證可參考 《附004.Kubernetes Dashboard簡介及使用》。
dashboard登錄整個流程可參考:https://www.cnadn.net/post/2613.html
Longhorn存儲部署
Longhorn概述
Longhorn是用於Kubernetes的開源分佈式塊存儲系統。
提示:更多介紹參考:https://github.com/longhorn/longhorn。
Longhorn部署
[root@master01 ~]# source environment.sh
[root@master01 ~]# for all_ip in ${ALL_IPS[@]}
  do
    echo ">>> ${all_ip}"
    ssh root@${all_ip} "yum -y install iscsi-initiator-utils &"
  done
提示:所有節點都需要安裝。
[root@master01 ~]# mkdir longhorn
[root@master01 ~]# cd longhorn/
[root@master01 longhorn]# wget \
https://raw.githubusercontent.com/longhorn/longhorn/master/deploy/longhorn.yaml
[root@master01 longhorn]# vi longhorn.yaml
#……
---
kind: Service
apiVersion: v1
metadata:
  labels:
    app: longhorn-ui
  name: longhorn-frontend
  namespace: longhorn-system
spec:
  type: NodePort			#修改為nodeport
  selector:
    app: longhorn-ui
  ports:
  - port: 80
    targetPort: 8000
    nodePort: 30002
---
……
kind: DaemonSet
……
        imagePullPolicy: IfNotPresent
……
#……
[root@master01 longhorn]# kubectl apply -f longhorn.yaml
[root@master01 longhorn]# kubectl -n longhorn-system get pods -o wide
提示:若部署異常可刪除重建,若出現無法刪除namespace,可通過如下操作進行刪除:
wget https://github.com/longhorn/longhorn/blob/master/uninstall/uninstall.yaml
rm -rf /var/lib/longhorn/
kubectl apply -f uninstall.yaml
kubectl delete -f longhorn.yaml
動態sc創建
提示:默認longhorn部署完成已創建一個sc,也可通過如下手動編寫yaml創建。
[root@master01 longhorn]# kubectl get sc
NAME                   PROVISIONER             RECLAIMPOLICY   VOLUMEBINDINGMODE      ALLOWVOLUMEEXPANSION   AGE
……
longhorn               driver.longhorn.io      Delete          Immediate              true                   15m
[root@master01 longhorn]# vi longhornsc.yaml
kind: StorageClass
apiVersion: storage.k8s.io/v1
metadata:
  name: longhornsc
provisioner: rancher.io/longhorn
parameters:
  numberOfReplicas: "3"
  staleReplicaTimeout: "30"
  fromBackup: ""
[root@master01 longhorn]# kubectl create -f longhornsc.yaml
測試PV及PVC
[root@master01 longhorn]# vi longhornpod.yaml
apiVersion: v1
kind: PersistentVolumeClaim
metadata:
  name: longhorn-pvc
spec:
  accessModes:
    - ReadWriteOnce
  storageClassName: longhorn
  resources:
    requests:
      storage: 2Gi
---
apiVersion: v1
kind: Pod
metadata:
  name: longhorn-pod
  namespace: default
spec:
  containers:
  - name: volume-test
    image: nginx:stable-alpine
    imagePullPolicy: IfNotPresent
    volumeMounts:
    - name: volv
      mountPath: /data
    ports:
    - containerPort: 80
  volumes:
  - name: volv
    persistentVolumeClaim:
      claimName: longhorn-pvc
[root@master01 longhorn]# kubectl apply -f longhornpod.yaml
[root@master01 longhorn]# kubectl get pods
[root@master01 longhorn]# kubectl get pvc
[root@master01 longhorn]# kubectl get pv
Ingress暴露Longhorn
[root@master01 longhorn]# yum -y install httpd-tools
[root@master01 longhorn]# htpasswd -c auth xhy				#創建用戶名和密碼
提示:也可通過如下命令創建:USER=xhy; PASSWORD=x120952576; echo "${USER}:$(openssl passwd -stdin -apr1 <<< ${PASSWORD})" >> auth
[root@master01 longhorn]# kubectl -n longhorn-system create secret generic longhorn-basic-auth --from-file=auth [root@master01 longhorn]# vi longhorn-ingress.yaml #創建ingress規則
apiVersion: networking.k8s.io/v1beta1
kind: Ingress
metadata:
  name: longhorn-ingress
  namespace: longhorn-system
  annotations:
    nginx.ingress.kubernetes.io/auth-type: basic
    nginx.ingress.kubernetes.io/auth-secret: longhorn-basic-auth
    nginx.ingress.kubernetes.io/auth-realm: 'Authentication Required '
spec:
  rules:
  - host: longhorn.odocker.com
    http:
      paths:
      - path: /
        backend:
          serviceName: longhorn-frontend
          servicePort: 80
[root@master01 longhorn]# kubectl apply -f longhorn-ingress.yaml
確認驗證
瀏覽器訪問:longhorn.odocker.com,並輸入賬號和密碼。
Helm安裝
參考《053.集群管理-Helm工具》。
本站聲明:網站內容來源於博客園,如有侵權,請聯繫我們,我們將及時處理
【其他文章推薦】
※超省錢租車方案
※別再煩惱如何寫文案,掌握八大原則!
※回頭車貨運收費標準
※教你寫出一流的銷售文案?
※產品缺大量曝光嗎?你需要的是一流包裝設計!
※廣告預算用在刀口上,台北網頁設計公司幫您達到更多曝光效益