Maven系列第6篇:生命周期和插件詳解,此篇看過之後在maven的理解上可以超越同級別90%的人!

maven系列目標:從入門開始開始掌握一個高級開發所需要的maven技能。

這是maven系列第6篇。

整個maven系列的內容前後是有依賴的,如果之前沒有接觸過maven,建議從第一篇看起,本文尾部有maven完整系列的連接。

前面我們使用maven過程中,用到了一些命令,如下:

mvn clean
mvn compile
mvn test
mvn package
mvn install
mvn install -Dmaven.test.skip=true
mvn deploy
mvn help:system

上面這些命令,如果你玩過maven,估計大家還是比較眼熟的,只是大家有沒有想過這些命令為什麼這麼寫,為什麼-Dmaven.test.skip=true可以跳過測試,大家需要知道mvn命令背後的一些原理,這就是本文的主要內容,廢話不多說,上乾貨。

本文主要內容

  1. 用戶自定義屬性的使用
  2. maven生命周期詳解
  3. maven插件詳解

用戶屬性Properties的使用

項目pom.xml中,有下面這樣一段依賴:

<dependencies>
    <dependency>
        <groupId>org.springframework</groupId>
        <artifactId>spring-core</artifactId>
        <version>5.2.1.RELEASE</version>
    </dependency>
    <dependency>
        <groupId>org.springframework</groupId>
        <artifactId>spring-beans</artifactId>
        <version>5.2.1.RELEASE</version>
    </dependency>
    <dependency>
        <groupId>org.springframework</groupId>
        <artifactId>spring-aop</artifactId>
        <version>5.2.1.RELEASE</version>
    </dependency>
</dependencies>

大家看一下上面的配置,有沒有什麼問題?

他們的groupId和version都是一樣的,程序員面對與重複的代碼,需要提取,如果是java代碼中,我們可以將同樣的代碼或者變量值,提取成方法或者變量,做到重用,方便維護。

那麼maven的pom.xml中也支持這麼做:

<properties>
    <spring.group>org.springframework</spring.group>
    <spring.version>5.2.1.RELEASE</spring.version>
</properties>

<dependencies>
    <dependency>
        <groupId>${spring.group}</groupId>
        <artifactId>spring-core</artifactId>
        <version>${spring.version}</version>
    </dependency>
    <dependency>
        <groupId>${spring.group}</groupId>
        <artifactId>spring-beans</artifactId>
        <version>${spring.version}</version>
    </dependency>
    <dependency>
        <groupId>${spring.group}</groupId>
        <artifactId>spring-aop</artifactId>
        <version>${spring.version}</version>
    </dependency>
</dependencies>

大家看一下上面的代碼,properties位於pom.xml中的,是project元素的子元素,用戶可以在properties中自定義一些用戶屬性,然後可以在其他地方使用${屬性名稱}這種方式進行引用。

生命周期

我們開發一個項目的時候,通常有這些環節:創建項目、編寫代碼、清理已編譯的代碼、編譯代碼、執行單元測試、打包、集成測試、驗證、部署、生成站點等,這些環節組成了項目的生命周期,這些過程也叫做項目的構建過程,幾乎所有的項目都由這些環節中的其中幾個,創建項目和編寫代碼是我們程序員需要多參与的,其他的都可以做成自動化的方式。

用過ant的朋友回憶一下,在maven出現以前,開發人員每天都在對項目進行清理、編譯、執行單元測試、打包、部署等操作,雖然大家都在做這些工作,但是沒有一個統一的標準,項目和項目之間,公司和公司之間,大多數都是各寫各的,寫法是千奇百怪,能滿足自身需求就可以了,但是換個項目就得從頭再來,這些操作又需要重新編寫腳本。

而maven出來之後,項目生命周期中的這些環節都被簡化了,被規範化了,maven出現之前,項目的結構沒有一個統一的標準,所以生命周期中各個環節對應的自動化腳本也是各種各樣,而maven約定好了項目的結構,源碼的位置、資源文件的位置、測試代碼的位置、測試用到的資源文件的位置、靜態資源的位置、打包之後文件的位置等,這些都是maven約定好的,所以清理代碼用一個命令mvn clean就可以完成,不需要我們去配置清理的目標目錄;用mvn compile命令就可以完成編譯的操作;用mvn test就可以自動運行測試用例;用mvn package就可以將項目打包為jar、war格式的包,能夠如此簡單,主要還是maven中約定大於配置的結果。

maven中生命周期詳解

maven將項目的生命周期抽象成了3套生命周期,每套生命周期又包含多個階段,每套中具體包含哪些階段是maven已經約定好的,但是每個階段具體需要做什麼,是用戶可以自己指定的。

maven中定義的3套生命周期:

  1. clean生命周期
  2. default生命周期
  3. site生命周期

上面這3套生命周期是相互獨立的,沒有依賴關係的,而每套生命周期中有多個階段,每套中的多個階段是有先後順序的,並且後面的階段依賴於前面的階段,而用戶可以直接使用mvn命令來調用這些階段去完成項目生命周期中具體的操作,命令是:

mvn 生命周期階段

通俗點解釋:

maven中的3套生命周期相當於maven定義了3個類來解決項目生命周期中需要的各種操作,每個類中有多個方法,這些方法就是指具體的階段,方法名稱就是階段的名稱,每個類的方法是有順序的,當執行某個方法的時候,這個方法前面的方法也會執行。具體每個方法中需要執行什麼,這個是通過插件的方式讓用戶去配置的,所以非常靈活。

用戶執行mvn 階段名稱就相當於調用了具體的某個方法。

下面我們來看看每個生命周期中有哪些階段(也就是我們說的每個類中有哪些方法,順序是什麼樣的)。

clean生命周期

clean生命周期的目的是清理項目,它包含三個階段:

生命周期階段 描述
pre-clean 執行一些需要在clean之前完成的工作
clean 移除所有上一次構建生成的文件
post-clean 執行一些需要在clean之後立刻完成的工作

用戶可以通過mvn pre-clean來調用clean生命周期中的pre-clean階段需要執行的操作。

調用mvn post-clean會執行上面3個階段所有的操作,上文中有說過,每個生命周期中的後面的階段會依賴於前面的階段,當執行某個階段的時候,會先執行其前面的階段。

default生命周期

這個是maven主要的生命周期,主要被用於構建應用,包含了23個階段。

生命周期階段 描述
validate 校驗:校驗項目是否正確並且所有必要的信息可以完成項目的構建過程。
initialize 初始化:初始化構建狀態,比如設置屬性值。
generate-sources 生成源代碼:生成包含在編譯階段中的任何源代碼。
process-sources 處理源代碼:處理源代碼,比如說,過濾任意值。
generate-resources 生成資源文件:生成將會包含在項目包中的資源文件。
process-resources 編譯:複製和處理資源到目標目錄,為打包階段最好準備。
compile 處理類文件:編譯項目的源代碼。
process-classes 處理類文件:處理編譯生成的文件,比如說對Java class文件做字節碼改善優化。
generate-test-sources 生成測試源代碼:生成包含在編譯階段中的任何測試源代碼。
process-test-sources 處理測試源代碼:處理測試源代碼,比如說,過濾任意值。
generate-test-resources 生成測試源文件:為測試創建資源文件。
process-test-resources 處理測試源文件:複製和處理測試資源到目標目錄。
test-compile 編譯測試源碼:編譯測試源代碼到測試目標目錄.
process-test-classes 處理測試類文件:處理測試源碼編譯生成的文件。
test 測試:使用合適的單元測試框架運行測試(Juint是其中之一)。
prepare-package 準備打包:在實際打包之前,執行任何的必要的操作為打包做準備。
package 打包:將編譯后的代碼打包成可分發格式的文件,比如JAR、WAR或者EAR文件。
pre-integration-test 集成測試前:在執行集成測試前進行必要的動作。比如說,搭建需要的環境。
integration-test 集成測試:處理和部署項目到可以運行集成測試環境中。
post-integration-test 集成測試后:在執行集成測試完成後進行必要的動作。比如說,清理集成測試環境。
verify 驗證:運行任意的檢查來驗證項目包有效且達到質量標準。
install 安裝:安裝項目包到本地倉庫,這樣項目包可以用作其他本地項目的依賴。
deploy 部署:將最終的項目包複製到遠程倉庫中與其他開發者和項目共享。

site生命周期

site生命周期的目的是建立和發布項目站點,Maven能夠基於pom.xml所包含的信息,自動生成一個友好的站點,方便團隊交流和發布項目信息。主要包含以下4個階段:

階段 描述
pre-site 執行一些需要在生成站點文檔之前完成的工作
site 生成項目的站點文檔
post-site 執行一些需要在生成站點文檔之後完成的工作,並且為部署做準備
site-deploy 將生成的站點文檔部署到特定的服務器上

mvn命令和生命周期

從命令行執行maven任務的最主要方式就是調用maven生命周期的階段,需要注意的是,每套生命周期是相互獨立的,但是每套生命周期中階段是有前後依賴關係的,執行某個的時候,會按序先執行其前面所有的。

mvn執行階段的命令格式是:

mvn 階段1 [階段2] [階段n]

多個階段的名稱之間用空格隔開。

下面我們舉一些常見的例子來說明一下:

mvn clean

該命令是調用clean生命周期的clean階段,實際執行的階段為clean生命周期中的pre-clean和clean階段。

mvn test

該命令調用default生命周期的test階段,實際上會從default生命周期的第一個階段(validate)開始執行一直到test階段結束。這裏面包含了代碼的編譯,運行測試用例。

mvn clean install

這個命令中執行了兩個階段:cleaninstall,從上面3個生命周期的階段列表中找一下,可以看出clean位於clean生命周期的表格中,install位於default生命周期的表格中,所以這個命令會先從clean生命周期中的pre-clean階段開始執行一直到clean生命周期的clean階段;然後會繼續從default生命周期的validate階段開始執行一直到default生命周期的install階段。

這裏面包含了清理上次構建的結果,編譯代碼,測試,打包,將打好的包安裝到本地倉庫。

mvn clean deploy

這個命令也比較常用,會先按順序執行clean生命周期的[pre-clean,clean]這個閉區間內所有的階段,然後按序執行default生命周期的[validate,deploy]這個閉區間內的所有階段(也就是default生命周期中的所有階段)。這個命令內部包含了清理上次構建的結果、編譯代碼、運行單元測試、打包、將打好的包安裝到本地倉庫、將打好的包發布到私服倉庫。

上面說了這麼多理論,我們來看一下效果。

案例

創建一個maven項目

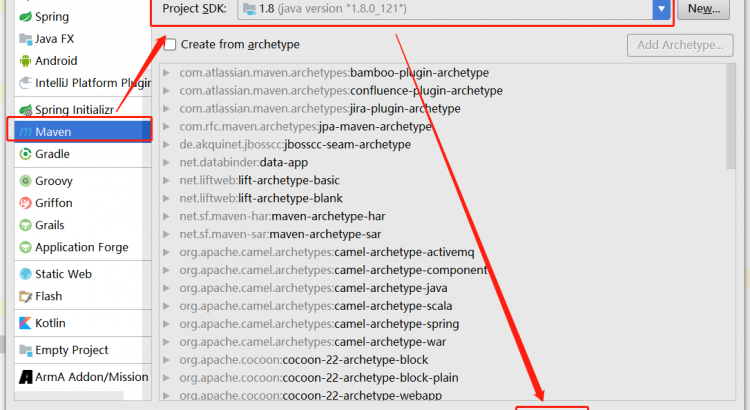
打開idea,點擊File->New->Project,選擇Maven,如下:

點擊Next,輸入項目坐標信息,如下:

點擊Next,輸入Project name 為maven-chat06,如下:

點擊Finish,創建成功,如下:

配置一下idea的maven環境,點擊File->Settings,如下圖:

點擊上面的OK完成配置。

還原~/.m2/settings.xml的配置到初始狀態,操作如下:

將M2_HOME/conf/settings.xml複製到~/.m2/settings.xml目錄,如果存在先備份一個,然後進行覆蓋。

maven項目是約定大於配置的,項目結構是按照maven的約定生成好的,關於maven約定項目結構,我們再來回顧一下。

Maven 提倡使用一個共同的標準目錄結構,Maven 使用約定優於配置的原則,大家盡可能的遵守這樣的目錄結構,如下所示:

目錄 目的
${basedir} 存放pom.xml和所有的子目錄
${basedir}/src/main/java 項目的java源代碼
${basedir}/src/main/resources 項目的資源,比如說property文件,springmvc.xml
${basedir}/src/test/java 項目的測試類,比如說Junit代碼
${basedir}/src/test/resources 測試用的資源
${basedir}/src/main/webapp/WEB-INF web應用文件目錄,web項目的信息,比如存放web.xml、本地圖片、jsp視圖頁面
${basedir}/target 打包輸出目錄
${basedir}/target/classes 編譯輸出目錄
${basedir}/target/test-classes 測試編譯輸出目錄
Test.java Maven只會自動運行符合該命名規則的測試類
~/.m2/repository Maven默認的本地倉庫目錄位置

結合剛才項目的結構和這個表格領會一下,下面我們來感受一下執行生命周期中的階段產生的效果。

修改pom.xml,如下:

<?xml version="1.0" encoding="UTF-8"?>
<project xmlns="http://maven.apache.org/POM/4.0.0"
         xmlns:xsi="http://www.w3.org/2001/XMLSchema-instance"
         xsi:schemaLocation="http://maven.apache.org/POM/4.0.0 http://maven.apache.org/xsd/maven-4.0.0.xsd">
    <modelVersion>4.0.0</modelVersion>

    <groupId>com.javacode2018</groupId>
    <artifactId>maven-chat06</artifactId>
    <version>1.0-SNAPSHOT</version>
    <packaging>jar</packaging>
    <properties>
        <project.build.sourceEncoding>UTF-8</project.build.sourceEncoding>
        <!-- 配置maven編譯的時候採用的編譯器版本 -->
        <maven.compiler.compilerVersion>1.8</maven.compiler.compilerVersion>
        <!-- 指定源代碼是什麼版本的,如果源碼和這個版本不符將報錯,maven中執行編譯的時候會用到這個配置,默認是1.5,這個相當於javac命令後面的-source參數 -->
        <maven.compiler.source>1.8</maven.compiler.source>
        <!-- 該命令用於指定生成的class文件將保證和哪個版本的虛擬機進行兼容,maven中執行編譯的時候會用到這個配置,默認是1.5,這個相當於javac命令後面的-target參數 -->
        <maven.compiler.target>1.8</maven.compiler.target>
    </properties>

    <dependencies>
        <dependency>
            <groupId>junit</groupId>
            <artifactId>junit</artifactId>
            <version>4.12</version>
            <scope>test</scope>
        </dependency>
    </dependencies>

</project>

上面properties這個元素中的配置,可能大家看不懂,先略過,後面會詳解。

創建一個Demo類,源碼是放在src/main/java目錄中,如下:

package com.javacode2018.maven;

import java.util.ArrayList;
import java.util.List;

public class Demo1 {
    public static void main(String[] args) {
        System.out.println("歡迎和【路人甲java】一起學習maven,帶你成為maven高手!");
        List<Integer> list = new ArrayList<>();
        for (int i = 0; i < 5; i++) {
            list.add(i);
        }
        list.forEach(System.out::print);
    }
}
mvn clean命令效果

在當前項目pom.xml所在目錄中執行下面命令:

mvn clean

效果如下:

D:\code\IdeaProjects\maven-chat06>mvn clean
[INFO] Scanning for projects...
[INFO]
[INFO] -------------------< com.javacode2018:maven-chat06 >--------------------
[INFO] Building maven-chat06 1.0-SNAPSHOT
[INFO] --------------------------------[ jar ]---------------------------------
[INFO]
[INFO] --- maven-clean-plugin:2.5:clean (default-clean) @ maven-chat06 ---
[INFO] Deleting D:\code\IdeaProjects\maven-chat06\target
[INFO] ------------------------------------------------------------------------
[INFO] BUILD SUCCESS
[INFO] ------------------------------------------------------------------------
[INFO] Total time:  0.477 s
[INFO] Finished at: 2019-11-15T18:46:13+08:00
[INFO] ------------------------------------------------------------------------

上面有提到編譯、打包的內容都放在target目錄,看上面輸出中有個Deleting target目錄,說明mvn clean是對這個目錄進行清理,這個目錄中目前是空的。

mvn compile命令效果

先看一下項目的目錄中是沒有target目錄的,如下圖:

cmd中執行:

mvn compile

輸出:

D:\code\IdeaProjects\maven-chat06>mvn compile
[INFO] Scanning for projects...
[INFO]
[INFO] -------------------< com.javacode2018:maven-chat06 >--------------------
[INFO] Building maven-chat06 1.0-SNAPSHOT
[INFO] --------------------------------[ jar ]---------------------------------
[INFO]
[INFO] --- maven-resources-plugin:2.6:resources (default-resources) @ maven-chat06 ---
[INFO] Using 'UTF-8' encoding to copy filtered resources.
[INFO] Copying 0 resource
[INFO]
[INFO] --- maven-compiler-plugin:3.1:compile (default-compile) @ maven-chat06 ---
[INFO] Changes detected - recompiling the module!
[INFO] Compiling 1 source file to D:\code\IdeaProjects\maven-chat06\target\classes
[INFO] ------------------------------------------------------------------------
[INFO] BUILD SUCCESS
[INFO] ------------------------------------------------------------------------
[INFO] Total time:  1.897 s
[INFO] Finished at: 2019-11-15T18:53:12+08:00
[INFO] ------------------------------------------------------------------------

可以看到上面有Compiling 1 source ....,這個是編譯Demo.java,然後輸出到了target中的classes目錄,再來看一下項目的結構,如下圖:

上圖中匡紅的是新生成的。

mvn clean package效果
D:\code\IdeaProjects\maven-chat06>mvn clean package
[INFO] Scanning for projects...
[INFO]
[INFO] -------------------< com.javacode2018:maven-chat06 >--------------------
[INFO] Building maven-chat06 1.0-SNAPSHOT
[INFO] --------------------------------[ jar ]---------------------------------
[INFO]
[INFO] --- maven-clean-plugin:2.5:clean (default-clean) @ maven-chat06 ---
[INFO] Deleting D:\code\IdeaProjects\maven-chat06\target
[INFO]
[INFO] --- maven-resources-plugin:2.6:resources (default-resources) @ maven-chat06 ---
[INFO] Using 'UTF-8' encoding to copy filtered resources.
[INFO] Copying 0 resource
[INFO]
[INFO] --- maven-compiler-plugin:3.1:compile (default-compile) @ maven-chat06 ---
[INFO] Changes detected - recompiling the module!
[INFO] Compiling 1 source file to D:\code\IdeaProjects\maven-chat06\target\classes
[INFO]
[INFO] --- maven-resources-plugin:2.6:testResources (default-testResources) @ maven-chat06 ---
[INFO] Using 'UTF-8' encoding to copy filtered resources.
[INFO] Copying 0 resource
[INFO]
[INFO] --- maven-compiler-plugin:3.1:testCompile (default-testCompile) @ maven-chat06 ---
[INFO] Nothing to compile - all classes are up to date
[INFO]
[INFO] --- maven-surefire-plugin:2.12.4:test (default-test) @ maven-chat06 ---
[INFO]
[INFO] --- maven-jar-plugin:2.4:jar (default-jar) @ maven-chat06 ---
[INFO] Building jar: D:\code\IdeaProjects\maven-chat06\target\maven-chat06-1.0-SNAPSHOT.jar
[INFO] ------------------------------------------------------------------------
[INFO] BUILD SUCCESS
[INFO] ------------------------------------------------------------------------
[INFO] Total time:  2.177 s
[INFO] Finished at: 2019-11-15T18:56:59+08:00
[INFO] ------------------------------------------------------------------------

從輸出中看一下,有個Building jar ...,生成了一個jar包,這個項目的pom.xml中的packaging元素沒有指定值,那就取默認值jar,表示這個構件是一個jar包,mvn clean package先清理編譯的代碼,然後執行了default生命周期的compile階段,將項目打成了jar放在了target目錄,如下圖:

大家看到上面還有很多其他的輸出,這個大家可以先忽略,本文看完了,都會明白的。

mvn clean install效果
D:\code\IdeaProjects\maven-chat06>mvn clean install
[INFO] Scanning for projects...
[INFO]
[INFO] -------------------< com.javacode2018:maven-chat06 >--------------------
[INFO] Building maven-chat06 1.0-SNAPSHOT
[INFO] --------------------------------[ jar ]---------------------------------
[INFO]
[INFO] --- maven-clean-plugin:2.5:clean (default-clean) @ maven-chat06 ---
[INFO] Deleting D:\code\IdeaProjects\maven-chat06\target
[INFO]
[INFO] --- maven-resources-plugin:2.6:resources (default-resources) @ maven-chat06 ---
[INFO] Using 'UTF-8' encoding to copy filtered resources.
[INFO] Copying 0 resource
[INFO]
[INFO] --- maven-compiler-plugin:3.1:compile (default-compile) @ maven-chat06 ---
[INFO] Changes detected - recompiling the module!
[INFO] Compiling 1 source file to D:\code\IdeaProjects\maven-chat06\target\classes
[INFO]
[INFO] --- maven-resources-plugin:2.6:testResources (default-testResources) @ maven-chat06 ---
[INFO] Using 'UTF-8' encoding to copy filtered resources.
[INFO] Copying 0 resource
[INFO]
[INFO] --- maven-compiler-plugin:3.1:testCompile (default-testCompile) @ maven-chat06 ---
[INFO] Nothing to compile - all classes are up to date
[INFO]
[INFO] --- maven-surefire-plugin:2.12.4:test (default-test) @ maven-chat06 ---
[INFO]
[INFO] --- maven-jar-plugin:2.4:jar (default-jar) @ maven-chat06 ---
[INFO] Building jar: D:\code\IdeaProjects\maven-chat06\target\maven-chat06-1.0-SNAPSHOT.jar
[INFO]
[INFO] --- maven-install-plugin:2.4:install (default-install) @ maven-chat06 ---
[INFO] Installing D:\code\IdeaProjects\maven-chat06\target\maven-chat06-1.0-SNAPSHOT.jar to C:\Users\Think\.m2\repository\com\javacode2018\maven-chat06\1.0-SNAPSHOT\maven-chat06-1.0-SNAPSHOT.jar
[INFO] Installing D:\code\IdeaProjects\maven-chat06\pom.xml to C:\Users\Think\.m2\repository\com\javacode2018\maven-chat06\1.0-SNAPSHOT\maven-chat06-1.0-SNAPSHOT.pom
[INFO] ------------------------------------------------------------------------
[INFO] BUILD SUCCESS
[INFO] ------------------------------------------------------------------------
[INFO] Total time:  2.977 s
[INFO] Finished at: 2019-11-15T19:05:21+08:00
[INFO] ------------------------------------------------------------------------

mvn clean package的輸出對比一下,多了幾行輸出,主要是多了2個Installing...,將項目打成jar包以及項目的pom文件放到本地倉庫去了,也就是將構件打包安裝到本地倉庫了。

上面幾個mvn命令的案例,都是通過mvn命令去執行了mvn中定義的生命周期中的階段,然後完成了很多看似內部很複雜的操作。比如打包,內部包含很多複雜的操作,maven都幫我們屏蔽了,通過一個簡單的mvn package就完成了。

上面也有說過,每個階段具體做的事情是由maven插件來完成的。

我們在回頭看一下上面一個輸出中,有很多類似於maven-xxxx-plugin:版本:xxx這樣的內容,這個就是表示當前在運行這個插件來完成對應階段的操作,mvn 階段明明執行的是階段,但是實際輸出中確實插件在幹活,那麼階段是如何和插件關聯起來的呢?插件又是什麼呢?

注意以下所有命令都在cmd窗口執行,執行位置位於上面這個項目的pom.xml所在目錄。

Maven插件

maven插件主要是為maven中生命周期中的階段服務的,maven中只是定義了3套生命周期,以及每套生命周期中有哪些階段,具體每個階段中執行什麼操作,完全是交給插件去乾的。

maven中的插件就相當於一些工具,比如編譯代碼的工具,運行測試用例的工具,打包代碼的工具,將代碼上傳到本地倉庫的工具,將代碼部署到遠程倉庫的工具等等,這些都是maven中的插件。

插件可以通過mvn命令的方式調用直接運行,或者將插件和maven生命周期的階段進行綁定,然後通過mvn 階段的方式執行階段的時候,會自動執行和這些階段綁定的插件。

插件目標

maven中的插件以jar的方式存在於倉庫中,和其他構件是一樣的,也是通過坐標進行訪問,每個插件中可能為了代碼可以重用,一個插件可能包含了多個功能,比如編譯代碼的插件,可以編譯源代碼、也可以編譯測試代碼;插件中的每個功能就叫做插件的目標(Plugin Goal),每個插件中可能包含一個或者多個插件目標(Plugin Goal)

目標參數

插件目標是用來執行任務的,那麼執行任務肯定是有參數配的,這些就是目標的參數,每個插件目標對應於java中的一個類,參數就對應於這個類中的屬性。

列出插件所有目標
mvn 插件goupId:插件artifactId[:插件version]:help
mvn 插件前綴:help

上面插件前綴的先略過,我們先看第一種效果。

如:

D:\code\IdeaProjects\maven-chat06>mvn org.apache.maven.plugins:maven-clean-plugin:help
[INFO] Scanning for projects...
[INFO]
[INFO] -------------------< com.javacode2018:maven-chat06 >--------------------
[INFO] Building maven-chat06 1.0-SNAPSHOT
[INFO] --------------------------------[ jar ]---------------------------------
[INFO]
[INFO] --- maven-clean-plugin:2.5:help (default-cli) @ maven-chat06 ---
[INFO] org.apache.maven.plugins:maven-clean-plugin:2.5

Maven Clean Plugin
  The Maven Clean Plugin is a plugin that removes files generated at build-time
  in a project's directory.

This plugin has 2 goals:

clean:clean
  Goal which cleans the build.
  This attempts to clean a project's working directory of the files that were
  generated at build-time. By default, it discovers and deletes the directories
  configured in project.build.directory, project.build.outputDirectory,
  project.build.testOutputDirectory, and project.reporting.outputDirectory.

  Files outside the default may also be included in the deletion by configuring
  the filesets tag.

clean:help
  Display help information on maven-clean-plugin.
  Call
    mvn clean:help -Ddetail=true -Dgoal=<goal-name>
  to display parameter details.

上面列出了maven-clean-plugin這個插件所有的目標,有2個,分別是clean:clean、clean:help,分號後面的部分是目標名稱,分號前面的部分是插件的前綴,每個目標的後面包含對這個目標的詳細解釋說明,關於前綴的後面會有詳細介紹。

查看插件目標參數列表
mvn 插件goupId:插件artifactId[:插件version]:help -Dgoal=目標名稱 -Ddetail
mvn 插件前綴:help -Dgoal=目標名稱 -Ddetail

上面命令中的-Ddetail用戶輸出目標詳細的參數列表信息,如果沒有這個,目標的參數列表不會輸出出來,看效果。

如:

D:\code\IdeaProjects\maven-chat06>mvn org.apache.maven.plugins:maven-clean-plugin:help -Dgoal=help -Ddetail
[INFO] Scanning for projects...
[INFO]
[INFO] -------------------< com.javacode2018:maven-chat06 >--------------------
[INFO] Building maven-chat06 1.0-SNAPSHOT
[INFO] --------------------------------[ jar ]---------------------------------
[INFO]
[INFO] --- maven-clean-plugin:2.5:help (default-cli) @ maven-chat06 ---
[INFO] org.apache.maven.plugins:maven-clean-plugin:2.5

Maven Clean Plugin
  The Maven Clean Plugin is a plugin that removes files generated at build-time
  in a project's directory.

clean:help
  Display help information on maven-clean-plugin.
  Call
    mvn clean:help -Ddetail=true -Dgoal=<goal-name>
  to display parameter details.

  Available parameters:

    detail (Default: false)
      If true, display all settable properties for each goal.
      Expression: ${detail}

    goal
      The name of the goal for which to show help. If unspecified, all goals
      will be displayed.
      Expression: ${goal}

    indentSize (Default: 2)
      The number of spaces per indentation level, should be positive.
      Expression: ${indentSize}

    lineLength (Default: 80)
      The maximum length of a display line, should be positive.
      Expression: ${lineLength}

上面列出了clean插件的help目標的詳細參數信息。

注意上面參數詳細參數說明中有Expression: ${xxx}這樣的部分,這種表示給這個運行的目標傳參,可以通過mvn -Dxxx這種方式傳參,xxx${xxx}中的xxx部分,這個xxx有時候和目標參數的名稱不一致,所以這點需要注意,運行帶參數的目標,看一下效果:

D:\code\IdeaProjects\maven-chat06>mvn org.apache.maven.plugins:maven-clean-plugin:help -Dgoal=help -Ddetail=false
[INFO] Scanning for projects...
[INFO]
[INFO] -------------------< com.javacode2018:maven-chat06 >--------------------
[INFO] Building maven-chat06 1.0-SNAPSHOT
[INFO] --------------------------------[ jar ]---------------------------------
[INFO]
[INFO] --- maven-clean-plugin:2.5:help (default-cli) @ maven-chat06 ---
[INFO] org.apache.maven.plugins:maven-clean-plugin:2.5

Maven Clean Plugin
  The Maven Clean Plugin is a plugin that removes files generated at build-time
  in a project's directory.

clean:help
  Display help information on maven-clean-plugin.
  Call
    mvn clean:help -Ddetail=true -Dgoal=<goal-name>
  to display parameter details.


[INFO] ------------------------------------------------------------------------
[INFO] BUILD SUCCESS
[INFO] ------------------------------------------------------------------------
[INFO] Total time:  0.332 s
[INFO] Finished at: 2019-11-18T15:14:56+08:00
[INFO] ------------------------------------------------------------------------

上面傳了一個detail=false,上面未輸出目標的詳細參數信息。

命令行運行插件
mvn 插件goupId:插件artifactId[:插件version]:插件目標 [-D目標參數1] [-D目標參數2] [-D目標參數n]
mvn 插件前綴:插件目標  [-D目標參數1] [-D目標參數2] [-D目標參數n]

案例:

maven中運行測試用例使用到的插件坐標是:

<dependency>
    <groupId>org.apache.maven.plugins</groupId>
    <artifactId>maven-surefire-plugin</artifactId>
    <version>2.12.4</version>
</dependency>

我們看一下這個插件有哪些目標:

D:\code\IdeaProjects\maven-chat06>mvn org.apache.maven.plugins:maven-surefire-plugin:help
[INFO] Scanning for projects...
[INFO]
[INFO] -------------------< com.javacode2018:maven-chat06 >--------------------
[INFO] Building maven-chat06 1.0-SNAPSHOT
[INFO] --------------------------------[ jar ]---------------------------------
[INFO]
[INFO] --- maven-surefire-plugin:2.12.4:help (default-cli) @ maven-chat06 ---
[INFO] Maven Surefire Plugin 2.12.4
  Surefire is a test framework project.

This plugin has 2 goals:

surefire:help
  Display help information on maven-surefire-plugin.
  Call mvn surefire:help -Ddetail=true -Dgoal=<goal-name> to display parameter
  details.

surefire:test
  Run tests using Surefire.


[INFO] ------------------------------------------------------------------------
[INFO] BUILD SUCCESS
[INFO] ------------------------------------------------------------------------
[INFO] Total time:  0.662 s
[INFO] Finished at: 2019-11-18T15:26:26+08:00
[INFO] ------------------------------------------------------------------------

maven-surefire-plugin插件有2個目標helptest,描述中可以看出test目標是用來運行測試用例的。

我們看一下test目標對應的參數列表:

test目標對應的參數太多,我們只列出了部分參數,如下:

D:\code\IdeaProjects\maven-chat06>mvn org.apache.maven.plugins:maven-surefire-plugin:help -Dgoal=test -Ddetail=true
[INFO] Scanning for projects...
[INFO]
[INFO] -------------------< com.javacode2018:maven-chat06 >--------------------
[INFO] Building maven-chat06 1.0-SNAPSHOT
[INFO] --------------------------------[ jar ]---------------------------------
[INFO]
[INFO] --- maven-surefire-plugin:2.12.4:help (default-cli) @ maven-chat06 ---
[INFO] Maven Surefire Plugin 2.12.4
  Surefire is a test framework project.

surefire:test
  Run tests using Surefire.

  Available parameters:

    skip (Default: false)
      Set this to 'true' to bypass unit tests entirely. Its use is NOT
      RECOMMENDED, especially if you enable it using the 'maven.test.skip'
      property, because maven.test.skip disables both running the tests and
      compiling the tests. Consider using the skipTests parameter instead.

大家認真看一下skip這個參數說明,這個參數默認是false,如果設置為true的時候,項目將跳過測試代碼的編譯和測試用例的執行,可以maven.test.skip這個屬性來進行命令行傳參,將其傳遞給test目標的skip屬性,這個通過-D傳遞的參數名稱就和目標參數名稱不一樣了,所以需要注意-D後面並不一定是參數名稱。

我們來運行一下test目標看看效果。

先看一下不加參數的效果:

D:\code\IdeaProjects\maven-chat06>mvn org.apache.maven.plugins:maven-surefire-plugin:test
[INFO] Scanning for projects...
[INFO]
[INFO] -------------------< com.javacode2018:maven-chat06 >--------------------
[INFO] Building maven-chat06 1.0-SNAPSHOT
[INFO] --------------------------------[ jar ]---------------------------------
[INFO]
[INFO] --- maven-surefire-plugin:2.12.4:test (default-cli) @ maven-chat06 ---
[INFO] ------------------------------------------------------------------------
[INFO] BUILD SUCCESS
[INFO] ------------------------------------------------------------------------
[INFO] Total time:  0.640 s
[INFO] Finished at: 2019-11-18T15:33:48+08:00
[INFO] ------------------------------------------------------------------------

maven.skip.test=true的效果如下:

D:\code\IdeaProjects\maven-chat06>mvn org.apache.maven.plugins:maven-surefire-plugin:test -Dmaven.test.skip=true
[INFO] Scanning for projects...
[INFO]
[INFO] -------------------< com.javacode2018:maven-chat06 >--------------------
[INFO] Building maven-chat06 1.0-SNAPSHOT
[INFO] --------------------------------[ jar ]---------------------------------
[INFO]
[INFO] --- maven-surefire-plugin:2.12.4:test (default-cli) @ maven-chat06 ---
[INFO] Tests are skipped.
[INFO] ------------------------------------------------------------------------
[INFO] BUILD SUCCESS
[INFO] ------------------------------------------------------------------------
[INFO] Total time:  0.652 s
[INFO] Finished at: 2019-11-18T15:34:45+08:00
[INFO] ------------------------------------------------------------------------

對比一下上面2個輸出,下面的多了一行如下:

[INFO] Tests are skipped.

說明跳過了測試的執行。

插件傳參的2種方式

剛才上面講了一種通過-D後面跟用戶屬性的方式給用戶傳參,還有一種方式,在pom.xml中properties的用戶自定義屬性中進行配置,如下:

修改項目maven-chat06的pom.xml,properties中加入:

<maven.test.skip>true</maven.test.skip>

cmd中運行:

mvn org.apache.maven.plugins:maven-surefire-plugin:test

效果如下:

D:\code\IdeaProjects\maven-chat06>mvn org.apache.maven.plugins:maven-surefire-plugin:test
[INFO] Scanning for projects...
[INFO]
[INFO] -------------------< com.javacode2018:maven-chat06 >--------------------
[INFO] Building maven-chat06 1.0-SNAPSHOT
[INFO] --------------------------------[ jar ]---------------------------------
[INFO]
[INFO] --- maven-surefire-plugin:2.12.4:test (default-cli) @ maven-chat06 ---
[INFO] Tests are skipped.
[INFO] ------------------------------------------------------------------------
[INFO] BUILD SUCCESS
[INFO] ------------------------------------------------------------------------
[INFO] Total time:  0.638 s
[INFO] Finished at: 2019-11-18T15:46:04+08:00
[INFO] ------------------------------------------------------------------------

輸出中也有Tests are skipped.,說明也跳過了測試,和-Dmaven.test.skip=true效果一樣。

上面說的都是插件目標的東西,那麼插件目標是如何和生命周期關聯起來的呢?繼續向下看。

獲取插件目標詳細描述信息的另外一種方式
mvn help:describe -Dplugin=插件goupId:插件artifactId[:插件version] -Dgoal=目標名稱 -Ddetail
mvn help:describe -Dplugin=插件前綴 -Dgoal=目標名稱 -Ddetail

上面這個命令調用的是help插件的describe這個目標,這個目標可以列出其他指定插件目標的詳細信息,看效果:

D:\code\IdeaProjects\maven-chat06>mvn help:describe -Dplugin=org.apache.maven.plugins:maven-surefire-plugin -Dgoal=test -Ddetail
[INFO] Scanning for projects...
[INFO]
[INFO] -------------------< com.javacode2018:maven-chat06 >--------------------
[INFO] Building maven-chat06 1.0-SNAPSHOT
[INFO] --------------------------------[ jar ]---------------------------------
[INFO]
[INFO] --- maven-help-plugin:3.2.0:describe (default-cli) @ maven-chat06 ---
[INFO] Mojo: 'surefire:test'
surefire:test
  Description: Run tests using Surefire.
  Implementation: org.apache.maven.plugin.surefire.SurefirePlugin
  Language: java
  Bound to phase: test

  Available parameters:

    additionalClasspathElements
      Additional elements to be appended to the classpath.

    argLine
      User property: argLine
      Arbitrary JVM options to set on the command line.

    skip (Default: false)
      User property: maven.test.skip
      Set this to 'true' to bypass unit tests entirely. Its use is NOT
      RECOMMENDED, especially if you enable it using the 'maven.test.skip'
      property, because maven.test.skip disables both running the tests and
      compiling the tests. Consider using the skipTests parameter instead.

可以拿這種和上面獲取插件目標參數詳情列表對比一下,上面這個更詳細一些,參數說明中多了一行User property: 屬性名稱,這個屬性名稱可以通過兩種方式傳遞:

  1. mvn命令-D屬性名稱的方式傳遞
  2. pom.xml中properties中定義的方式指定。

現在可以大家估計可以知道我們一直用的-Dmaven.test.skip為什麼可以跳過測試代碼的編譯和單元測試的執行了吧。

插件前綴

運行插件的時候,可以通過指定插件坐標的方式運行,但是插件的坐標信息過於複雜,也不方便寫和記憶,所以maven中給插件定義了一些簡捷的插件前綴,可以通過插件前綴來運行指定的插件。

可以通過下面命令查看到插件的前綴:

mvn help:describe -Dplugin=插件goupId:插件artifactId[:插件version]

示例效果:

D:\code\IdeaProjects\maven-chat06>mvn help:describe -Dplugin=org.apache.maven.plugins:maven-surefire-plugin
[INFO] Scanning for projects...
[INFO]
[INFO] -------------------< com.javacode2018:maven-chat06 >--------------------
[INFO] Building maven-chat06 1.0-SNAPSHOT
[INFO] --------------------------------[ jar ]---------------------------------
[INFO]
[INFO] --- maven-help-plugin:3.2.0:describe (default-cli) @ maven-chat06 ---
[INFO] org.apache.maven.plugins:maven-surefire-plugin:2.12.4

Name: Maven Surefire Plugin
Description: Surefire is a test framework project.
Group Id: org.apache.maven.plugins
Artifact Id: maven-surefire-plugin
Version: 2.12.4
Goal Prefix: surefire

輸出中的Goal Prefix:部分對應的就是插件的前綴,上面這個插件的前綴是surefire

我們使用前綴來運行一下插件感受一下效果:

D:\code\IdeaProjects\maven-chat06>mvn surefire:test
[INFO] Scanning for projects...
[INFO]
[INFO] -------------------< com.javacode2018:maven-chat06 >--------------------
[INFO] Building maven-chat06 1.0-SNAPSHOT
[INFO] --------------------------------[ jar ]---------------------------------
[INFO]
[INFO] --- maven-surefire-plugin:2.12.4:test (default-cli) @ maven-chat06 ---
[INFO] Tests are skipped.
[INFO] ------------------------------------------------------------------------
[INFO] BUILD SUCCESS
[INFO] ------------------------------------------------------------------------
[INFO] Total time:  0.934 s
[INFO] Finished at: 2019-11-18T16:18:42+08:00
[INFO] ------------------------------------------------------------------------

上面通過別名來運行插件maven-surefire-plugintest目標,是不是簡潔了很多。

上面用了很多mvn help:這個命令,這個調用的是maven-help-plugin插件的功能,help是插件的前綴,它的坐標是:

<dependency>
    <groupId>org.apache.maven.plugins</groupId>
    <artifactId>maven-help-plugin</artifactId>
    <version>3.2.0</version>
</dependency>

插件和生命周期階段綁定

maven只是定義了生命周期中的階段,而沒有定義每個階段中具體的實現,這些實現是由插件的目標來完成的,所以需要將階段和插件目標進行綁定,來讓插件目標幫助生命周期的階段做具體的工作,生命周期中的每個階段支持綁定多個插件的多個目標。

當我們將生命周期中的階段和插件的目標進行綁定的時候,執行mvn 階段就可以執行和這些階段綁定的插件目標

maven內置插件以及綁定

maven為了讓我們不用做任何配置就可以實現一些項目的構建操作,比如運行mvn clean就可以幫我們清理代碼,運行mvn install就可以將構件安裝到本地倉庫,所以maven幫我們做了一些事情,maven內部已經提供了很多默認的插件,而將一些階段默認和這些插件階段綁定好了,所以我們不用做任何配置就可以執行清理代碼、編譯代碼、測試、打包、安裝到本地倉庫、上傳到遠程倉庫等階段的操作,是因為maven已經默認給這些階段綁定好了插件目標,所以不需要我們再去配置,就直接可以運行,這些都是maven內置綁定幫我們做的事情,我們來看看maven有哪些內置綁定。

maven內置綁定

clean生命周期階段與插件綁定關係
生命周期階段 插件:目標
pre-clean
clean maven-clean-plugin:clean
post-clean

clean周期中只有clean階段默認綁定了maven-clean-plugin插件的clean目標。maven-clean-plugin插件的clean目標作用就是刪除項目的輸出目錄。

default生命周期階段與插件綁定關係

default生命周期中有23個階段,我只列出有默認綁定的,其他的沒有列出的沒有綁定任何插件,因此沒有任何實際的行為。

生命周期階段 插件:目標 執行任務
process-resources maven-resources-plugin:resources 複製主資源文件至主輸出目錄
compile maven-compiler-plugin:compile 編譯主代碼至主輸出目錄
process-test-resources maven-resources-plugin:testResources 複製測試資源文件至測試輸出目錄
test-compile maven-compiler-plugin:testCompile 編譯測試代碼至測試輸出目錄
test maven-surefile-plugin:test 執行測試用例
package maven-jar-plugin:jar 創建項目jar包
install maven-install-plugin:install 將輸出構件安裝到本地倉庫
deploy maven-deploy-plugin:deploy 將輸出的構件部署到遠程倉庫
site生命周期階段與插件綁定關係
生命周期階段 插件:目標
pre-site
site maven-site-plugin:site
post-site
site-deploy maven-site-plugin:deploy

來幾個案例解說一下。

mvn clean

該命令是調用clean生命周期的clean階段,實際執行的階段為clean生命周期中的pre-clean和clean階段,從上面內置綁定表格中找一下,可以看到只有clean階段綁定了maven-clean-plugin插件的clean目標,所以運行mvn clean的時候,實際上會調用maven-clean-plugin插件的clean目標來清理代碼。

運行一下看一下效果:

D:\code\IdeaProjects\maven-chat06>mvn clean
[INFO] Scanning for projects...
[INFO]
[INFO] -------------------< com.javacode2018:maven-chat06 >--------------------
[INFO] Building maven-chat06 1.0-SNAPSHOT
[INFO] --------------------------------[ jar ]---------------------------------
[INFO]
[INFO] --- maven-clean-plugin:2.5:clean (default-clean) @ maven-chat06 ---
[INFO] Deleting D:\code\IdeaProjects\maven-chat06\target
[INFO] ------------------------------------------------------------------------
[INFO] BUILD SUCCESS
[INFO] ------------------------------------------------------------------------
[INFO] Total time:  0.408 s
[INFO] Finished at: 2019-11-18T16:34:14+08:00
[INFO] ------------------------------------------------------------------------

上面有一行輸出如下:

[INFO] --- maven-clean-plugin:2.5:clean (default-clean) @ maven-chat06 ---

這個表示調用的插件是:maven-clean-plugin,版本是:2.5,插件的目標是:clean

mvn test

該命令調用default生命周期的test階段,實際上會從default生命周期的第一個階段(validate)開始執行一直到test階段結束。這裏面包含了代碼的編譯,運行測試用例。還是和上面的分析過程一樣,對照上面表格中的綁定關係,可以得到mvn test會調用下面一些插件的目標:

maven-resources-plugin:resources
maven-compiler-plugin:compile
maven-resources-plugin:testResources
maven-compiler-plugin:testCompile
maven-surefile-plugin:test

我們來驗證一下,看看是不是和我們分析的一樣:

D:\code\IdeaProjects\maven-chat06>mvn test
[INFO] Scanning for projects...
[INFO]
[INFO] -------------------< com.javacode2018:maven-chat06 >--------------------
[INFO] Building maven-chat06 1.0-SNAPSHOT
[INFO] --------------------------------[ jar ]---------------------------------
[INFO]
[INFO] --- maven-resources-plugin:2.6:resources (default-resources) @ maven-chat06 ---
[INFO] Using 'UTF-8' encoding to copy filtered resources.
[INFO] Copying 0 resource
[INFO]
[INFO] --- maven-compiler-plugin:3.1:compile (default-compile) @ maven-chat06 ---
[INFO] Changes detected - recompiling the module!
[INFO] Compiling 1 source file to D:\code\IdeaProjects\maven-chat06\target\classes
[INFO]
[INFO] --- maven-resources-plugin:2.6:testResources (default-testResources) @ maven-chat06 ---
[INFO] Using 'UTF-8' encoding to copy filtered resources.
[INFO] Copying 0 resource
[INFO]
[INFO] --- maven-compiler-plugin:3.1:testCompile (default-testCompile) @ maven-chat06 ---
[INFO] Changes detected - recompiling the module!
[INFO] Compiling 1 source file to D:\code\IdeaProjects\maven-chat06\target\test-classes
[INFO]
[INFO] --- maven-surefire-plugin:2.12.4:test (default-test) @ maven-chat06 ---
[INFO] Tests are skipped.
[INFO] ------------------------------------------------------------------------
[INFO] BUILD SUCCESS
[INFO] ------------------------------------------------------------------------
[INFO] Total time:  1.880 s
[INFO] Finished at: 2019-11-18T16:36:55+08:00
[INFO] ------------------------------------------------------------------------

從上面輸出中可以看到調用了5個插件的目標,和分析的一樣。

再來看一個跳過測試的例子,如下:

D:\code\IdeaProjects\maven-chat06>mvn test -Dmaven.skip.test=true
[INFO] Scanning for projects...
[INFO]
[INFO] -------------------< com.javacode2018:maven-chat06 >--------------------
[INFO] Building maven-chat06 1.0-SNAPSHOT
[INFO] --------------------------------[ jar ]---------------------------------
[INFO]
[INFO] --- maven-resources-plugin:2.6:resources (default-resources) @ maven-chat06 ---
[INFO] Using 'UTF-8' encoding to copy filtered resources.
[INFO] Copying 0 resource
[INFO]
[INFO] --- maven-compiler-plugin:3.1:compile (default-compile) @ maven-chat06 ---
[INFO] Nothing to compile - all classes are up to date
[INFO]
[INFO] --- maven-resources-plugin:2.6:testResources (default-testResources) @ maven-chat06 ---
[INFO] Using 'UTF-8' encoding to copy filtered resources.
[INFO] Copying 0 resource
[INFO]
[INFO] --- maven-compiler-plugin:3.1:testCompile (default-testCompile) @ maven-chat06 ---
[INFO] Nothing to compile - all classes are up to date
[INFO]
[INFO] --- maven-surefire-plugin:2.12.4:test (default-test) @ maven-chat06 ---
[INFO] Tests are skipped.
[INFO] ------------------------------------------------------------------------
[INFO] BUILD SUCCESS
[INFO] ------------------------------------------------------------------------
[INFO] Total time:  1.384 s
[INFO] Finished at: 2019-11-18T16:38:52+08:00
[INFO] ------------------------------------------------------------------------

上面這個是不是很熟悉,經常用到的跳過測試,為什麼這麼寫,我想大家都知道了吧。

其他幾個mvn compilemvn installmvn deploy建議大家也自己去玩玩,加深理解。

自定義綁定

除了默認綁定的一些操作,我們自己也可以將一些階段綁定到指定的插件目標上來完成一些操作,這種自定義綁定讓maven項目在構件的過程中可以執行更多更豐富的操作。

常見的一個案例是:創建項目的源碼jar包,將其安裝到倉庫中,內置插件綁定關係中沒有涉及到這一步的任務,所以需要用戶自己配置。

插件maven-source-pluginjar-no-fork可以幫助我們完成該任務,我們將這個目標綁定在default生命周期的verify階段上面,這個階段沒有任何默認綁定,verify是在測試完成之後並將構件安裝到本地倉庫之前執行的階段,在這個階段我們生成源碼,配置如下:

maven-chat06中的pom.xml加入如下配置:

<build>
    <plugins>
        <plugin>
            <groupId>org.apache.maven.plugins</groupId>
            <artifactId>maven-source-plugin</artifactId>
            <version>3.2.0</version>
            <executions>
                <!-- 使用插件需要執行的任務 -->
                <execution>
                    <!-- 任務id -->
                    <id>attach-source</id>
                    <!-- 任務中插件的目標,可以指定多個 -->
                    <goals>
                        <goal>jar-no-fork</goal>
                    </goals>
                    <!-- 綁定的階段 -->
                    <phase>verify</phase>
                </execution>
            </executions>
        </plugin>
    </plugins>
</build>

注意上面配置的attach-source,後面輸出中會有。

id:任務的id,需唯一,如果不指定,默認為default

每個插件的配置在pom.xml的plugins元素中只能寫一次,否則會有警告。

最終pom.xml如下:

<?xml version="1.0" encoding="UTF-8"?>
<project xmlns="http://maven.apache.org/POM/4.0.0"
         xmlns:xsi="http://www.w3.org/2001/XMLSchema-instance"
         xsi:schemaLocation="http://maven.apache.org/POM/4.0.0 http://maven.apache.org/xsd/maven-4.0.0.xsd">
    <modelVersion>4.0.0</modelVersion>

    <groupId>com.javacode2018</groupId>
    <artifactId>maven-chat06</artifactId>
    <version>1.0-SNAPSHOT</version>
    <packaging>jar</packaging>
    <properties>
        <project.build.sourceEncoding>UTF-8</project.build.sourceEncoding>
        <!-- 配置maven編譯的時候採用的編譯器版本 -->
        <maven.compiler.compilerVersion>1.8</maven.compiler.compilerVersion>
        <!-- 指定源代碼是什麼版本的,如果源碼和這個版本不符將報錯,maven中執行編譯的時候會用到這個配置,默認是1.5,這個相當於javac命令後面的-source參數 -->
        <maven.compiler.source>1.8</maven.compiler.source>
        <!-- 該命令用於指定生成的class文件將保證和哪個版本的虛擬機進行兼容,maven中執行編譯的時候會用到這個配置,默認是1.5,這個相當於javac命令後面的-target參數 -->
        <maven.compiler.target>1.8</maven.compiler.target>
    </properties>

    <dependencies>
        <dependency>
            <groupId>junit</groupId>
            <artifactId>junit</artifactId>
            <version>4.12</version>
            <scope>test</scope>
        </dependency>
    </dependencies>

    <build>
        <plugins>
            <plugin>
                <groupId>org.apache.maven.plugins</groupId>
                <artifactId>maven-source-plugin</artifactId>
                <version>3.2.0</version>
                <executions>
                    <!-- 使用插件需要執行的任務 -->
                    <execution>
                        <!-- 任務id -->
                        <id>attach-source</id>
                        <!-- 任務中插件的目標,可以指定多個 -->
                        <goals>
                            <goal>jar-no-fork</goal>
                        </goals>
                        <!-- 綁定的階段 -->
                        <phase>verify</phase>
                    </execution>
                </executions>
            </plugin>
        </plugins>
    </build>

</project>

運行下面命令:

mvn install

效果:

D:\code\IdeaProjects\maven-chat06>mvn install
[INFO] Scanning for projects...
[INFO]
[INFO] -------------------< com.javacode2018:maven-chat06 >--------------------
[INFO] Building maven-chat06 1.0-SNAPSHOT
[INFO] --------------------------------[ jar ]---------------------------------
[INFO]
[INFO] --- maven-resources-plugin:2.6:resources (default-resources) @ maven-chat06 ---
[INFO] Using 'UTF-8' encoding to copy filtered resources.
[INFO] Copying 0 resource
[INFO]
[INFO] --- maven-compiler-plugin:3.1:compile (default-compile) @ maven-chat06 ---
[INFO] Nothing to compile - all classes are up to date
[INFO]
[INFO] --- maven-resources-plugin:2.6:testResources (default-testResources) @ maven-chat06 ---
[INFO] Using 'UTF-8' encoding to copy filtered resources.
[INFO] Copying 0 resource
[INFO]
[INFO] --- maven-compiler-plugin:3.1:testCompile (default-testCompile) @ maven-chat06 ---
[INFO] Nothing to compile - all classes are up to date
[INFO]
[INFO] --- maven-surefire-plugin:2.12.4:test (default-test) @ maven-chat06 ---
[INFO]
[INFO] --- maven-jar-plugin:2.4:jar (default-jar) @ maven-chat06 ---
[INFO]
[INFO] --- maven-source-plugin:3.2.0:jar-no-fork (attach-source) @ maven-chat06 ---
[INFO]
[INFO] --- maven-install-plugin:2.4:install (default-install) @ maven-chat06 ---
[INFO] Installing D:\code\IdeaProjects\maven-chat06\target\maven-chat06-1.0-SNAPSHOT.jar to C:\Users\Think\.m2\repository\com\javacode2018\maven-chat06\1.0-SNAPSHOT\maven-chat06-1.0-SNAPSHOT.jar
[INFO] Installing D:\code\IdeaProjects\maven-chat06\pom.xml to C:\Users\Think\.m2\repository\com\javacode2018\maven-chat06\1.0-SNAPSHOT\maven-chat06-1.0-SNAPSHOT.pom
[INFO] Installing D:\code\IdeaProjects\maven-chat06\target\maven-chat06-1.0-SNAPSHOT-sources.jar to C:\Users\Think\.m2\repository\com\javacode2018\maven-chat06\1.0-SNAPSHOT\maven-chat06-1.0-SNAPSHOT-sources.jar
[INFO] ------------------------------------------------------------------------
[INFO] BUILD SUCCESS
[INFO] ------------------------------------------------------------------------
[INFO] Total time:  2.268 s
[INFO] Finished at: 2019-11-18T16:59:12+08:00
[INFO] ------------------------------------------------------------------------

上面有個輸出如下:

maven-source-plugin:3.2.0:jar-no-fork (attach-source) @ maven-chat06 ---

可以看出調用了我們配置的插件生成源碼jar,上面的括號中的attach-source就是pom.xml中配置的任務id。

最後有個輸出:

[INFO] Installing D:\code\IdeaProjects\maven-chat06\target\maven-chat06-1.0-SNAPSHOT-sources.jar to C:\Users\Think\.m2\repository\com\javacode2018\maven-chat06\1.0-SNAPSHOT\maven-chat06-1.0-SNAPSHOT-sources.jar

可以看到將源碼安裝到本地倉庫了。

有些插件的目標默認會綁定到一些生命周期的階段中,那麼如果剛好插件默認綁定的階段和上面配置的一致,那麼上面phase元素可以不寫了,那麼怎麼查看插件的默認綁定呢?

mvn help:describe -Dplugin=插件goupId:插件artifactId[:插件version] -Dgoal=目標名稱 -Ddetail
mvn help:describe -Dplugin=插件前綴 -Dgoal=目標名稱 -Ddetail

我們看一下插件sourcejar-no-fork目標默認的綁定:

D:\code\IdeaProjects\maven-chat06>mvn help:describe -Dplugin=source -Dgoal=jar-no-fork -Ddetail
[INFO] Scanning for projects...
[INFO]
[INFO] -------------------< com.javacode2018:maven-chat06 >--------------------
[INFO] Building maven-chat06 1.0-SNAPSHOT
[INFO] --------------------------------[ jar ]---------------------------------
[INFO]
[INFO] --- maven-help-plugin:3.2.0:describe (default-cli) @ maven-chat06 ---
[INFO] Mojo: 'source:jar-no-fork'
source:jar-no-fork
  Description: This goal bundles all the sources into a jar archive. This
    goal functions the same as the jar goal but does not fork the build and is
    suitable for attaching to the build lifecycle.
  Implementation: org.apache.maven.plugins.source.SourceJarNoForkMojo
  Language: java
  Bound to phase: package

上面輸出中有個Bound to phase: package,表示默認綁定在了package階段上。

我們知道3套生命周期的運行時沒有依賴的,但是每套中的階段是有先後順序的,運行某個階段的時候,會先執行他前面所有的階段。清理代碼使用的是clean周期中的clean階段,編譯代碼用的是default周期中的compile階段,當直接運行mvn compile編譯代碼的時候並不會去清理代碼,編譯代碼的時候若發現文件沒有變動,會跳過沒有變化的文件進行編譯。如果我們想每次編譯之前強制先清理代碼,我們經常這麼寫:

mvn clean compile

上面的寫法是不是很熟悉,運行一下看看效果:

D:\code\IdeaProjects\maven-chat06>mvn clean compile
[INFO] Scanning for projects...
[INFO]
[INFO] -------------------< com.javacode2018:maven-chat06 >--------------------
[INFO] Building maven-chat06 1.0-SNAPSHOT
[INFO] --------------------------------[ jar ]---------------------------------
[INFO]
[INFO] --- maven-clean-plugin:2.5:clean (default-clean) @ maven-chat06 ---
[INFO] Deleting D:\code\IdeaProjects\maven-chat06\target
[INFO]
[INFO] --- maven-resources-plugin:2.6:resources (default-resources) @ maven-chat06 ---
[INFO] Using 'UTF-8' encoding to copy filtered resources.
[INFO] Copying 0 resource
[INFO]
[INFO] --- maven-compiler-plugin:3.1:compile (default-compile) @ maven-chat06 ---
[INFO] Changes detected - recompiling the module!
[INFO] Compiling 1 source file to D:\code\IdeaProjects\maven-chat06\target\classes
[INFO] ------------------------------------------------------------------------
[INFO] BUILD SUCCESS
[INFO] ------------------------------------------------------------------------
[INFO] Total time:  1.666 s
[INFO] Finished at: 2019-11-18T17:16:53+08:00
[INFO] ------------------------------------------------------------------------

還有其他方式么?

我們剛才學了自定義綁定,我們可以在default生命周期的第一個階段validate綁定清理代碼的插件,那我們來通過自定義綁定來實現一下,project->build->plugins元素中加入下面配置:

<plugin>
    <groupId>org.apache.maven.plugins</groupId>
    <artifactId>maven-clean-plugin</artifactId>
    <version>2.5</version>
    <executions>
        <!-- 使用插件需要執行的任務 -->
        <execution>
            <!-- 任務中插件的目標,可以指定多個 -->
            <id>clean-target</id>
            <goals>
                <goal>clean</goal>
            </goals>
            <!-- 綁定的階段 -->
            <phase>validate</phase>
        </execution>
    </executions>
</plugin>

運行下面命令看效果:

D:\code\IdeaProjects\maven-chat06>mvn compile
[INFO] Scanning for projects...
[INFO]
[INFO] -------------------< com.javacode2018:maven-chat06 >--------------------
[INFO] Building maven-chat06 1.0-SNAPSHOT
[INFO] --------------------------------[ jar ]---------------------------------
[INFO]
[INFO] --- maven-clean-plugin:2.5:clean (clean-target) @ maven-chat06 ---
[INFO] Deleting D:\code\IdeaProjects\maven-chat06\target
[INFO]
[INFO] --- maven-resources-plugin:2.6:resources (default-resources) @ maven-chat06 ---
[INFO] Using 'UTF-8' encoding to copy filtered resources.
[INFO] Copying 0 resource
[INFO]
[INFO] --- maven-compiler-plugin:3.1:compile (default-compile) @ maven-chat06 ---
[INFO] Changes detected - recompiling the module!
[INFO] Compiling 1 source file to D:\code\IdeaProjects\maven-chat06\target\classes
[INFO] ------------------------------------------------------------------------
[INFO] BUILD SUCCESS
[INFO] ------------------------------------------------------------------------
[INFO] Total time:  1.630 s
[INFO] Finished at: 2019-11-18T17:22:37+08:00
[INFO] ------------------------------------------------------------------------

輸出中有:

[INFO] --- maven-clean-plugin:2.5:clean (clean-target) @ maven-chat06 ---
[INFO] Deleting D:\code\IdeaProjects\maven-chat06\target

這個表示運行了代碼清理的功能,進行了代碼清理,是不是感覺很爽,不用每次都寫clean了。

POM.xml插件配置詳解

插件目標共享參數配置

build->plugins->plugin中配置:

<!-- 插件參數配置,對插件中所有的目標起效 -->
<configuration>
    <目標參數名>參數值</目標參數名>
</configuration>

configuration節點下配置目標參數的值,節點名稱為目標的參數名稱,上面這種配置對當前插件的所有目標起效,也就是說這個插件中所有的目標共享此參數配置。

案例:

將案例中的pom.xml中的build元素修改成下面這樣。

<build>
    <plugins>
        <plugin>
            <groupId>org.apache.maven.plugins</groupId>
            <artifactId>maven-surefire-plugin</artifactId>
            <version>2.12.4</version>
            <!-- 插件參數配置,對插件中所有的目標起效 -->
            <configuration>
                <skip>true</skip>
            </configuration>
        </plugin>
    </plugins>
</build>

運行下面命令,看效果:

D:\code\IdeaProjects\maven-chat06>mvn test
[INFO] Scanning for projects...
[INFO]
[INFO] -------------------< com.javacode2018:maven-chat06 >--------------------
[INFO] Building maven-chat06 1.0-SNAPSHOT
[INFO] --------------------------------[ jar ]---------------------------------
[INFO]
[INFO] --- maven-resources-plugin:2.6:resources (default-resources) @ maven-chat06 ---
[INFO] Using 'UTF-8' encoding to copy filtered resources.
[INFO] Copying 0 resource
[INFO]
[INFO] --- maven-compiler-plugin:3.1:compile (default-compile) @ maven-chat06 ---
[INFO] Nothing to compile - all classes are up to date
[INFO]
[INFO] --- maven-resources-plugin:2.6:testResources (default-testResources) @ maven-chat06 ---
[INFO] Using 'UTF-8' encoding to copy filtered resources.
[INFO] Copying 0 resource
[INFO]
[INFO] --- maven-compiler-plugin:3.1:testCompile (default-testCompile) @ maven-chat06 ---
[INFO] Nothing to compile - all classes are up to date
[INFO]
[INFO] --- maven-surefire-plugin:2.12.4:test (default-test) @ maven-chat06 ---
[INFO] Tests are skipped.
[INFO] ------------------------------------------------------------------------
[INFO] BUILD SUCCESS
[INFO] ------------------------------------------------------------------------
[INFO] Total time:  1.328 s
[INFO] Finished at: 2019-11-18T17:30:58+08:00
[INFO] ------------------------------------------------------------------------

可以看到Test are skipped,說明跳過了測試,到此為止,跳過測試已經講了3種了:

1. mvn -Dmaven.test.skip=tue
2. properties中配置<maven.test.skip>true</maven.test.skip>
3. build中配置插件參數的方式

上面這個配置參數方式對當前插件的所有目標有效,如果想對指定的目標進行配置呢,用下面的方式。

插件目標參數配置

project->build->plugins->plugin->executions->execution元素中進行配置,如下:

<!-- 這個地方配置只對當前任務有效 -->
<configuration>
    <目標參數名>參數值</目標參數名>
</configuration>

上面這種配置常用於自定義插件綁定,只對當前任務有效。

感受一下效果,將pom.xml中的build元素改為下面內容:

<build>
    <plugins>
        <plugin>
            <groupId>org.apache.maven.plugins</groupId>
            <artifactId>maven-surefire-plugin</artifactId>
            <version>2.12.4</version>
            <executions>
                <execution>
                    <goals>
                        <goal>test</goal>
                        <goal>help</goal>
                    </goals>
                    <phase>pre-clean</phase>
                    <!-- 這個地方配置只對當前任務有效 -->
                    <configuration>
                        <skip>true</skip>
                    </configuration>
                </execution>
            </executions>
        </plugin>
    </plugins>
</build>

上面自定義了一個綁定,在clean周期的pre-clean階段綁定了插件maven-surefire-plugin的兩個目標test和helpexecution元素沒有指定id,所以默認id是default

運行下面命令,見效果:

D:\code\IdeaProjects\maven-chat06>mvn pre-clean
[INFO] Scanning for projects...
[INFO]
[INFO] -------------------< com.javacode2018:maven-chat06 >--------------------
[INFO] Building maven-chat06 1.0-SNAPSHOT
[INFO] --------------------------------[ jar ]---------------------------------
[INFO]
[INFO] --- maven-surefire-plugin:2.12.4:test (default) @ maven-chat06 ---
[INFO] Tests are skipped.
[INFO]
[INFO] --- maven-surefire-plugin:2.12.4:help (default) @ maven-chat06 ---
[INFO] Maven Surefire Plugin 2.12.4
  Surefire is a test framework project.

This plugin has 2 goals:

surefire:help
  Display help information on maven-surefire-plugin.
  Call mvn surefire:help -Ddetail=true -Dgoal=<goal-name> to display parameter
  details.

surefire:test
  Run tests using Surefire.


[INFO] ------------------------------------------------------------------------
[INFO] BUILD SUCCESS
[INFO] ------------------------------------------------------------------------
[INFO] Total time:  0.738 s
[INFO] Finished at: 2019-11-18T17:41:08+08:00
[INFO] ------------------------------------------------------------------------

可以看到上面輸出中運行了插件的兩個目標,和預期結果一致。

獲取maven插件信息

上面我們介紹了,可以通過下面命令獲取插件詳細介紹信息

mvn help:describe -Dplugin=插件goupId:插件artifactId[:插件version] -Dgoal=目標名稱 -Ddetail
mvn help:describe -Dplugin=插件前綴 -Dgoal=目標名稱 -Ddetail

更多maven插件的幫助文檔可以參考maven的官方網站,上面有詳細的介紹,建議大家去看看,地址:

http://maven.apache.org/plugins/

插件解析機制

為了方便用戶使用和配置插件,maven不需要用戶提供完整的插件坐標信息,就可以解析到正確的插件,不過我建議使用插件配置的時候最好還是配置完整的坐標信息,不然不利於新人的理解和問題的排查。

插件倉庫

與其他maven構件一樣,插件構件也是基於坐標存儲在maven倉庫中,有需要的時候,maven會從本地查找插件,如果不存在,則到遠程倉庫查找,找到了以後下載到本地倉庫,然後使用。

大家回憶一下,上一章講過的,pom.xml中可以配置依賴的構件的倉庫地址,如下:

<repositories>
    <repository>
        <id>maven-nexus</id>
        <url>http://localhost:8081/repository/maven-public/</url>
        <releases>
            <enabled>true</enabled>
        </releases>
        <snapshots>
            <enabled>true</enabled>
        </snapshots>
    </repository>
</repositories>

但是插件倉庫的配置和這個有一點不一樣,插件的是在pluginRepositories->pluginRepository元素中配置的,如下:

<pluginRepositories>
    <pluginRepository>
        <id>myplugin-repository</id>
        <url>http://repo1.maven.org/maven2/</url>
        <releases>
            <enabled>true</enabled>
        </releases>
    </pluginRepository>
</pluginRepositories>

看一下上面2段配置,repository中的配置和pluginRepository中的子元素是一樣的,這個主意下就可以了。

插件的默認groupId

在pom.xml中配置插件的時候,如果是官方的插件,可以省略groupId

案例:

修改本篇示例中的pom.xml,如下:

<?xml version="1.0" encoding="UTF-8"?>
<project xmlns="http://maven.apache.org/POM/4.0.0"
         xmlns:xsi="http://www.w3.org/2001/XMLSchema-instance"
         xsi:schemaLocation="http://maven.apache.org/POM/4.0.0 http://maven.apache.org/xsd/maven-4.0.0.xsd">
    <modelVersion>4.0.0</modelVersion>

    <groupId>com.javacode2018</groupId>
    <artifactId>maven-chat06</artifactId>
    <version>1.0-SNAPSHOT</version>
    <packaging>jar</packaging>
    
    <properties>
        <project.build.sourceEncoding>UTF-8</project.build.sourceEncoding>
    </properties>

    <build>
        <plugins>
            <plugin>
                <artifactId>maven-compiler-plugin</artifactId>
                <version>3.1</version>
                <configuration>
                    <compilerVersion>1.8</compilerVersion>
                    <source>1.8</source>
                    <target>1.8</target>
                </configuration>
            </plugin>
        </plugins>
    </build>

</project>

上面用到了maven-compiler-plugin,這個插件是編譯代碼的,是maven官方提供的插件,我們省略了groupId

上面這個插件用於編譯代碼的,編譯代碼的時候需要指定編譯器的版本,源碼的版本,目標代碼的版本,都是用的是1.8。

大家回頭去看一下,文章最開始的時候,在properties中有幾個屬性值是1.8的配置,這幾個值默認會被maven-compiler-plugin這個插件的上面3個參數獲取,具體可以去看一下這個插件compile目標的參數說明。

運行下面命令:

D:\code\IdeaProjects\maven-chat06>mvn clean compile
[INFO] Scanning for projects...
[INFO]
[INFO] -------------------< com.javacode2018:maven-chat06 >--------------------
[INFO] Building maven-chat06 1.0-SNAPSHOT
[INFO] --------------------------------[ jar ]---------------------------------
[INFO]
[INFO] --- maven-clean-plugin:2.5:clean (default-clean) @ maven-chat06 ---
[INFO] Deleting D:\code\IdeaProjects\maven-chat06\target
[INFO]
[INFO] --- maven-resources-plugin:2.6:resources (default-resources) @ maven-chat06 ---
[INFO] Using 'UTF-8' encoding to copy filtered resources.
[INFO] Copying 0 resource
[INFO]
[INFO] --- maven-compiler-plugin:3.1:compile (default-compile) @ maven-chat06 ---
[INFO] Changes detected - recompiling the module!
[INFO] Compiling 1 source file to D:\code\IdeaProjects\maven-chat06\target\classes
[INFO] ------------------------------------------------------------------------
[INFO] BUILD SUCCESS
[INFO] ------------------------------------------------------------------------
[INFO] Total time:  1.692 s
[INFO] Finished at: 2019-11-18T18:11:34+08:00
[INFO] ------------------------------------------------------------------------

可以看到可以正常運行。

上面pom.xml省略了插件的groupId配置,如下:

<groupId>org.apache.maven.plugins</groupId>

maven在解析該插件的時候,會自動給這個插件補上默認的官方的groupId,所以可以正常運行,但是不建議大家這麼使用,容易讓新手比較懵逼。

插件前綴的解析

前面說過了使用mvn命令調用插件的時候,可以使用插件的前綴來代替繁瑣的插件坐標的方式,那麼maven是如何根據插件的前綴找到對應的插件的呢?

插件前綴與插件groupId:artifactId是一一對應的關係,這個關係的配置存儲在倉庫的元數據中,元數據位於下面2個xml中:

~/.m2/repository/org/apache/maven/plugins/maven-metadata-central.xml
~/.m2/repository/org/codehaus/mojo/maven-metadata-central.xml

接幾個圖,大家感受一下:

也可以通過在settings.xml中配置,讓maven檢查其他grouId上的插件元數據中前綴和插件關係的配置,如下:

<settings>
  <pluginGroups>
    <pluginGroup>com.your.plugins</pluginGroup>
  </pluginGroups>
</settings>

pluginGroups中有多個pluginGroup,可以配置你自己插件的元數據所在的groupId,然後可以通過前綴來訪問你自己的插件元數據目錄,此處先不細說,這個後面文章中講自定義插件的時候會再次說明。

查看項目最終pom.xml文件

我們的pom.xml默認會繼承maven頂級的一個父類pom.xml,頂級的pom.xml中指定了很多默認的配置,如生命周期中的階段和很多插件的綁定,這些如果我們想看到,到哪裡看呢?

mvn命令在項目中執行的時候,我們的pom.xml和父類的pom.xml最終會進行合併,當我們的pom.xml寫的比較複雜的時候,最終合併之後是什麼效果呢,我們可以通過下面這個命令查看:

mvn help:effective-pom

效果:

D:\code\IdeaProjects\maven-chat06>mvn help:effective-pom > 1.xml

上面我們將命令產生的結果輸出到項目的1.xml文件中了,我們看一下項目的1.xml的內容:

<?xml version="1.0" encoding="GBK"?>
<!-- ====================================================================== -->
<!--                                                                        -->
<!-- Generated by Maven Help Plugin on 2019-11-18T18:41:40+08:00            -->
<!-- See: http://maven.apache.org/plugins/maven-help-plugin/                -->
<!--                                                                        -->
<!-- ====================================================================== -->
<!-- ====================================================================== -->
<!--                                                                        -->
<!-- Effective POM for project                                              -->
<!-- 'com.javacode2018:maven-chat06:jar:1.0-SNAPSHOT'                       -->
<!--                                                                        -->
<!-- ====================================================================== -->
<project xmlns="http://maven.apache.org/POM/4.0.0" xmlns:xsi="http://www.w3.org/2001/XMLSchema-instance"
         xsi:schemaLocation="http://maven.apache.org/POM/4.0.0 http://maven.apache.org/xsd/maven-4.0.0.xsd">
    <modelVersion>4.0.0</modelVersion>
    <groupId>com.javacode2018</groupId>
    <artifactId>maven-chat06</artifactId>
    <version>1.0-SNAPSHOT</version>
    <properties>
        <project.build.sourceEncoding>UTF-8</project.build.sourceEncoding>
    </properties>
    <repositories>
        <repository>
            <snapshots>
                <enabled>false</enabled>
            </snapshots>
            <id>central</id>
            <name>Central Repository</name>
            <url>https://repo.maven.apache.org/maven2</url>
        </repository>
    </repositories>
    <pluginRepositories>
        <pluginRepository>
            <releases>
                <updatePolicy>never</updatePolicy>
            </releases>
            <snapshots>
                <enabled>false</enabled>
            </snapshots>
            <id>central</id>
            <name>Central Repository</name>
            <url>https://repo.maven.apache.org/maven2</url>
        </pluginRepository>
    </pluginRepositories>
    <build>
        <sourceDirectory>D:\code\IdeaProjects\maven-chat06\src\main\java</sourceDirectory>
        <scriptSourceDirectory>D:\code\IdeaProjects\maven-chat06\src\main\scripts</scriptSourceDirectory>
        <testSourceDirectory>D:\code\IdeaProjects\maven-chat06\src\test\java</testSourceDirectory>
        <outputDirectory>D:\code\IdeaProjects\maven-chat06\target\classes</outputDirectory>
        <testOutputDirectory>D:\code\IdeaProjects\maven-chat06\target\test-classes</testOutputDirectory>
        <resources>
            <resource>
                <directory>D:\code\IdeaProjects\maven-chat06\src\main\resources</directory>
            </resource>
        </resources>
        <testResources>
            <testResource>
                <directory>D:\code\IdeaProjects\maven-chat06\src\test\resources</directory>
            </testResource>
        </testResources>
        <directory>D:\code\IdeaProjects\maven-chat06\target</directory>
        <finalName>maven-chat06-1.0-SNAPSHOT</finalName>
        <pluginManagement>
            <plugins>
                <plugin>
                    <artifactId>maven-antrun-plugin</artifactId>
                    <version>1.3</version>
                </plugin>
                <plugin>
                    <artifactId>maven-assembly-plugin</artifactId>
                    <version>2.2-beta-5</version>
                </plugin>
                <plugin>
                    <artifactId>maven-dependency-plugin</artifactId>
                    <version>2.8</version>
                </plugin>
                <plugin>
                    <artifactId>maven-release-plugin</artifactId>
                    <version>2.5.3</version>
                </plugin>
            </plugins>
        </pluginManagement>
        <plugins>
            <plugin>
                <artifactId>maven-compiler-plugin</artifactId>
                <version>3.1</version>
                <executions>
                    <execution>
                        <id>default-compile</id>
                        <phase>compile</phase>
                        <goals>
                            <goal>compile</goal>
                        </goals>
                        <configuration>
                            <compilerVersion>1.8</compilerVersion>
                            <source>1.8</source>
                            <target>1.8</target>
                        </configuration>
                    </execution>
                    <execution>
                        <id>default-testCompile</id>
                        <phase>test-compile</phase>
                        <goals>
                            <goal>testCompile</goal>
                        </goals>
                        <configuration>
                            <compilerVersion>1.8</compilerVersion>
                            <source>1.8</source>
                            <target>1.8</target>
                        </configuration>
                    </execution>
                </executions>
                <configuration>
                    <compilerVersion>1.8</compilerVersion>
                    <source>1.8</source>
                    <target>1.8</target>
                </configuration>
            </plugin>
            <plugin>
                <artifactId>maven-clean-plugin</artifactId>
                <version>2.5</version>
                <executions>
                    <execution>
                        <id>default-clean</id>
                        <phase>clean</phase>
                        <goals>
                            <goal>clean</goal>
                        </goals>
                    </execution>
                </executions>
            </plugin>
            <plugin>
                <artifactId>maven-resources-plugin</artifactId>
                <version>2.6</version>
                <executions>
                    <execution>
                        <id>default-testResources</id>
                        <phase>process-test-resources</phase>
                        <goals>
                            <goal>testResources</goal>
                        </goals>
                    </execution>
                    <execution>
                        <id>default-resources</id>
                        <phase>process-resources</phase>
                        <goals>
                            <goal>resources</goal>
                        </goals>
                    </execution>
                </executions>
            </plugin>
            <plugin>
                <artifactId>maven-jar-plugin</artifactId>
                <version>2.4</version>
                <executions>
                    <execution>
                        <id>default-jar</id>
                        <phase>package</phase>
                        <goals>
                            <goal>jar</goal>
                        </goals>
                    </execution>
                </executions>
            </plugin>
            <plugin>
                <artifactId>maven-surefire-plugin</artifactId>
                <version>2.12.4</version>
                <executions>
                    <execution>
                        <id>default-test</id>
                        <phase>test</phase>
                        <goals>
                            <goal>test</goal>
                        </goals>
                    </execution>
                </executions>
            </plugin>
            <plugin>
                <artifactId>maven-install-plugin</artifactId>
                <version>2.4</version>
                <executions>
                    <execution>
                        <id>default-install</id>
                        <phase>install</phase>
                        <goals>
                            <goal>install</goal>
                        </goals>
                    </execution>
                </executions>
            </plugin>
            <plugin>
                <artifactId>maven-deploy-plugin</artifactId>
                <version>2.7</version>
                <executions>
                    <execution>
                        <id>default-deploy</id>
                        <phase>deploy</phase>
                        <goals>
                            <goal>deploy</goal>
                        </goals>
                    </execution>
                </executions>
            </plugin>
            <plugin>
                <artifactId>maven-site-plugin</artifactId>
                <version>3.3</version>
                <executions>
                    <execution>
                        <id>default-site</id>
                        <phase>site</phase>
                        <goals>
                            <goal>site</goal>
                        </goals>
                        <configuration>
                            <outputDirectory>D:\code\IdeaProjects\maven-chat06\target\site</outputDirectory>
                            <reportPlugins>
                                <reportPlugin>
                                    <groupId>org.apache.maven.plugins</groupId>
                                    <artifactId>maven-project-info-reports-plugin</artifactId>
                                </reportPlugin>
                            </reportPlugins>
                        </configuration>
                    </execution>
                    <execution>
                        <id>default-deploy</id>
                        <phase>site-deploy</phase>
                        <goals>
                            <goal>deploy</goal>
                        </goals>
                        <configuration>
                            <outputDirectory>D:\code\IdeaProjects\maven-chat06\target\site</outputDirectory>
                            <reportPlugins>
                                <reportPlugin>
                                    <groupId>org.apache.maven.plugins</groupId>
                                    <artifactId>maven-project-info-reports-plugin</artifactId>
                                </reportPlugin>
                            </reportPlugins>
                        </configuration>
                    </execution>
                </executions>
                <configuration>
                    <outputDirectory>D:\code\IdeaProjects\maven-chat06\target\site</outputDirectory>
                    <reportPlugins>
                        <reportPlugin>
                            <groupId>org.apache.maven.plugins</groupId>
                            <artifactId>maven-project-info-reports-plugin</artifactId>
                        </reportPlugin>
                    </reportPlugins>
                </configuration>
            </plugin>
        </plugins>
    </build>
    <reporting>
        <outputDirectory>D:\code\IdeaProjects\maven-chat06\target\site</outputDirectory>
    </reporting>
</project>

上面這個文件,大家一定要認真多看幾遍,理解一下,裡面包含太多東西,再重複一下,上面的文件多看幾遍!多看幾遍!多看幾遍!要理解!

課後題

留給大家2個問題

  1. 下面這個配置是干什麼的?給哪個插件使用的?

    <properties>
        <project.build.sourceEncoding>UTF-8</project.build.sourceEncoding>
    </properties>
  2. mvn test運行測試用例的時候,測試用例類名的寫法默認是有規則的,這些規則有人知道么?從哪裡可以看到這些規則?如何自定義?

大家可以留言或者在技術群討論。

總結

本文內容比較多,希望大家多讀幾遍,要理解。如果有收穫的幫忙分享一下,你們的支持也是我不斷輸出的一個動力,希望大家都能夠學到東西!

Maven系列目錄

更多好文章

本站聲明:網站內容來源於博客園,如有侵權,請聯繫我們,我們將及時處理

【其他文章推薦】

網頁設計公司推薦更多不同的設計風格,搶佔消費者視覺第一線

※廣告預算用在刀口上,網站設計公司幫您達到更多曝光效益

※自行創業 缺乏曝光? 下一步"網站設計"幫您第一時間規劃公司的門面形象

台灣寄大陸海運貨物規則及重量限制?

大陸寄台灣海運費用試算一覽表

台中搬家,彰化搬家,南投搬家前需注意的眉眉角角,別等搬了再說!

美軍擬造機動微型核反應爐 解偏遠基地電力需求

摘錄自2020年3月10日中央社報導

美國軍方今(9日)表示,正在規畫部署微型核能反應爐,這種移動式發電廠可用貨車載運,且不受時間限制為偏遠地區的基地提供電力。

法新社報導,美國國防部已經為了這種移動式核反應爐跟三間企業簽訂合約,目標是產生1百萬瓦至5百萬瓦(megawatt)的電力。預計在兩年內,其中一間公司將獲選來生產反應爐的原型。國防部聲明表示,這項名為「裴雷」(Pele)的計畫是透過發展安全的、可移動的、先進的微型核子反應爐,以因應國防部多元的任務需求。

然而,美軍規畫部署微型核能發電設備,部分民間核能專家對此抱持懷疑態度。這些專家認為,若遭遇攻擊,反應爐被破壞後恐導致放射性燃料外洩,或是核物料落入敵人手中且被用來製造低階的髒彈(dirty bomb)。

能源議題
國際新聞
美國
核反應爐
移動

本站聲明:網站內容來源環境資訊中心https://e-info.org.tw/,如有侵權,請聯繫我們,我們將及時處理

【其他文章推薦】

※帶您來了解什麼是 USB CONNECTOR  ?

※自行創業 缺乏曝光? 下一步”網站設計“幫您第一時間規劃公司的門面形象

※如何讓商品強力曝光呢? 網頁設計公司幫您建置最吸引人的網站,提高曝光率!!

※綠能、環保無空污,成為電動車最新代名詞,目前市場使用率逐漸普及化

※廣告預算用在刀口上,網站設計公司幫您達到更多曝光效益

※試算大陸海運運費!

百度將在美國測試無人駕駛汽車 計畫2018年前推商用車型

日前,百度首席科學家吳恩達在接受國外媒體採訪時透露,百度將很快在美國測試無人駕駛汽車,並希望在2018年前推出一款可商用的車型。

百度無人駕駛車專案於2013年起步,由百度研究院主導研發,其技術核心是“百度汽車大腦”,包括高精度地圖、定位、感知、智慧決策與控制四大模組。2014年7月,百度首次對外證實啟動“百度無人駕駛汽車”研發計畫。

2015年12月10日,百度宣佈,百度無人駕駛車國內首次實現城市、環路及高速道路混合路況下的全自動駕駛。百度公佈的路測路線顯示,百度無人駕駛車從位於北京中關村軟體園的百度大廈附近出發,駛入G7京新高速公路,經五環路,抵達奧林匹克森林公園,並隨後按原路線返回。百度無人駕駛車往返全程均實現自動駕駛,並實現了多次跟車減速、變道、超車、上下匝道、調頭等複雜駕駛動作,完成了進入高速(匯入車流)到駛出高速(離開車流)的不同道路場景的切換。測試時最高速度達到100公里/小時。

本站聲明:網站內容來源於EnergyTrend https://www.energytrend.com.tw/ev/,如有侵權,請聯繫我們,我們將及時處理

【其他文章推薦】

※帶您來了解什麼是 USB CONNECTOR  ?

※自行創業 缺乏曝光? 下一步”網站設計“幫您第一時間規劃公司的門面形象

※如何讓商品強力曝光呢? 網頁設計公司幫您建置最吸引人的網站,提高曝光率!!

※綠能、環保無空污,成為電動車最新代名詞,目前市場使用率逐漸普及化

※廣告預算用在刀口上,網站設計公司幫您達到更多曝光效益

※試算大陸海運運費!

斯柯達混動/純電動汽車未來幾年將相繼上市

近日,據海外媒體報導,斯柯達在未來幾年計畫推出一系列新能源車,其中包括或將於2019年上市的插電式混動車型以及最早2020年才能推出的純電動版車型。

斯柯達未來的純電動車型就將基於大眾MEB電動車模組化平臺進行打造,目前在考慮推出晶銳和明銳的純電動版車型,不過即使推出的話,最早也要等到2020年,不知道那時候某些城市購買純電動車搖號的話會不會很費勁了。

在推出純電動車之前,斯柯達計畫先推出插電式混動車型,首先考慮的是旗艦車型速派,最早能在2019年正式推出。

本站聲明:網站內容來源於EnergyTrend https://www.energytrend.com.tw/ev/,如有侵權,請聯繫我們,我們將及時處理

【其他文章推薦】

網頁設計公司推薦更多不同的設計風格,搶佔消費者視覺第一線

※廣告預算用在刀口上,網站設計公司幫您達到更多曝光效益

※自行創業 缺乏曝光? 下一步"網站設計"幫您第一時間規劃公司的門面形象

台灣寄大陸海運貨物規則及重量限制?

大陸寄台灣海運費用試算一覽表

台中搬家,彰化搬家,南投搬家前需注意的眉眉角角,別等搬了再說!

flink 流式處理中如何集成mybatis框架

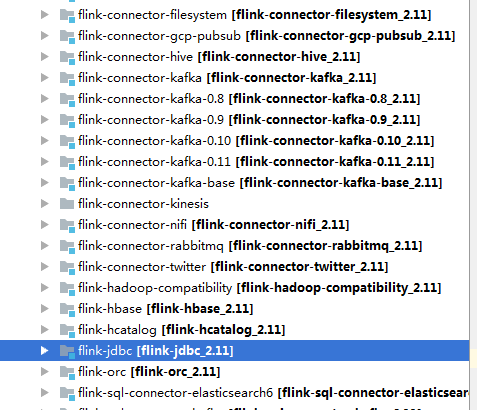
flink 中自身雖然實現了大量的connectors,如下圖所示,也實現了jdbc的connector,可以通過jdbc 去操作數據庫,但是flink-jdbc包中對數據庫的操作是以ROW來操作並且對數據庫事務的控制比較死板,有時候操作關係型數據庫我們會非常懷念在java web應用開發中的非常優秀的mybatis框架,那麼其實flink中是可以自己集成mybatis進來的。 我們這裏以flink 1.9版本為例來進行集成。

如下圖為flink內部自帶的flink-jdbc:


創建一個flink的流式處理項目,引入flink的maven依賴和mybatis依賴(注意這裏引入的是非spring版本,也就是mybatis的單機版):

<properties>

<flink.version>1.9.0</flink.version>
</properties>
<!-- https://mvnrepository.com/artifact/org.mybatis/mybatis -->
<dependency>
    <groupId>org.mybatis</groupId>
    <artifactId>mybatis</artifactId>
    <version>3.5.2</version>
</dependency>
<!-- flink java 包 -->
<dependency>
    <groupId>org.apache.flink</groupId>
    <artifactId>flink-streaming-java_2.11</artifactId>
    <version>${flink.version}</version>
</dependency>

maven依賴引入以後,那麼需要在resources下面定義mybatis-config.xml 配置:

mybatis-config.xml 需要定義如下配置:

<?xml version="1.0" encoding="UTF-8"?>
<!DOCTYPE configuration PUBLIC "-//mybatis.org//DTD Config 3.0//EN"
        "http://mybatis.org/dtd/mybatis-3-config.dtd">
<configuration>
    <typeAliases>
        <typeAlias alias="BankBillPublic" type="xxxx.xx.xx.BankBillPublic" />
    </typeAliases>
    <environments default="development">
        <environment id="development">
            <transactionManager type="JDBC" />
            <dataSource type="POOLED">
                <property name="driver" value="com.mysql.jdbc.Driver" />
                <property name="url" value="jdbc:mysql://xx.xx.xx.xx:3306/hue?characterEncoding=UTF-8&zeroDateTimeBehavior=convertToNull&allowMultiQueries=true&autoReconnect=true" />
                <property name="username" value="xxxx" />
                <property name="password" value="xxxx*123%" />
            </dataSource>
        </environment>
    </environments>
    <mappers>
        <mapper resource="mapper/xxxxxMapper.xml" />
    </mappers>
</configuration>

typeAlias 標籤中為自定義的數據類型,然後在xxxxxMapper.xml 中parameterType或者resultType就可以直接用這種定義的數據類型。

dataSource type=”POOLED” 我們使用的是mybatis中的POOLED 類型,也就是連接池的方式去使用。默認支持如下這三種類型。

 我們也可以使用阿里巴巴開源的druid連接池,那麼就需要引入對應的maven依賴,如下所示:

        <dependency>
            <groupId>com.alibaba</groupId>
            <artifactId>druid</artifactId>
            <version>1.0.14</version>
        </dependency>  

 然後定義一個對應的druid的DataSource,如下所示:

import java.sql.SQLException;
import java.util.Properties;
import javax.sql.DataSource;
import org.apache.ibatis.datasource.DataSourceFactory;
import com.alibaba.druid.pool.DruidDataSource;

public class DruidDataSourceFactory implements DataSourceFactory {
    private Properties props;

    @Override
    public DataSource getDataSource() {
        DruidDataSource dds = new DruidDataSource();
        dds.setDriverClassName(this.props.getProperty("driver"));
        dds.setUrl(this.props.getProperty("url"));
        dds.setUsername(this.props.getProperty("username"));
        dds.setPassword(this.props.getProperty("password"));
        // 其他配置可以根據MyBatis主配置文件進行配置
        try {
            dds.init();
        } catch (SQLException e) {
            e.printStackTrace();
        }
        return dds;
    }

    @Override
    public void setProperties(Properties props) {
        this.props = props;
    }
}

之後就可以mybatis的配置中使用了,如下所示:

<?xml version="1.0" encoding="UTF-8"?>
<!DOCTYPE configuration PUBLIC "-//mybatis.org//DTD Config 3.0//EN"
        "http://mybatis.org/dtd/mybatis-3-config.dtd">
<configuration>
    <typeAliases>
        <typeAlias alias="BankBillPublic" type="xxxx.xx.xx.BankBillPublic" />
        <typeAlias alias="DRUID" 
 type="com.xx.mybatis.druid.utils.DruidDataSourceFactory" />
    </typeAliases>
    <environments default="development">
        <environment id="development">
            <transactionManager type="JDBC" />
            <dataSource type="DRUID">
                <property name="driver" value="com.mysql.jdbc.Driver" />
                <property name="url" value="jdbc:mysql://xx.xx.xx.xx:3306/hue?characterEncoding=UTF-8&zeroDateTimeBehavior=convertToNull&allowMultiQueries=true&autoReconnect=true" />
                <property name="username" value="xxxx" />
                <property name="password" value="xxxx*123%" />
            </dataSource>
        </environment>
    </environments>
    <mappers>
        <mapper resource="mapper/xxxxxMapper.xml" />
    </mappers>
</configuration>

<mappers> 下面為定義的mybatis 的xxxxxMapper文件。裏面放置的都是sql語句。

本文作者張永清,轉載請註明出處:

xxxxxMapper.xml 中的sql示例:

<?xml version="1.0" encoding="UTF-8"?>
<!DOCTYPE mapper PUBLIC "-//mybatis.org//DTD Mapper 3.0//EN"
        "http://mybatis.org/dtd/mybatis-3-mapper.dtd">
<mapper namespace="xx.xx.bigdata.flink.xx.xx.mapper.UserRelaInfoMapper">
    <!--查詢關鍵字匹配 -->
    <select id="queryUserRelaInfo" parameterType="String" resultType="UserRelaInfo">
        SELECT id AS id,
        USER_NAME AS userName,
        APPL_IDCARD AS applIdCard,
        PEER_USER AS peerUser,
        RELA_TYPE AS relaType,
        CREATE_USER AS createUser,
        CREATE_TIME AS createTime
        FROM USER_RELA_INFO
        <where>
            <if test="applIdCard != null">
                APPL_IDCARD=#{applIdCard}
            </if>
            <if test="peerUser != null">
            AND PEER_USER=#{peerUser}
            </if>
        </where>
    </select>
</mapper>

 定義Mapper,一般可以定義一個interface ,和xxxxxMapper.xml中的namespace保持一致

注意傳入的參數一般加上@Param 註解,傳入的參數和xxxxxMapper.xml中需要的參數保持一致

public interface UserRelaInfoMapper {
    List<UserRelaInfo> queryUserRelaInfo(@Param("applIdCard")String applIdCard,@Param("peerUser") String peerUser);
}

定義SessionFactory工廠(單例模式):

/**
 *
 *  sqlsession factory 單例  事務設置為手動提交
 */
public class MybatisSessionFactory {
    private static final Logger LOG = LoggerFactory.getLogger(MybatisSessionFactory.class);
    private static SqlSessionFactory sqlSessionFactory;
    private MybatisSessionFactory(){
        super();
    }
    public synchronized static SqlSessionFactory getSqlSessionFactory(){
        if(null==sqlSessionFactory){
            InputStream inputStream=null;
            try{
                inputStream = MybatisSessionFactory.class.getClassLoader().getResourceAsStream("mybatis-config.xml");
                sqlSessionFactory = new SqlSessionFactoryBuilder().build(inputStream);
            }
            catch (Exception e){
                LOG.error("create MybatisSessionFactory read mybatis-config.xml cause Exception",e);
            }
            if(null!=sqlSessionFactory){
                LOG.info("get Mybatis sqlsession sucessed....");
            }
            else {
                LOG.info("get Mybatis sqlsession failed....");
            }
        }
        return sqlSessionFactory;
    }
}


使用mybatis 對數據庫進行操作:

        SqlSession sqlSession = MybatisSessionFactory.getSqlSessionFactory().openSession();
        UserRelaInfoMapper  userRelaInfoMapper  = sqlSession.getMapper(UserRelaInfoMapper .class);
		//調用對應的方法
		userRelaInfoMapper.xxxx();
		//提交事務
		sqlSession.commit();
		//回滾事務,一般可以捕獲異常,在發生Exception的時候,事務進行回滾
		sqlSession.rollback();


這裏以mysql為示例,寫一個flink下mysql的sink示例,可以自己來靈活控制事務的提交:

public class MysqlSinkFunction<IN> extends RichSinkFunction {
    private static final Logger LOG = LoggerFactory.getLogger(MysqlSinkFunction.class);
    @Override
    public void invoke(Object value, Context context) throws Exception{
        SqlSession sqlSession = MybatisSessionFactory.getSqlSessionFactory().openSession();
        try{
                            //插入
                            LOG.info("MysqlSinkFunction start to do insert data...");
                            xxx.xxx();
							//更新
                            LOG.info("MysqlSinkFunction start to do update data...");
							xxx.xxx();
                            //刪除
                            LOG.info("MysqlSinkFunction start to do delete data...");
							xxx.xxx();


                sqlSession.commit();
                LOG.info("MysqlSinkFunction commit transaction success...");
        }
        catch (Throwable e){
            sqlSession.rollback();
            LOG.error("MysqlSinkFunction cause Exception,sqlSession transaction rollback...",e);
        }
    }
}  
相信您如果以前在spring中用過mybatis的話,對上面的這些操作一定不會陌生。由此你也可以發現,在大數據中可以完美的集成mybatis,這樣可以發揮mybatis框架對數據庫操作的優勢,使用起來也非常簡單方便。
一旦集成了mybaitis后,在flink中就可以方便的對各種各樣的關係型數據庫進行操作了。

本文作者張永清,轉載請註明出處:

本站聲明:網站內容來源於博客園,如有侵權,請聯繫我們,我們將及時處理

【其他文章推薦】

※帶您來了解什麼是 USB CONNECTOR  ?

※自行創業 缺乏曝光? 下一步”網站設計“幫您第一時間規劃公司的門面形象

※如何讓商品強力曝光呢? 網頁設計公司幫您建置最吸引人的網站,提高曝光率!!

※綠能、環保無空污,成為電動車最新代名詞,目前市場使用率逐漸普及化

※廣告預算用在刀口上,網站設計公司幫您達到更多曝光效益

※試算大陸海運運費!

Prometheus監控有所思:多標籤埋點及Mbean

  使用 grafana+prometheus+jmx 作為普通的監控手段,是比較有用的。我之前的文章介紹了相應的實現辦法。

  但是,按照之前的實現,我們更多的只能是監控 單值型的數據,如請求量,tps 等等,對於複雜組合型的指標卻不容易監控。

  這種情況一般帶有一定的業務屬性,比如想監控mq中的每個topic的消費情況,每類產品的實時訂單情況等等。當然,對於看過完整的 prometheus 的監控數據的同學來說,會覺得很正常,因為你會看到如下的數據:

# HELP java_lang_MemoryPool_PeakUsage_max java.lang.management.MemoryUsage (java.lang<type=MemoryPool, name=Metaspace><PeakUsage>max)
# TYPE java_lang_MemoryPool_PeakUsage_max untyped
java_lang_MemoryPool_PeakUsage_max{name="Metaspace",} -1.0
java_lang_MemoryPool_PeakUsage_max{name="PS Old Gen",} 1.415053312E9
java_lang_MemoryPool_PeakUsage_max{name="PS Eden Space",} 6.96778752E8
java_lang_MemoryPool_PeakUsage_max{name="Code Cache",} 2.5165824E8
java_lang_MemoryPool_PeakUsage_max{name="Compressed Class Space",} 1.073741824E9
java_lang_MemoryPool_PeakUsage_max{name="PS Survivor Space",} 5242880.0

  這裏面的 name 就是普通標籤嘛,同理於其他埋點咯。應該是可以實現的。

  是的,prometheus 是方便實現這玩意的,但是我們之前不是使用 jmx_exportor 作為導出工具嘛,使用的埋點組件是 io.dropwizard.metrics:metrics-core 。

  而它則是重在單值的監控,所以,用它我們是實現不了帶指標的數據的監控了。

  那怎麼辦呢?三個辦法!

1. 直接替換原有的 metrics-core 組件為 prometheus 的client 組件,因為官方是支持這種操作的;
2. 使用 prometheus-client 組件與 metrics-core 組件配合,各自使用各自的功能;
3. 自行實現帶標籤的埋點,這可能是基於 MBean 的;


  以上這幾種方案,各有優劣。方案1可能改動太大,而且可能功能不兼容不可行; 方案2可能存在整合不了或者功能衝突情況,當然如果能整合,絕對是最好的; 方案3實現複雜度就高了,比如監控值維護、線程安全、MBean數據吐出方式等等。

  好吧,不管怎麼樣,我們還是都看看吧。


一、 使用 prometheus-client 埋點實現帶標籤的監控

  1. 引入 pom 依賴

        <dependency>
            <groupId>io.prometheus</groupId>
            <artifactId>simpleclient</artifactId>
            <version>0.8.0</version>
        </dependency>
        <dependency>
                <groupId>io.prometheus</groupId>
                <artifactId>simpleclient_hotspot</artifactId>
                <version>0.8.0</version>
        </dependency>
        <dependency>
                <groupId>io.prometheus</groupId>
                <artifactId>simpleclient_servlet</artifactId>
                <version>0.8.0</version>
        </dependency>

  2. 框架註冊監控

        @Configuration
        public class PrometheusConfig {
            @Bean
            public ServletRegistrationBean servletRegistrationBean(){
                // 將埋點指標吐出到 /metrics 節點
                return new ServletRegistrationBean(new MetricsServlet(), "/metrics");
            }
        }

  3. 業務埋點數據

        // 註冊指標實例
        io.prometheus.client.Counter c = io.prometheus.client.Counter.build()
                .name("jmx_test_abc_ffff")
                .labelNames("topic")
                .help("topic counter usage.")
                .register();
        public void incTopicMetric(String topic) {
            // c.labels("test").inc();  // for test
        }

  4. 獲取埋點數據信息

        curl http://localhost:8080/metrics
        # 對外暴露http接口調用,結果如下
        # HELP jmx_test_abc_ffff counter usage.
        # TYPE jmx_test_abc_ffff counter
        jmx_test_abc_ffff{topic="bbb",} 1.0
        jmx_test_abc_ffff{topic="2",} 2.0
        jmx_test_abc_ffff{topic="test",} 1.0

  可以看出,效果咱們是實現了。但是,對於已經運行的東西,要改這玩意可能不是那麼友好。主要有以下幾點:

    1. 暴露數據方式變更,原來由javaagent進行統一處理的數據,現在可能由於應用端口的不一,導致收集的配置會變更,不一定符合運維場景;
    2. 需要將原來的埋點進行替換;


二、 prometheus-client 與 metrics-core 混合埋點

  不處理以前的監控,將新監控帶標籤數據吐入到 jmx_exportor 中。

  我們試着使用如上的埋點方式:

        // 註冊指標實例
        io.prometheus.client.Counter c = io.prometheus.client.Counter.build()
                .name("jmx_test_abc_ffff")
                .labelNames("topic")
                .help("topic counter usage.")
                .register();
        public void incTopicMetric(String topic) {
            // c.labels("test").inc();  // for test
        }

  好像數據是不會進入的到 jmx_exportor 的。這也不奇怪,畢竟咱們也不了解其原理,難道想靠運氣取勝??

  細去查看 metrics-core 組件的埋點實現方案,發現其是向 MBean 中吐入數據,從而被 jmx_exportor 抓取的。

        // com.codahale.metrics.jmx.JmxReporter.JmxListener#onCounterAdded
        @Override
        public void onCounterAdded(String name, Counter counter) {
            try {
                if (filter.matches(name, counter)) {
                    final ObjectName objectName = createName("counters", name);
                    registerMBean(new JmxCounter(counter, objectName), objectName);
                }
            } catch (InstanceAlreadyExistsException e) {
                LOGGER.debug("Unable to register counter", e);
            } catch (JMException e) {
                LOGGER.warn("Unable to register counter", e);
            }
        }
        // 向 mBeanServer 註冊監控實例
        // 默認情況下 mBeanServer = ManagementFactory.getPlatformMBeanServer();
        private void registerMBean(Object mBean, ObjectName objectName) throws InstanceAlreadyExistsException, JMException {
            ObjectInstance objectInstance = mBeanServer.registerMBean(mBean, objectName);
            if (objectInstance != null) {
                // the websphere mbeanserver rewrites the objectname to include
                // cell, node & server info
                // make sure we capture the new objectName for unregistration
                registered.put(objectName, objectInstance.getObjectName());
            } else {
                registered.put(objectName, objectName);
            }
        }

  而 prometheus-client 則是通過 CollectorRegistry.defaultRegistry 進行註冊實例的。

    // io.prometheus.client.SimpleCollector.Builder#register()
    /**
     * Create and register the Collector with the default registry.
     */
    public C register() {
      return register(CollectorRegistry.defaultRegistry);
    }
    /**
     * Create and register the Collector with the given registry.
     */
    public C register(CollectorRegistry registry) {
      C sc = create();
      registry.register(sc);
      return sc;
    }

  所以,好像原理上來講是不同的。至於到底為什麼不能監控到數據,那還不好說。至少,你可以學習 metrics-core 使用 MBean 的形式將數據導出。這是我們下一個方案要討論的事。

  這裏我可以給到一個最終簡單又不失巧合的方式,實現兩個監控組件的兼容,同時向 jmx_exportor 進行導出。如下:

  1. 引入 javaagent 依賴包

        <!-- javaagent 包,與 外部使用的 jmx_exportor 一致 -->
        <dependency>
            <groupId>io.prometheus.jmx</groupId>
            <artifactId>jmx_prometheus_javaagent</artifactId>
            <version>0.12.0</version>
        </dependency>

  2. 使用 agent 的工具類進行埋點

  因為 javaagent 裏面提供一套完整的 client 工具包,所以,我們可以使用。

        // 註冊指標實例
        // 將 io.prometheus.client.Counter 包替換為 io.prometheus.jmx.shaded.io.prometheus.client.Counter
        io.prometheus.client.Counter c = io.prometheus.client.Counter.build()
                .name("jmx_test_abc_ffff")
                .labelNames("topic")
                .help("topic counter usage.")
                .register();
        public void incTopicMetric(String topic) {
            // c.labels("test").inc();  // for test
        }

  3. 原樣使用 jmx_exportor 就可以導出監控數據了

  為什麼換一個包這樣就可以了?

  因為 jmx_exportor 也是通過註冊 CollectorRegistry.defaultRegistry 來進行收集數據的,我們只要保持與其實例一致,就可以做到在同一個jvm內共享數據了。


三、 基於 MBean自行實現帶標籤的埋點

// 測試類
public class PrometheusMbeanMetricsMain {
    private static ConcurrentHashMap<String, AtomicInteger> topicContainer = new ConcurrentHashMap<>();
    private static MBeanServer mBeanServer = ManagementFactory.getPlatformMBeanServer();

    public static void main(String[] args) throws Exception {
        // 模擬某個topic
        String commingTopic = "test_topic";
        AtomicInteger myTopic1Counter = getMetricCounter(commingTopic);
        System.out.println("jmx started!");
        while(true){
            System.out.println("---");
            // 計數增加
            myTopic1Counter.incrementAndGet();
            Thread.sleep(10000);
        }
    }

    private static AtomicInteger getMetricCounter(String topic) throws MalformedObjectNameException, NotCompliantMBeanException, InstanceAlreadyExistsException, MBeanRegistrationException {
        AtomicInteger myTopic1Counter = topicContainer.get(topic);
        if(myTopic1Counter == null) {
            myTopic1Counter = new AtomicInteger(0);
            Hashtable<String, String> tab = new Hashtable<>();
            tab.put("topic", topic);
            // 佔位符,雖然不知道什麼意思,但是感覺很厲害的樣子
            tab.put("_", "_value");
            ObjectName objectName = new ObjectName("mydomain_test", tab);
            // 註冊監控實例 到 MBeanServer 中
            ObjectInstance objectInstance = mBeanServer.registerMBean(new JmxCounter(myTopic1Counter, objectName), objectName);
        }
        return myTopic1Counter;
    }
}
// JmxCounter, MBean 要求: 1. 接口必須定義成Public的;  2. 接口命名規範符合要求, 即接口名叫 XYZMBean ,那麼實現名就必須一定是XYZ;
// DynamicMBean
public interface JmxCounterMBean {
    public Object getCount() throws Exception;
}
public class JmxCounter implements JmxCounterMBean {
    private AtomicInteger metric;
    private ObjectName objectName;

    public JmxCounter(AtomicInteger metric, ObjectName objectName) {
        this.objectName = objectName;
        this.metric = metric;
    }

    @Override
    public Object getCount() throws Exception {
        // 返回監控結果
        return metric.get();
    }

}

  最後,見證奇迹的時刻。結果如下:

# HELP mydomain_test_value_Count Attribute exposed for management (mydomain_test<_=_value, topic=b_topic><>Count)
# TYPE mydomain_test_value_Count untyped
mydomain_test_value_Count{topic="b_topic",} 1.0
mydomain_test_value_Count{topic="a_topic",} 88.0

  很明顯,這是一個糟糕的實現,不要學他。僅為了演示效果。

  所以,總結下來,自然是使用方案2了。兩個組件兼容,實現簡單,性能也不錯。如果只是為了使用,到此就可以了。不過你得明白,以上方案有取巧的成分在。


四、 原理: jmx_exportor 是如何獲取數據的?

  jmx_exportor 也是可以通過 http_server 暴露數據。

    // io.prometheus.client.exporter.HTTPServer
    /**
     * Start a HTTP server serving Prometheus metrics from the given registry.
     */
    public HTTPServer(InetSocketAddress addr, CollectorRegistry registry, boolean daemon) throws IOException {
        server = HttpServer.create();
        server.bind(addr, 3);
        // 使用 HTTPMetricHandler 處理請求
        HttpHandler mHandler = new HTTPMetricHandler(registry);
        // 綁定到 /metrics 地址上
        server.createContext("/", mHandler);
        server.createContext("/metrics", mHandler);
        executorService = Executors.newFixedThreadPool(5, DaemonThreadFactory.defaultThreadFactory(daemon));
        server.setExecutor(executorService);
        start(daemon);
    }    
    /**
     * Start a HTTP server by making sure that its background thread inherit proper daemon flag.
     */
    private void start(boolean daemon) {
        if (daemon == Thread.currentThread().isDaemon()) {
            server.start();
        } else {
            FutureTask<Void> startTask = new FutureTask<Void>(new Runnable() {
                @Override
                public void run() {
                    server.start();
                }
            }, null);
            DaemonThreadFactory.defaultThreadFactory(daemon).newThread(startTask).start();
            try {
                startTask.get();
            } catch (ExecutionException e) {
                throw new RuntimeException("Unexpected exception on starting HTTPSever", e);
            } catch (InterruptedException e) {
                // This is possible only if the current tread has been interrupted,
                // but in real use cases this should not happen.
                // In any case, there is nothing to do, except to propagate interrupted flag.
                Thread.currentThread().interrupt();
            }
        }
    }

  所以,可以主要邏輯是 HTTPMetricHandler 處理。來看看。

        // io.prometheus.client.exporter.HTTPServer.HTTPMetricHandler#handle
        public void handle(HttpExchange t) throws IOException {
            String query = t.getRequestURI().getRawQuery();

            ByteArrayOutputStream response = this.response.get();
            response.reset();
            OutputStreamWriter osw = new OutputStreamWriter(response);
            // 主要由該 TextFormat 進行格式化輸出
            // registry.filteredMetricFamilySamples() 進行數據收集
            TextFormat.write004(osw,
                    registry.filteredMetricFamilySamples(parseQuery(query)));
            osw.flush();
            osw.close();
            response.flush();
            response.close();

            t.getResponseHeaders().set("Content-Type",
                    TextFormat.CONTENT_TYPE_004);
            if (shouldUseCompression(t)) {
                t.getResponseHeaders().set("Content-Encoding", "gzip");
                t.sendResponseHeaders(HttpURLConnection.HTTP_OK, 0);
                final GZIPOutputStream os = new GZIPOutputStream(t.getResponseBody());
                response.writeTo(os);
                os.close();
            } else {
                t.getResponseHeaders().set("Content-Length",
                        String.valueOf(response.size()));
                t.sendResponseHeaders(HttpURLConnection.HTTP_OK, response.size());
                // 寫向客戶端
                response.writeTo(t.getResponseBody());
            }
            t.close();
        }

    }


五、 原理: jmx_exportor 是如何獲取Mbean 的數據的?

  jmx_exportor 有一個 JmxScraper, 專門用於處理 MBean 的值。

    // io.prometheus.jmx.JmxScraper#doScrape
    /**
      * Get a list of mbeans on host_port and scrape their values.
      *
      * Values are passed to the receiver in a single thread.
      */
    public void doScrape() throws Exception {
        MBeanServerConnection beanConn;
        JMXConnector jmxc = null;
        // 默認直接獲取本地的 jmx 信息
        // 即是通過共享 ManagementFactory.getPlatformMBeanServer() 變量來實現通信的
        if (jmxUrl.isEmpty()) {
          beanConn = ManagementFactory.getPlatformMBeanServer();
        } else {
          Map<String, Object> environment = new HashMap<String, Object>();
          if (username != null && username.length() != 0 && password != null && password.length() != 0) {
            String[] credent = new String[] {username, password};
            environment.put(javax.management.remote.JMXConnector.CREDENTIALS, credent);
          }
          if (ssl) {
              environment.put(Context.SECURITY_PROTOCOL, "ssl");
              SslRMIClientSocketFactory clientSocketFactory = new SslRMIClientSocketFactory();
              environment.put(RMIConnectorServer.RMI_CLIENT_SOCKET_FACTORY_ATTRIBUTE, clientSocketFactory);
              environment.put("com.sun.jndi.rmi.factory.socket", clientSocketFactory);
          }
          // 如果是遠程獲取,則會通過 rmi 進行遠程通信獲取
          jmxc = JMXConnectorFactory.connect(new JMXServiceURL(jmxUrl), environment);
          beanConn = jmxc.getMBeanServerConnection();
        }
        try {
            // Query MBean names, see #89 for reasons queryMBeans() is used instead of queryNames()
            Set<ObjectName> mBeanNames = new HashSet<ObjectName>();
            for (ObjectName name : whitelistObjectNames) {
                for (ObjectInstance instance : beanConn.queryMBeans(name, null)) {
                    mBeanNames.add(instance.getObjectName());
                }
            }

            for (ObjectName name : blacklistObjectNames) {
                for (ObjectInstance instance : beanConn.queryMBeans(name, null)) {
                    mBeanNames.remove(instance.getObjectName());
                }
            }

            // Now that we have *only* the whitelisted mBeans, remove any old ones from the cache:
            jmxMBeanPropertyCache.onlyKeepMBeans(mBeanNames);

            for (ObjectName objectName : mBeanNames) {
                long start = System.nanoTime();
                scrapeBean(beanConn, objectName);
                logger.fine("TIME: " + (System.nanoTime() - start) + " ns for " + objectName.toString());
            }
        } finally {
          if (jmxc != null) {
            jmxc.close();
          }
        }
    }
    
    // io.prometheus.jmx.JmxScraper#scrapeBean
    private void scrapeBean(MBeanServerConnection beanConn, ObjectName mbeanName) {
        MBeanInfo info;
        try {
          info = beanConn.getMBeanInfo(mbeanName);
        } catch (IOException e) {
          logScrape(mbeanName.toString(), "getMBeanInfo Fail: " + e);
          return;
        } catch (JMException e) {
          logScrape(mbeanName.toString(), "getMBeanInfo Fail: " + e);
          return;
        }
        MBeanAttributeInfo[] attrInfos = info.getAttributes();

        Map<String, MBeanAttributeInfo> name2AttrInfo = new LinkedHashMap<String, MBeanAttributeInfo>();
        for (int idx = 0; idx < attrInfos.length; ++idx) {
            MBeanAttributeInfo attr = attrInfos[idx];
            if (!attr.isReadable()) {
                logScrape(mbeanName, attr, "not readable");
                continue;
            }
            name2AttrInfo.put(attr.getName(), attr);
        }
        final AttributeList attributes;
        try {
            // 通過 MBean 調用對象,獲取所有屬性值,略去不說
            attributes = beanConn.getAttributes(mbeanName, name2AttrInfo.keySet().toArray(new String[0]));
        } catch (Exception e) {
            logScrape(mbeanName, name2AttrInfo.keySet(), "Fail: " + e);
            return;
        }
        for (Attribute attribute : attributes.asList()) {
            MBeanAttributeInfo attr = name2AttrInfo.get(attribute.getName());
            logScrape(mbeanName, attr, "process");
            // 處理單個key的屬性值, 如 topic=aaa,ip=1 將會進行再次循環處理
            processBeanValue(
                    mbeanName.getDomain(),
                    // 獲取有效的屬性列表, 我們可以簡單看一下過濾規則, 如下文
                    jmxMBeanPropertyCache.getKeyPropertyList(mbeanName),
                    new LinkedList<String>(),
                    attr.getName(),
                    attr.getType(),
                    attr.getDescription(),
                    attribute.getValue()
            );
        }
    }
    // 處理每個 mBean 的屬性,寫入到 receiver 中
    // io.prometheus.jmx.JmxScraper#processBeanValue
    /**
     * Recursive function for exporting the values of an mBean.
     * JMX is a very open technology, without any prescribed way of declaring mBeans
     * so this function tries to do a best-effort pass of getting the values/names
     * out in a way it can be processed elsewhere easily.
     */
    private void processBeanValue(
            String domain,
            LinkedHashMap<String, String> beanProperties,
            LinkedList<String> attrKeys,
            String attrName,
            String attrType,
            String attrDescription,
            Object value) {
        if (value == null) {
            logScrape(domain + beanProperties + attrName, "null");
        } 
        // 單值情況,数字型,字符串型,可以處理
        else if (value instanceof Number || value instanceof String || value instanceof Boolean) {
            logScrape(domain + beanProperties + attrName, value.toString());
            // 解析出的數據存入 receiver 中,可以是 jmx, 或者 控制台
            this.receiver.recordBean(
                    domain,
                    beanProperties,
                    attrKeys,
                    attrName,
                    attrType,
                    attrDescription,
                    value);
        } 
        // 多值型情況
        else if (value instanceof CompositeData) {
            logScrape(domain + beanProperties + attrName, "compositedata");
            CompositeData composite = (CompositeData) value;
            CompositeType type = composite.getCompositeType();
            attrKeys = new LinkedList<String>(attrKeys);
            attrKeys.add(attrName);
            for(String key : type.keySet()) {
                String typ = type.getType(key).getTypeName();
                Object valu = composite.get(key);
                processBeanValue(
                        domain,
                        beanProperties,
                        attrKeys,
                        key,
                        typ,
                        type.getDescription(),
                        valu);
            }
        } 
        // 更複雜型對象
        else if (value instanceof TabularData) {
            // I don't pretend to have a good understanding of TabularData.
            // The real world usage doesn't appear to match how they were
            // meant to be used according to the docs. I've only seen them
            // used as 'key' 'value' pairs even when 'value' is itself a
            // CompositeData of multiple values.
            logScrape(domain + beanProperties + attrName, "tabulardata");
            TabularData tds = (TabularData) value;
            TabularType tt = tds.getTabularType();

            List<String> rowKeys = tt.getIndexNames();

            CompositeType type = tt.getRowType();
            Set<String> valueKeys = new TreeSet<String>(type.keySet());
            valueKeys.removeAll(rowKeys);

            LinkedList<String> extendedAttrKeys = new LinkedList<String>(attrKeys);
            extendedAttrKeys.add(attrName);
            for (Object valu : tds.values()) {
                if (valu instanceof CompositeData) {
                    CompositeData composite = (CompositeData) valu;
                    LinkedHashMap<String, String> l2s = new LinkedHashMap<String, String>(beanProperties);
                    for (String idx : rowKeys) {
                        Object obj = composite.get(idx);
                        if (obj != null) {
                            // Nested tabulardata will repeat the 'key' label, so
                            // append a suffix to distinguish each.
                            while (l2s.containsKey(idx)) {
                              idx = idx + "_";
                            }
                            l2s.put(idx, obj.toString());
                        }
                    }
                    for(String valueIdx : valueKeys) {
                        LinkedList<String> attrNames = extendedAttrKeys;
                        String typ = type.getType(valueIdx).getTypeName();
                        String name = valueIdx;
                        if (valueIdx.toLowerCase().equals("value")) {
                            // Skip appending 'value' to the name
                            attrNames = attrKeys;
                            name = attrName;
                        } 
                        processBeanValue(
                            domain,
                            l2s,
                            attrNames,
                            name,
                            typ,
                            type.getDescription(),
                            composite.get(valueIdx));
                    }
                } else {
                    logScrape(domain, "not a correct tabulardata format");
                }
            }
        } else if (value.getClass().isArray()) {
            logScrape(domain, "arrays are unsupported");
        } else {
            // 多半會返回不支持的對象然後得不到jmx監控值
            // mydomain_test{3=3, topic=aaa} java.util.Hashtable is not exported
            logScrape(domain + beanProperties, attrType + " is not exported");
        }
    }
    
    // 我們看下prometheus 對 mbeanName 的轉換操作,會將各種特殊字符轉換為 屬性列表
    // io.prometheus.jmx.JmxMBeanPropertyCache#getKeyPropertyList
    public LinkedHashMap<String, String> getKeyPropertyList(ObjectName mbeanName) {
        LinkedHashMap<String, String> keyProperties = keyPropertiesPerBean.get(mbeanName);
        if (keyProperties == null) {
            keyProperties = new LinkedHashMap<String, String>();
            // 轉化為 string 格式
            String properties = mbeanName.getKeyPropertyListString();
            // 此處為 prometheus 認識的格式,已經匹配上了
            Matcher match = PROPERTY_PATTERN.matcher(properties);
            while (match.lookingAt()) {
                keyProperties.put(match.group(1), match.group(2));
                properties = properties.substring(match.end());
                if (properties.startsWith(",")) {
                    properties = properties.substring(1);
                }
                match.reset(properties);
            }
            keyPropertiesPerBean.put(mbeanName, keyProperties);
        }
        return keyProperties;
    }
        // io.prometheus.jmx.JmxMBeanPropertyCache#PROPERTY_PATTERN
        private static final Pattern PROPERTY_PATTERN = Pattern.compile(
            "([^,=:\\*\\?]+)" + // Name - non-empty, anything but comma, equals, colon, star, or question mark
                    "=" +  // Equals
                    "(" + // Either
                    "\"" + // Quoted
                    "(?:" + // A possibly empty sequence of
                    "[^\\\\\"]*" + // Greedily match anything but backslash or quote
                    "(?:\\\\.)?" + // Greedily see if we can match an escaped sequence
                    ")*" +
                    "\"" +
                    "|" + // Or
                    "[^,=:\"]*" + // Unquoted - can be empty, anything but comma, equals, colon, or quote
                    ")");


六、 原理: jmx_exportor 為什麼輸出的格式是這樣的?

  prometheus 的數據格式如下,如何從埋點數據轉換?

# HELP mydomain_test_value_Count Attribute exposed for management (mydomain_test<_=_value, topic=b_topic><>Count)
# TYPE mydomain_test_value_Count untyped
mydomain_test_value_Count{topic="b_topic",} 1.0
mydomain_test_value_Count{topic="a_topic",} 132.0

  是一個輸出格式問題,也是一協議問題。

  // io.prometheus.client.exporter.common.TextFormat#write004
  public static void write004(Writer writer, Enumeration<Collector.MetricFamilySamples> mfs) throws IOException {
    /* See http://prometheus.io/docs/instrumenting/exposition_formats/
     * for the output format specification. */
    while(mfs.hasMoreElements()) {
      Collector.MetricFamilySamples metricFamilySamples = mfs.nextElement();
      writer.write("# HELP ");
      writer.write(metricFamilySamples.name);
      writer.write(' ');
      writeEscapedHelp(writer, metricFamilySamples.help);
      writer.write('\n');

      writer.write("# TYPE ");
      writer.write(metricFamilySamples.name);
      writer.write(' ');
      writer.write(typeString(metricFamilySamples.type));
      writer.write('\n');

      for (Collector.MetricFamilySamples.Sample sample: metricFamilySamples.samples) {
        writer.write(sample.name);
        // 帶 labelNames 的,依次輸出對應的標籤
        if (sample.labelNames.size() > 0) {
          writer.write('{');
          for (int i = 0; i < sample.labelNames.size(); ++i) {
            writer.write(sample.labelNames.get(i));
            writer.write("=\"");
            writeEscapedLabelValue(writer, sample.labelValues.get(i));
            writer.write("\",");
          }
          writer.write('}');
        }
        writer.write(' ');
        writer.write(Collector.doubleToGoString(sample.value));
        if (sample.timestampMs != null){
          writer.write(' ');
          writer.write(sample.timestampMs.toString());
        }
        writer.write('\n');
      }
    }
  }


  done.

本站聲明:網站內容來源於博客園,如有侵權,請聯繫我們,我們將及時處理

【其他文章推薦】

網頁設計公司推薦更多不同的設計風格,搶佔消費者視覺第一線

※廣告預算用在刀口上,網站設計公司幫您達到更多曝光效益

※自行創業 缺乏曝光? 下一步"網站設計"幫您第一時間規劃公司的門面形象

台灣寄大陸海運貨物規則及重量限制?

大陸寄台灣海運費用試算一覽表

台中搬家,彰化搬家,南投搬家前需注意的眉眉角角,別等搬了再說!

未完成恐攻應變設施 日本川內核電廠成停機首例

摘錄自2020年03月16日中央廣播電台報導

位於日本鹿兒島縣的九州電力公司川內核電廠一號機,因未能在期限內完成「恐攻應變設施」,今(16日)下午將停止反應爐運轉,寫下運轉中的核電廠因不符新規範標準停機首例。

日本放送協會(NHK)報導,日本原子力規制委員會基於新規範標準,要求核電廠在提出建設因應恐攻或航機衝撞等設施的工程計畫獲同意後,必須在五年內完成興建。九州電力公司因為無法在規定期限內完成川內核電廠一號機恐攻應變設施,預計下午停止運轉。

日本原子力規制委員會曾因為沒有規定核電廠提出因應海嘯評估與對策的期限,結果造成福島第一核電廠發生核子事故憾事。基於這樣的教訓,對因應恐攻的應變設施不僅設有期限,也不同意延長,嚴格要求核電廠不符規範就必須停機。

核能
能源議題
國際新聞
日本
核電廠
核電廠反應爐

本站聲明:網站內容來源環境資訊中心https://e-info.org.tw/,如有侵權,請聯繫我們,我們將及時處理

【其他文章推薦】

※為什麼 USB CONNECTOR 是電子產業重要的元件?

網頁設計一頭霧水??該從何著手呢? 找到專業技術的網頁設計公司,幫您輕鬆架站!

※想要讓你的商品成為最夯、最多人討論的話題?網頁設計公司讓你強力曝光

※想知道最厲害的台北網頁設計公司推薦台中網頁設計公司推薦專業設計師”嚨底家”!!

※專營大陸快遞台灣服務

台灣快遞大陸的貨運公司有哪些呢?

現代轉攻新能源汽車 計畫2020年之前推26款新車

日前,據海外媒體報導,現代汽車集團將在2020年之前推出26款新能源汽車,其中包括旗下現代和起亞兩大品牌。現代汽車集團此舉意在搶佔新能源汽車市場的領先地位,爭取在2020年達到僅次於豐田的行業第二水準。

現代汽車集團計畫推出的26款新車型包括12款混動車型、6款插電式混動車型、2款純電動車型以及2款氫燃料電池車型等。其中,起亞將推出包括Niro混動版、凱尊(參配、圖片、詢價) 混動版、SoulEV在內的11款新車,而現代則會推出插電式混動版、純電動版IONIQ與豐田普銳斯一決高下。據現代汽車集團預估,到2020年現代汽車集團在新能源汽車市場的年銷量有望達到30萬台。

為了節省新能源汽車的開發成本,現代汽車集團相關負責人透露,旗下新能源車型將採用共用零部件策略。雖然每款車的動力系統在動力輸出上可能有所不同,但電動機直徑、核心部件等將會遵循統一化標準。

本站聲明:網站內容來源於EnergyTrend https://www.energytrend.com.tw/ev/,如有侵權,請聯繫我們,我們將及時處理

【其他文章推薦】

※帶您來了解什麼是 USB CONNECTOR  ?

※自行創業 缺乏曝光? 下一步”網站設計“幫您第一時間規劃公司的門面形象

※如何讓商品強力曝光呢? 網頁設計公司幫您建置最吸引人的網站,提高曝光率!!

※綠能、環保無空污,成為電動車最新代名詞,目前市場使用率逐漸普及化

※廣告預算用在刀口上,網站設計公司幫您達到更多曝光效益

※試算大陸海運運費!

【從今天開始好好學數據結構04】程序員你心中就沒點“樹”嗎?

目錄

前面我們講的都是線性表結構,棧、隊列等等。今天我們講一種非線性表結構,樹。樹這種數據結構比線性表的數據結構要複雜得多,內容也比較多,首先我們先從樹(Tree)開始講起。
@

樹(Tree)

樹型結構是一種非線性結構,它的數據元素之間呈現分支、分層的特點。

1.樹的定義

樹(Tree)是由n(n≥0)個結點構成的有限集合T,當n=0時T稱為空樹;否則,在任一非空樹T中:
(1)有且僅有一個特定的結點,它沒有前驅結點,稱其為根(Root)結點;
(2)剩下的結點可分為m(m≥0)個互不相交的子集T1,T2,…,Tm,其中每個子集本身又是一棵樹,並稱其為根的子樹(Subtree)。

注意:樹的定義具有遞歸性,即“樹中還有樹”。樹的遞歸定義揭示出了樹的固有特性

2.什麼是樹結構

什麼是“樹”?再好的定義,都沒有圖解來的直觀。所以我在圖中畫了幾棵“樹”。你來看看,這些“樹”都有什麼特徵?

你有沒有發現,“樹”這種數據結構真的很像我們現實生活中的“樹”

3.為什麼使用樹結構

在有序數組中,可以快速找到特定的值,但是想在有序數組中插入一個新的數據項,就必須首先找出新數據項插入的位置,然後將比新數據項大的數據項向後移動一位,來給新的數據項騰出空間,刪除同理,這樣移動很費時。顯而易見,如果要做很多的插入和刪除操作和刪除操作,就不該選用有序數組。另一方面,鏈表中可以快速添加和刪除某個數據項,但是在鏈表中查找數據項可不容易,必須從頭開始訪問鏈表的每一個數據項,直到找到該數據項為止,這個過程很慢。 樹這種數據結構,既能像鏈表那樣快速的插入和刪除,又能想有序數組那樣快速查找

4.樹的常用術語

結點——包含一個數據元素和若干指向其子樹的分支
度——結點擁有的子樹個數
樹的度——該樹中結點的最大度數
恭弘=叶 恭弘子——度為零的結點
分支結點(非終端結點)——度不為零的結點
孩子和雙親——結點的子樹的根稱為該結點的孩子,相應地,該結點稱為孩子的雙親
兄弟——同一個雙親的孩子
祖先和子孫——從根到該結點所經分支上的所有結點。相應地,以某一結點為根的子樹中的任一結點稱為該結點的子孫。
結點的層次——結點的層次從根開始定義,根結點的層次為1,其孩子結點的層次為2,……
堂兄弟——雙親在同一層的結點
樹的深度——樹中結點的最大層次
有序樹和無序樹——如果將樹中每個結點的各子樹看成是從左到右有次序的(即位置不能互換),則稱該樹為有序樹;否則稱為無序樹。
森林——m(m≥0)棵互不相交的樹的有限集合

到這裏,樹就講的差不多了,接下來講講二叉樹(Binary Tree)

二叉樹(Binary Tree)

樹結構多種多樣,不過我們最常用還是二叉樹,我們平時最常用的樹就是二叉樹。二叉樹的每個節點最多有兩個子節點,分別是左子節點和右子節點。二叉樹中,有兩種比較特殊的樹,分別是滿二叉樹和完全二叉樹。滿二叉樹又是完全二叉樹的一種特殊情況。

1.二叉樹的定義和特點

二叉樹的定義:
二叉樹(Binary Tree)是n(n≥0)個結點的有限集合BT,它或者是空集,或者由一個根結點和兩棵分別稱為左子樹和右子樹的互不相交的二叉樹組成 。
————————————
二叉樹的特點:
每個結點至多有二棵子樹(即不存在度大於2的結點);二叉樹的子樹有左、右之分,且其次序不能任意顛倒。

2.幾種特殊形式的二叉樹

1、滿二叉樹
定義:深度為k且有2k-1個結點的二叉樹,稱為滿二叉樹。
特點:每一層上的結點數都是最大結點數
2、完全二叉樹
定義:
深度為k,有n個結點的二叉樹當且僅當其每一個結點都與深度為k的滿二叉樹中編號從1至n的結點一一對應時,稱為完全二叉樹
特點:
特點一 : 恭弘=叶 恭弘子結點只可能在層次最大的兩層上出現;
特點二 : 對任一結點,若其右分支下子孫的最大層次為l,則其左分支下子孫的最大層次必為l 或l+1

建議看圖對應文字綜合理解

代碼創建二叉樹

首先,創建一個節點Node類

package demo5;
/*
 * 節(結)點類 
 */
public class Node {
    //節點的權
    int value;
    //左兒子(左節點)
    Node leftNode;
    //右兒子(右節點)
    Node rightNode;
    //構造函數,初始化的時候就給二叉樹賦上權值
    public Node(int value) {
        this.value=value;
    }
    
    //設置左兒子(左節點)
    public void setLeftNode(Node leftNode) {
        this.leftNode = leftNode;
    }
    //設置右兒子(右節點)
    public void setRightNode(Node rightNode) {
        this.rightNode = rightNode;
    }

接着創建一個二叉樹BinaryTree 類

package demo5;
/*
 * 二叉樹Class
 */
public class BinaryTree {
    //根節點root
    Node root;
    
    //設置根節點
    public void setRoot(Node root) {
        this.root = root;
    }
    
    //獲取根節點
    public Node getRoot() {
        return root;
    }
}

最後創建TestBinaryTree 類(該類主要是main方法用來測試)來創建一個二叉樹

package demo5;
public class TestBinaryTree {

    public static void main(String[] args) {
        //創建一顆樹
        BinaryTree binTree = new BinaryTree();
        //創建一個根節點
        Node root = new Node(1);
        //把根節點賦給樹
        binTree.setRoot(root);
        //創建一個左節點
        Node rootL = new Node(2);
        //把新創建的節點設置為根節點的子節點
        root.setLeftNode(rootL);
        //創建一個右節點
        Node rootR = new Node(3);
        //把新創建的節點設置為根節點的子節點
        root.setRightNode(rootR);
        //為第二層的左節點創建兩個子節點
        rootL.setLeftNode(new Node(4));
        rootL.setRightNode(new Node(5));
        //為第二層的右節點創建兩個子節點
        rootR.setLeftNode(new Node(6));
        rootR.setRightNode(new Node(7));
    }

}

下面將會講的遍歷、查找節點、刪除節點都將圍繞這三個類開展

不難看出創建好的二叉樹如下(畫的不好,還望各位見諒):

3.二叉樹的兩種存儲方式

二叉樹既可以用鏈式存儲,也可以用數組順序存儲。數組順序存儲的方式比較適合完全二叉樹,其他類型的二叉樹用數組存儲會比較浪費存儲空間,所以鏈式存儲更合適。

我們先來看比較簡單、直觀的鏈式存儲法

接着是基於數組的順序存儲法(該例子是一棵完全二叉樹)

上面例子是一棵完全二叉樹,所以僅僅“浪費”了一個下標為0的存儲位置。如果是非完全二叉樹,則會浪費比較多的數組存儲空間,如下。

還記得堆和堆排序嗎,堆其實就是一種完全二叉樹,最常用的存儲方式就是數組。

4.二叉樹的遍歷

前面我講了二叉樹的基本定義和存儲方法,現在我們來看二叉樹中非常重要的操作,二叉樹的遍歷。這也是非常常見的面試題。

經典遍歷的方法有三種,前序遍歷中序遍歷後序遍歷

前序遍歷是指,對於樹中的任意節點來說,先打印這個節點,然後再打印它的左子樹,最後打印它的右子樹。

中序遍歷是指,對於樹中的任意節點來說,先打印它的左子樹,然後再打印它本身,最後打印它的右子樹。

後序遍歷是指,對於樹中的任意節點來說,先打印它的左子樹,然後再打印它的右子樹,最後打印這個節點本身。

我想,睿智的你已經想到了二叉樹的前、中、後序遍歷就是一個遞歸的過程。比如,前序遍歷,其實就是先打印根節點,然後再遞歸地打印左子樹,最後遞歸地打印右子樹。

在之前創建好的二叉樹代碼之上,我們來使用這三種方法遍歷一下~

依舊是在Node節點類上添加方法:可以看出遍歷方法都是用的遞歸思想

package demo5;
/*
 * 節(結)點類 
 */
public class Node {
//===================================開始 遍歷========================================
    //前序遍歷
    public void frontShow() {
        //先遍歷當前節點的內容
        System.out.println(value);
        //左節點
        if(leftNode!=null) {
            leftNode.frontShow();
        }
        //右節點
        if(rightNode!=null) {
            rightNode.frontShow();
        }
    }

    //中序遍歷
    public void midShow() {
        //左子節點
        if(leftNode!=null) {
            leftNode.midShow();
        }
        //當前節點
        System.out.println(value);
        //右子節點
        if(rightNode!=null) {
            rightNode.midShow();
        }
    }

    //後序遍歷
    public void afterShow() {
        //左子節點
        if(leftNode!=null) {
            leftNode.afterShow();
        }
        //右子節點
        if(rightNode!=null) {
            rightNode.afterShow();
        }
        //當前節點
        System.out.println(value);
    }

}

然後依舊是在二叉樹BinaryTree 類上添加方法,並且添加的方法調用Node類中的遍歷方法

package demo5;
/*
 * 二叉樹Class
 */
public class BinaryTree {

    public void frontShow() {
        if(root!=null) {
            //調用節點類Node中的前序遍歷frontShow()方法
            root.frontShow();
        }
    }

    public void midShow() {
        if(root!=null) {
            //調用節點類Node中的中序遍歷midShow()方法
            root.midShow();
        }
    }

    public void afterShow() {
        if(root!=null) {
            //調用節點類Node中的後序遍歷afterShow()方法
            root.afterShow();
        }
    }

}

依舊是在TestBinaryTree類中測試

package demo5;

public class TestBinaryTree {

    public static void main(String[] args) {
        //前序遍歷樹
        binTree.frontShow();
        System.out.println("===============");
        //中序遍歷
        binTree.midShow();
        System.out.println("===============");
        //後序遍歷
        binTree.afterShow();
        System.out.println("===============");
        //前序查找
        Node result = binTree.frontSearch(5);
        System.out.println(result);
        
}

如果遞歸理解的不是很透,我可以分享一個學習的小方法:我建議各位可以這樣斷點調試,一步一步調,思維跟上,仔細推敲每一步的運行相信我,你會重新認識到遞歸!(像下面這樣貼個圖再一步一步斷點思維更加清晰)

貼一下我斷點對遞歸的分析,希望對你有一定的幫助~

二叉樹遍歷的遞歸實現思路自然、簡單,易於理解,但執行效率較低。為了提高程序的執行效率,可以顯式的設置棧,寫出相應的非遞歸遍歷算法。非遞歸的遍歷算法可以根據遞歸算法的執行過程寫出。至於代碼可以嘗試去寫一寫,這也是一種提升!具體的非遞歸算法主要流程圖貼在下面了:

二叉樹遍歷算法分析:

二叉樹遍歷算法中的基本操作是訪問根結點,不論按哪種次序遍歷,都要訪問所有的結點,對含n個結點的二叉樹,其時間複雜度均為O(n)。所需輔助空間為遍歷過程中所需的棧空間,最多等於二叉樹的深度k乘以每個結點所需空間數,最壞情況下樹的深度為結點的個數n,因此,其空間複雜度也為O(n)。

5.二叉樹中節點的查找與刪除

剛才講到二叉樹的三種金典遍歷放法,那麼節點的查找同樣是可以效仿的,分別叫做前序查找、中序查找以及後序查找,下面代碼只以前序查找為例,三者查找方法思路類似~

至於刪除節點,有三種情況:

1、如果刪除的是根節點,那麼二叉樹就完全被刪了
2、如果刪除的是雙親節點,那麼該雙親節點以及他下面的所有子節點所構成的子樹將被刪除
3、如果刪除的是恭弘=叶 恭弘子節點,那麼就直接刪除該恭弘=叶 恭弘子節點

那麼,我把完整的三個類給貼出來(包含創建、遍歷、查找、刪除)

依舊是Node節點類

package demo5;
/*
 * 節(結)點類 
 */
public class Node {
    //節點的權
    int value;
    //左兒子
    Node leftNode;
    //右兒子
    Node rightNode;
    //構造函數,初始化的時候就給二叉樹賦上權值
    public Node(int value) {
        this.value=value;
    }
    
    //設置左兒子
    public void setLeftNode(Node leftNode) {
        this.leftNode = leftNode;
    }
    //設置右兒子
    public void setRightNode(Node rightNode) {
        this.rightNode = rightNode;
    }
    
    //前序遍歷
    public void frontShow() {
        //先遍歷當前節點的內容
        System.out.println(value);
        //左節點
        if(leftNode!=null) {
            leftNode.frontShow();
        }
        //右節點
        if(rightNode!=null) {
            rightNode.frontShow();
        }
    }

    //中序遍歷
    public void midShow() {
        //左子節點
        if(leftNode!=null) {
            leftNode.midShow();
        }
        //當前節點
        System.out.println(value);
        //右子節點
        if(rightNode!=null) {
            rightNode.midShow();
        }
    }

    //後序遍歷
    public void afterShow() {
        //左子節點
        if(leftNode!=null) {
            leftNode.afterShow();
        }
        //右子節點
        if(rightNode!=null) {
            rightNode.afterShow();
        }
        //當前節點
        System.out.println(value);
    }

    //前序查找
    public Node frontSearch(int i) {
        Node target=null;
        //對比當前節點的值
        if(this.value==i) {
            return this;
        //當前節點的值不是要查找的節點
        }else {
            //查找左兒子
            if(leftNode!=null) {
                //有可能可以查到,也可以查不到,查不到的話,target還是一個null
                target = leftNode.frontSearch(i);
            }
            //如果不為空,說明在左兒子中已經找到
            if(target!=null) {
                return target;
            }
            //查找右兒子
            if(rightNode!=null) {
                target=rightNode.frontSearch(i);
            }
        }
        return target;
    }
    
    //刪除一個子樹
    public void delete(int i) {
        Node parent = this;
        //判斷左兒子
        if(parent.leftNode!=null&&parent.leftNode.value==i) {
            parent.leftNode=null;
            return;
        }
        //判斷右兒子
        if(parent.rightNode!=null&&parent.rightNode.value==i) {
            parent.rightNode=null;
            return;
        }
        
        //遞歸檢查並刪除左兒子
        parent=leftNode;
        if(parent!=null) {
            parent.delete(i);
        }
        
        //遞歸檢查並刪除右兒子
        parent=rightNode;
        if(parent!=null) {
            parent.delete(i);
        }
    }

}

依舊是BinaryTree 二叉樹類

package demo5;
/*
 * 二叉樹Class
 */
public class BinaryTree {
    //根節點root
    Node root;
    
    //設置根節點
    public void setRoot(Node root) {
        this.root = root;
    }
    
    //獲取根節點
    public Node getRoot() {
        return root;
    }

    public void frontShow() {
        if(root!=null) {
            //調用節點類Node中的前序遍歷frontShow()方法
            root.frontShow();
        }
    }

    public void midShow() {
        if(root!=null) {
            //調用節點類Node中的中序遍歷midShow()方法
            root.midShow();
        }
    }

    public void afterShow() {
        if(root!=null) {
            //調用節點類Node中的後序遍歷afterShow()方法
            root.afterShow();
        }
    }
    //查找節點i
    public Node frontSearch(int i) {
        return root.frontSearch(i);
    }
    //刪除節點i
    public void delete(int i) {
        if(root.value==i) {
            root=null;
        }else {
            root.delete(i);
        }
    }
    
}

依舊是TestBinaryTree測試類

package demo5;

public class TestBinaryTree {

    public static void main(String[] args) {
        //創建一顆樹
        BinaryTree binTree = new BinaryTree();
        //創建一個根節點
        Node root = new Node(1);
        //把根節點賦給樹
        binTree.setRoot(root);
        //創建一個左節點
        Node rootL = new Node(2);
        //把新創建的節點設置為根節點的子節點
        root.setLeftNode(rootL);
        //創建一個右節點
        Node rootR = new Node(3);
        //把新創建的節點設置為根節點的子節點
        root.setRightNode(rootR);
        //為第二層的左節點創建兩個子節點
        rootL.setLeftNode(new Node(4));
        rootL.setRightNode(new Node(5));
        //為第二層的右節點創建兩個子節點
        rootR.setLeftNode(new Node(6));
        rootR.setRightNode(new Node(7));
        //前序遍歷樹
        binTree.frontShow();
        System.out.println("===============");
        //中序遍歷
        binTree.midShow();
        System.out.println("===============");
        //後序遍歷
        binTree.afterShow();
        System.out.println("===============");
        //前序查找
        Node result = binTree.frontSearch(5);
        System.out.println(result);
        
        System.out.println("===============");
        //刪除一個子樹
        binTree.delete(4);
        binTree.frontShow();
        
    }

}

到這裏,總結一下,我們學了一種非線性表數據結構,樹。關於樹,有幾個比較常用的概念你需要掌握,那就是:根節點、恭弘=叶 恭弘子節點、父節點、子節點、兄弟節點,還有節點的高度、深度、層數,以及樹的高度等。我們平時最常用的樹就是二叉樹。二叉樹的每個節點最多有兩個子節點,分別是左子節點和右子節點。二叉樹中,有兩種比較特殊的樹,分別是滿二叉樹和完全二叉樹。滿二叉樹又是完全二叉樹的一種特殊情況。二叉樹既可以用鏈式存儲,也可以用數組順序存儲。數組順序存儲的方式比較適合完全二叉樹,其他類型的二叉樹用數組存儲會比較浪費存儲空間。除此之外,二叉樹里非常重要的操作就是前、中、後序遍歷操作,遍歷的時間複雜度是O(n),你需要理解並能用遞歸代碼來實現。

如果本文章對你有幫助,哪怕是一點點,請點個讚唄,謝謝~

歡迎各位關注我的公眾號,一起探討技術,嚮往技術,追求技術…說好了來了就是盆友喔…

本站聲明:網站內容來源於博客園,如有侵權,請聯繫我們,我們將及時處理

【其他文章推薦】

※帶您來了解什麼是 USB CONNECTOR  ?

※自行創業 缺乏曝光? 下一步”網站設計“幫您第一時間規劃公司的門面形象

※如何讓商品強力曝光呢? 網頁設計公司幫您建置最吸引人的網站,提高曝光率!!

※綠能、環保無空污,成為電動車最新代名詞,目前市場使用率逐漸普及化

※廣告預算用在刀口上,網站設計公司幫您達到更多曝光效益

※試算大陸海運運費!

[UWP]通過自定義XamlCompositionBrushBase實現圖片平鋪

1. 什麼是XamlCompositionBrushBase

我早就想試試自定義XamlCompositionBrushBase,但一直沒機會。上一篇文章介紹到,原理很簡單,但每次都要寫這些代碼很繁瑣,正好就用這個作為例子試試XamlCompositionBrushBase。

CompositionBrush靈活多變,它的基本用法如下:

  1. 通過Compositor創建CompositionBrush;
  2. 配置CompositionBrush;
  3. 創建SpriteVisual並將它的Brush設置為CompositionBrush;
  4. 使用 將SpriteVisual設置到某個UIElement的可視化層里。

這些步驟很繁瑣,而且不能用在XAML中。XamlCompositionBrushBase提供了將CompositionBrush用在XAML中一個橋樑,他繼承自Brush類,可以直接像普通的XAML 畫筆(如SolidColorBrush)那樣直接用在XAML中。

如上圖所示,中已經提了很不少XamlCompositionBrushBase的實現,它們的使用方式已經有很多文章介紹,這裏不一一列舉。

2. 自定義XamlCompositionBrushBase

這篇文章將介紹一個自定義的畫筆:TiledImageBrush,它的主要目標是實現ImageBrush沒有的圖片平鋪功能,並且它可以在XAML中使用,使用方式如下:

<Rectangle IsHitTestVisible="False">
    <Rectangle.Fill>
        <controls:TiledImageBrush Source="ms-appx:///Assets/flutter.png"/>
    </Rectangle.Fill>
</Rectangle>

順便複習下普通的ImageBrush的用法:

<Rectangle >
    <Rectangle.Fill>
        <ImageBrush ImageSource="ms-appx:///Assets/flutter.png"/>
    </Rectangle.Fill>
</Rectangle>

看起來TiledImageBrush的用法是不是和ImageBrush很像?接下來講解TiledImageBrush的實現步驟。TiledImageBrush繼承自XamlCompositionBrushBase,而實現XamlCompositionBrushBase的一般步驟如下:

protected override void OnConnected()
{
    // Delay creating composition resources until they're required.
    if (CompositionBrush == null)
    {
         CompositionBrush = CreateCompositionBrush();//Create A CompositionBrush.
    }
}

protected override void OnDisconnected()
{
    // Dispose of composition resources when no longer in use.
    if (CompositionBrush != null)
    {
        CompositionBrush.Dispose();
        CompositionBrush = null;
    }
}

首先重寫,當畫筆在屏幕上首次用於繪製元素時會調用這個函數。在這個函數里創建CompositionBrush並賦值給。

然後重寫,它在畫筆不再用於繪製任何元素時被調用。在這個函數里盡可能地釋放各種資源,例如CompositionBrush。這兩步就是實現XamlCompositionBrushBase的基本步驟。

創建CompositionBrush有很多種玩法,我之前寫過兩篇文章分別介紹 及 。這裏使用這篇文章里介紹到的代碼,首先使用LoadedImageSurface.StartLoadFromUri創建CompositionSurfaceBrush,然後加入到BorderEffect里實現圖片平鋪,然後把產生的CompositionEffectBrush賦值給XamlCompositionBrushBase.CompositionBrush

TiledImageBrush中添加了Source屬性用於設置圖片Uri(實際上是個ImageSource類型),模仿ImageBrush,這裏的Source也是一個ImageSource類型的屬性,雖然實際上使用的是它的UriSource。詳細代碼如下:

public ImageSource Source
{
    get => (ImageSource)GetValue(SourceProperty);
    set => SetValue(SourceProperty, value);
}

private void UpdateSurface()
{
    if (Source != null && _surfaceBrush != null)
    {
        var uri = (Source as BitmapImage)?.UriSource ?? new Uri("ms-appx:///");
        _surface = LoadedImageSurface.StartLoadFromUri(uri);
        _surfaceBrush.Surface = _surface;
    }
}

OnConnected的詳細代碼如下:

protected override void OnConnected()
{
    base.OnConnected();

    if (CompositionBrush == null)
    {
        _surfaceBrush = Compositor.CreateSurfaceBrush();
        _surfaceBrush.Stretch = CompositionStretch.None;

        UpdateSurface();

        _borderEffect = new BorderEffect()
        {
            Source = new CompositionEffectSourceParameter("source"),
            ExtendX = Microsoft.Graphics.Canvas.CanvasEdgeBehavior.Wrap,
            ExtendY = Microsoft.Graphics.Canvas.CanvasEdgeBehavior.Wrap
        };

        _borderEffectFactory = Compositor.CreateEffectFactory(_borderEffect);
        _borderEffectBrush = _borderEffectFactory.CreateBrush();
        _borderEffectBrush.SetSourceParameter("source", _surfaceBrush);
        CompositionBrush = _borderEffectBrush;
    }
}

這樣一個基本的XamlCompositionBrush就完成了,完整的代碼可以在這裏查看:

3. 參考

本站聲明:網站內容來源於博客園,如有侵權,請聯繫我們,我們將及時處理

【其他文章推薦】

網頁設計公司推薦更多不同的設計風格,搶佔消費者視覺第一線

※廣告預算用在刀口上,網站設計公司幫您達到更多曝光效益

※自行創業 缺乏曝光? 下一步"網站設計"幫您第一時間規劃公司的門面形象

台灣寄大陸海運貨物規則及重量限制?

大陸寄台灣海運費用試算一覽表

台中搬家,彰化搬家,南投搬家前需注意的眉眉角角,別等搬了再說!