作為一名java開發者,相信你或多或少的接觸過單元測試,對於測試來講它是一門能夠區分專業開發人員與業餘開發人員的重要學科,這篇文章將對java中最常見的一個單元測試框架junit進行一個梳理和講解。
為什麼需要單元測試
在平時的開發當中,一個項目往往包含了大量的方法,可能有成千上萬個。如何去保證這些方法產生的結果是我們想要的呢?當然了,最容易想到的一個方式,就是我們通過System.out來輸出我們的結果,看看是不是滿足我們的需求,但是項目中這些成千上萬個方法,我們總不能在每一個方法中都去輸出一遍嘛。這也太枯燥了。這時候用我們的單元測試框架junit就可以很好地解決這個問題。
junit如何解決這個問題的呢?答案在於內部提供了一個斷言機制,他能夠將我們預期的結果和實際的結果進行比對,判斷出是否滿足我們的期望。
預備工作
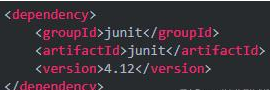
junit4是一個單元測試框架,既然是框架,這也就意味着jdk並沒有為我們提供api,因此在這裏我們就需要導入相關的依賴。
junit4是一個單元測試框架,既然是框架,這也就意味着jdk並沒有為我們提供api,因此在這裏我們就需要導入相關的依賴。
這裏的版本是4.12。當然還有最新的版本。你可以手動選擇。這裏選用的是4的版本。
案例
這裏我們要測試的功能超級簡單,就是加減乘除法的驗證。
然後我們看看如何使用junit去測試。
以上就是我們的單元測試,需要遵循一下規則:
- •每一個測試方法上使用@Test進行修飾
- •每一個測試方法必須使用public void 進行修飾
- •每一個測試方法不能攜帶參數
- •測試代碼和源代碼在兩個不同的項目路徑下
- •測試類的包應該和被測試類保持一致
- •測試單元中的每個方法必須可以獨立測試
以上的6條規則,是在使用單元測試的必須項,當然junit也建議我們在每一個測試方法名加上test前綴,表明這是一個測試方法。
assertEquals是一個斷言的規則,裏面有兩個參數,第一個參數表明我們預期的值,第二個參數表示實際運行的值。
我們運行一下測試類,就會運行每一個測試方法,我們也可以運行某一個,只需要在相應的測試方法上面右鍵運行即可。如果運行成功編輯器的控制台不會出現錯誤信息,如果有就會出現failure等信息。
運行流程
在上面的每一個測試方法中,代碼是相當簡單的,就一句話。現在我們分析一下這個測試的流程是什麼:
在上面的代碼中,我們使用了兩個測試方法,還有junit運行整個流程方法。我們可以運行一下,就會出現下面的運行結果:
從上面的結果我們來畫一張流程圖就知道了:
如果我們使用過SSM等其他的一些框架,經常會在before中添加打開數據庫等預處理的代碼,也會在after中添加關閉流等相關代碼。
註解
對於@Test,裏面有很多參數供我們去選擇。我們來認識一下
- •@Test(expected=XX.class) 這個參數表示我們期望會出現什麼異常,比如說在除法中,我們1/0會出現ArithmeticException異常,那這裏@Test(expected=ArithmeticException.class)。在測試這個除法時候依然能夠通過。
- •@Test(timeout=毫秒 ) 這個參數表示如果測試方法在指定的timeout內沒有完成,就會強制停止。
- •@Ignore 這個註解其實基本上不用,他的意思是所修飾的測試方法會被測試運行器忽略。•@RunWith 更改測試運行器。
測試套件
如果我們的項目中如果有成千上萬個方法,那此時也要有成千上萬個測試方法嘛?如果這樣junit使用起來還不如System.out呢,現在我們認識一下測試嵌套的方法,他的作用是我們把測試類封裝起來,也就是把測試類嵌套起來,只需要運行測試套件,就能運行所有的測試類了。
下面我們使用測試套件,把這些測試類嵌套在一起。
參數化設置
什麼是參數化設置呢?在一開始的代碼中我們看到,測試加法的時候是1+1,不過我們如果要測試多組數據怎麼辦?總不能一個一個輸入,然後運行測試吧。這時候我們可以把我們需要測試的數據先配置好。
這時候再去測試,只需要去選擇相應的值即可,避免了我們一個一個手動輸入。
spring boot + junit
通過spring suite tools新建工程
1. Controller
@RestController
@RequestMapping
public class BookController {
    @RequestMapping("/books")
    public String book() {
        System.out.println("controller");
        return "book";
    }
}
Test1 引入Spring上下文,但不啟動tomcat
@RunWith(SpringRunner.class)
@SpringBootTest  //引入Spring上下文 -> 上下文中的 bean 可用,自動注入
public class BookControllerTest {

    @Autowired
    private BookController bookController;  //自動注入

    @Test
    public void testControllerExists() {
        Assert.assertNotNull(bookController);
    }

}
Test2 引入Spring上下文,且啟動Tomcat 模擬生產環境,接收Http請求
package com.cloud.skyme;

import org.junit.Assert;
import org.junit.jupiter.api.Test;
import org.junit.runner.RunWith;
import org.springframework.beans.factory.annotation.Autowired;
import org.springframework.boot.test.context.SpringBootTest;
import org.springframework.boot.test.web.client.TestRestTemplate;
import org.springframework.boot.web.server.LocalServerPort;
import org.springframework.test.context.junit4.SpringRunner;

/** * @author zhangfeng * web單元測試 * */
@RunWith(SpringRunner.class)
@SpringBootTest(webEnvironment = SpringBootTest.WebEnvironment.RANDOM_PORT)
class Chapter0302junitApplicationTests {

	@LocalServerPort
    private int port;

	@Autowired
	private TestRestTemplate restTemplate;

    @Test
    public void testControllerExists() {
    	Assert.assertEquals(this.restTemplate.getForObject("http://localhost:" + port + "/books", String.class), "book");
    }

}
@RunWith(SpringRunner.class),讓測試運行於Spring測試環境,此註釋在org.springframework.test.annotation包中提供。
@SpringBootTest指定Sspring Bboot程序的測試引導入口。
TestRestTemplate是用於測試rest接口的模板類。
運行單元測試,測試上面邊構建的Wweb地址,可以看到輸出的測試結果與期望的結果相同.
運行單元測試,得到與期望相同的結果。
javascript 44行
13:31:03.722 [main] DEBUG org.springframework.test.context.BootstrapUtils - Instantiating CacheAwareContextLoaderDelegate from class [org.springframework.test.context.cache.DefaultCacheAwareContextLoaderDelegate] 13:31:03.739 [main] DEBUG org.springframework.test.context.BootstrapUtils - Instantiating BootstrapContext using constructor [public org.springframework.test.context.support.DefaultBootstrapContext(java.lang.Class,org.springframework.test.context.CacheAwareContextLoaderDelegate)] 13:31:03.801 [main] DEBUG org.springframework.test.context.BootstrapUtils - Instantiating TestContextBootstrapper for test class [com.cloud.skyme.Chapter0302junitApplicationTests] from class [org.springframework.boot.test.context.SpringBootTestContextBootstrapper] 13:31:03.830 [main] INFO org.springframework.boot.test.context.SpringBootTestContextBootstrapper - Neither @ContextConfiguration nor @ContextHierarchy found for test class [com.cloud.skyme.Chapter0302junitApplicationTests], using SpringBootContextLoader 13:31:03.837 [main] DEBUG org.springframework.test.context.support.AbstractContextLoader - Did not detect default resource location for test class [com.cloud.skyme.Chapter0302junitApplicationTests]: class path resource [com/cloud/skyme/Chapter0302junitApplicationTests-context.xml] does not exist 13:31:03.838 [main] DEBUG org.springframework.test.context.support.AbstractContextLoader - Did not detect default resource location for test class [com.cloud.skyme.Chapter0302junitApplicationTests]: class path resource [com/cloud/skyme/Chapter0302junitApplicationTestsContext.groovy] does not exist 13:31:03.838 [main] INFO org.springframework.test.context.support.AbstractContextLoader - Could not detect default resource locations for test class [com.cloud.skyme.Chapter0302junitApplicationTests]: no resource found for suffixes {-context.xml, Context.groovy}.
13:31:03.839 [main] INFO org.springframework.test.context.support.AnnotationConfigContextLoaderUtils - Could not detect default configuration classes for test class [com.cloud.skyme.Chapter0302junitApplicationTests]: Chapter0302junitApplicationTests does not declare any static, non-private, non-final, nested classes annotated with @Configuration. 13:31:03.918 [main] DEBUG org.springframework.test.context.support.ActiveProfilesUtils - Could not find an 'annotation declaring class' for annotation type [org.springframework.test.context.ActiveProfiles] and class [com.cloud.skyme.Chapter0302junitApplicationTests] 13:31:04.070 [main] DEBUG org.springframework.context.annotation.ClassPathScanningCandidateComponentProvider - Identified candidate component class: file [C:\java\workspace\microservice\chapter0302junit\target\classes\com\cloud\skyme\Chapter0302junitApplication.class] 13:31:04.073 [main] INFO org.springframework.boot.test.context.SpringBootTestContextBootstrapper - Found @SpringBootConfiguration com.cloud.skyme.Chapter0302junitApplication for test class com.cloud.skyme.Chapter0302junitApplicationTests 13:31:04.225 [main] DEBUG org.springframework.boot.test.context.SpringBootTestContextBootstrapper - @TestExecutionListeners is not present for class [com.cloud.skyme.Chapter0302junitApplicationTests]: using defaults. 13:31:04.226 [main] INFO org.springframework.boot.test.context.SpringBootTestContextBootstrapper - Loaded default TestExecutionListener class names from location [META-INF/spring.factories]: [org.springframework.boot.test.mock.mockito.MockitoTestExecutionListener, org.springframework.boot.test.mock.mockito.ResetMocksTestExecutionListener, org.springframework.boot.test.autoconfigure.restdocs.RestDocsTestExecutionListener, org.springframework.boot.test.autoconfigure.web.client.MockRestServiceServerResetTestExecutionListener, org.springframework.boot.test.autoconfigure.web.servlet.MockMvcPrintOnlyOnFailureTestExecutionListener, org.springframework.boot.test.autoconfigure.web.servlet.WebDriverTestExecutionListener, org.springframework.boot.test.autoconfigure.webservices.client.MockWebServiceServerTestExecutionListener, org.springframework.test.context.web.ServletTestExecutionListener, org.springframework.test.context.support.DirtiesContextBeforeModesTestExecutionListener, org.springframework.test.context.support.DependencyInjectionTestExecutionListener, org.springframework.test.context.support.DirtiesContextTestExecutionListener, org.springframework.test.context.transaction.TransactionalTestExecutionListener, org.springframework.test.context.jdbc.SqlScriptsTestExecutionListener, org.springframework.test.context.event.EventPublishingTestExecutionListener] 13:31:04.243 [main] DEBUG org.springframework.boot.test.context.SpringBootTestContextBootstrapper - Skipping candidate TestExecutionListener [org.springframework.test.context.transaction.TransactionalTestExecutionListener] due to a missing dependency. Specify custom listener classes or make the default listener classes and their required dependencies available. Offending class: [org/springframework/transaction/interceptor/TransactionAttributeSource] 13:31:04.244 [main] DEBUG org.springframework.boot.test.context.SpringBootTestContextBootstrapper - Skipping candidate TestExecutionListener [org.springframework.test.context.jdbc.SqlScriptsTestExecutionListener] due to a missing dependency. Specify custom listener classes or make the default listener classes and their required dependencies available. Offending class: [org/springframework/transaction/interceptor/TransactionAttribute] 13:31:04.244 [main] INFO org.springframework.boot.test.context.SpringBootTestContextBootstrapper - Using TestExecutionListeners: [org.springframework.test.context.web.ServletTestExecutionListener@7133da86, org.springframework.test.context.support.DirtiesContextBeforeModesTestExecutionListener@3232a28a, org.springframework.boot.test.mock.mockito.MockitoTestExecutionListener@73e22a3d, org.springframework.boot.test.autoconfigure.SpringBootDependencyInjectionTestExecutionListener@47faa49c, org.springframework.test.context.support.DirtiesContextTestExecutionListener@28f2a10f, org.springframework.test.context.event.EventPublishingTestExecutionListener@f736069, org.springframework.boot.test.mock.mockito.ResetMocksTestExecutionListener@6da21078, org.springframework.boot.test.autoconfigure.restdocs.RestDocsTestExecutionListener@7fee8714, org.springframework.boot.test.autoconfigure.web.client.MockRestServiceServerResetTestExecutionListener@4229bb3f, org.springframework.boot.test.autoconfigure.web.servlet.MockMvcPrintOnlyOnFailureTestExecutionListener@56cdfb3b, org.springframework.boot.test.autoconfigure.web.servlet.WebDriverTestExecutionListener@2b91004a, org.springframework.boot.test.autoconfigure.webservices.client.MockWebServiceServerTestExecutionListener@20ccf40b] 13:31:04.250 [main] DEBUG org.springframework.test.context.support.AbstractDirtiesContextTestExecutionListener - Before test class: context [DefaultTestContext@6cd28fa7 testClass = Chapter0302junitApplicationTests, testInstance = [null], testMethod = [null], testException = [null], mergedContextConfiguration = [WebMergedContextConfiguration@614ca7df testClass = Chapter0302junitApplicationTests, locations = '{}', classes = '{class com.cloud.skyme.Chapter0302junitApplication}', contextInitializerClasses = '[]', activeProfiles = '{}', propertySourceLocations = '{}', propertySourceProperties = '{org.springframework.boot.test.context.SpringBootTestContextBootstrapper=true, server.port=0}', contextCustomizers = set[org.springframework.boot.test.context.filter.ExcludeFilterContextCustomizer@3b07a0d6, org.springframework.boot.test.json.DuplicateJsonObjectContextCustomizerFactory$DuplicateJsonObjectContextCustomizer@14d3bc22, org.springframework.boot.test.mock.mockito.MockitoContextCustomizer@0, org.springframework.boot.test.web.client.TestRestTemplateContextCustomizer@45b9a632, org.springframework.boot.test.autoconfigure.properties.PropertyMappingContextCustomizer@0, org.springframework.boot.test.autoconfigure.web.servlet.WebDriverContextCustomizerFactory$Customizer@5e316c74, org.springframework.boot.test.context.SpringBootTestArgs@1], resourceBasePath = 'src/main/webapp', contextLoader = 'org.springframework.boot.test.context.SpringBootContextLoader', parent = [null]], attributes = map['org.springframework.test.context.web.ServletTestExecutionListener.activateListener' -> false]], class annotated with @DirtiesContext [false] with mode [null]. 13:31:04.267 [main] DEBUG org.springframework.test.context.support.DependencyInjectionTestExecutionListener - Performing dependency injection for test context [[DefaultTestContext@6cd28fa7 testClass = Chapter0302junitApplicationTests, testInstance = com.cloud.skyme.Chapter0302junitApplicationTests@31fa1761, testMethod = [null], testException = [null], mergedContextConfiguration = [WebMergedContextConfiguration@614ca7df testClass = Chapter0302junitApplicationTests, locations = '{}', classes = '{class com.cloud.skyme.Chapter0302junitApplication}', contextInitializerClasses = '[]', activeProfiles = '{}', propertySourceLocations = '{}', propertySourceProperties = '{org.springframework.boot.test.context.SpringBootTestContextBootstrapper=true, server.port=0}', contextCustomizers = set[org.springframework.boot.test.context.filter.ExcludeFilterContextCustomizer@3b07a0d6, org.springframework.boot.test.json.DuplicateJsonObjectContextCustomizerFactory$DuplicateJsonObjectContextCustomizer@14d3bc22, org.springframework.boot.test.mock.mockito.MockitoContextCustomizer@0, org.springframework.boot.test.web.client.TestRestTemplateContextCustomizer@45b9a632, org.springframework.boot.test.autoconfigure.properties.PropertyMappingContextCustomizer@0, org.springframework.boot.test.autoconfigure.web.servlet.WebDriverContextCustomizerFactory$Customizer@5e316c74, org.springframework.boot.test.context.SpringBootTestArgs@1], resourceBasePath = 'src/main/webapp', contextLoader = 'org.springframework.boot.test.context.SpringBootContextLoader', parent = [null]], attributes = map['org.springframework.test.context.web.ServletTestExecutionListener.activateListener' -> false]]].
13:31:04.306 [main] DEBUG org.springframework.test.context.support.TestPropertySourceUtils - Adding inlined properties to environment: {spring.jmx.enabled=false, org.springframework.boot.test.context.SpringBootTestContextBootstrapper=true, server.port=0}

  .   ____          _            __ _ _
 /\\ / ___'_ __ _ _(_)_ __ __ _ \ \ \ \ ( ( )\___ | '_ | '_| | '_ \/ _` | \ \ \ \ \\/ ___)| |_)| | | | | || (_| | ) ) ) ) ' |____| .__|_| |_|_| |_\__, | / / / / =========|_|==============|___/=/_/_/_/ :: Spring Boot :: (v2.3.1.RELEASE) 2020-06-28 13:31:04.940 INFO 8376 --- [ main] c.c.s.Chapter0302junitApplicationTests : Starting Chapter0302junitApplicationTests on WIN-55FHBQI56BD with PID 8376 (started by Administrator in C:\java\workspace\microservice\chapter0302junit) 2020-06-28 13:31:04.942 INFO 8376 --- [ main] c.c.s.Chapter0302junitApplicationTests : No active profile set, falling back to default profiles: default 2020-06-28 13:31:09.134 INFO 8376 --- [ main] o.s.b.w.embedded.tomcat.TomcatWebServer : Tomcat initialized with port(s): 0 (http) 2020-06-28 13:31:09.160 INFO 8376 --- [ main] o.apache.catalina.core.StandardService : Starting service [Tomcat] 2020-06-28 13:31:09.161 INFO 8376 --- [ main] org.apache.catalina.core.StandardEngine : Starting Servlet engine: [Apache Tomcat/9.0.36] 2020-06-28 13:31:09.372 INFO 8376 --- [ main] o.a.c.c.C.[Tomcat].[localhost].[/] : Initializing Spring embedded WebApplicationContext 2020-06-28 13:31:09.372 INFO 8376 --- [ main] w.s.c.ServletWebServerApplicationContext : Root WebApplicationContext: initialization completed in 4316 ms 2020-06-28 13:31:10.029 INFO 8376 --- [ main] o.s.s.concurrent.ThreadPoolTaskExecutor : Initializing ExecutorService 'applicationTaskExecutor' 2020-06-28 13:31:10.655 INFO 8376 --- [ main] o.s.b.w.embedded.tomcat.TomcatWebServer : Tomcat started on port(s): 59724 (http) with context path '' 2020-06-28 13:31:10.673 INFO 8376 --- [ main] c.c.s.Chapter0302junitApplicationTests : Started Chapter0302junitApplicationTests in 6.362 seconds (JVM running for 8.218) 2020-06-28 13:31:11.423 INFO 8376 --- [o-auto-1-exec-1] o.a.c.c.C.[Tomcat].[localhost].[/] : Initializing Spring DispatcherServlet 'dispatcherServlet' 2020-06-28 13:31:11.423 INFO 8376 --- [o-auto-1-exec-1] o.s.web.servlet.DispatcherServlet : Initializing Servlet 'dispatcherServlet' 2020-06-28 13:31:11.461 INFO 8376 --- [o-auto-1-exec-1] o.s.web.servlet.DispatcherServlet : Completed initialization in 37 ms controller 2020-06-28 13:31:13.497 INFO 8376 --- [extShutdownHook] o.s.s.concurrent.ThreadPoolTaskExecutor : Shutting down ExecutorService 'applicationTaskExecutor'
這樣,一個web應用從構建到單元測試就都已經完成了,可見,構建一個Spring Web MVC的應用就是如此簡單。
本站聲明:網站內容來源於博客園,如有侵權,請聯繫我們,我們將及時處理
【其他文章推薦】
※為什麼 USB CONNECTOR 是電子產業重要的元件?
※網頁設計一頭霧水該從何著手呢? 台北網頁設計公司幫您輕鬆架站!
※台北網頁設計公司全省服務真心推薦
※想知道最厲害的網頁設計公司"嚨底家"!
※新北清潔公司,居家、辦公、裝潢細清專業服務
※推薦評價好的iphone維修中心
 《富比世》報導,當特斯拉 Model S 電動車上市時,Gogoro 創辦人陸學森原本想要擁有一輛,但是第一個問題是在台灣沒有上市,就算進口一輛,台灣的住處大樓沒有獨立車庫,無法安裝幫 Model S 電動車充電的充電座,若非要開 Model S 電動車,只能在公司裝設充電座在公司充電,但這樣一來,週末就無法開出去兜風,豈不是大煞風景,最後陸學森在女友說服下,還是打退堂鼓。 這個困擾,其實也是各國所有大樓住戶的困擾,雖然以美國來說,如加州等地區路上設有充電站,不過電動車車主總是想要在家把電充飽飽才開出門,以免半路沒電,據美國能源部統計,80% 電動車都是在家充電,要是在家不能充電,購買電動車的意願就會降低,ChargePoint 執行長帕斯奎‧羅曼諾(Pasquale Romano)表示,除了少數例外,住大樓的人通常不買電動車,正是因為如此。 那要如何改善這個情況?羅曼諾認為,過去為了讓少數電動車主能在大樓停車場充電,大樓業主得全數自掏腰包在停車場設置充電座,投資風險很高,因此意願低落,但大樓業主如果並不用負擔充電座的設置費用,像大樓附設的投幣式自助洗衣機一樣,由業者來設置機器,這樣就成了。