一 OpenShift網絡實現
1.1 軟件定義網絡(SDN)
默認情況下,Docker網絡使用僅使用主機虛機網橋bridge,主機內的所有容器都連接至該網橋。連接到此橋的所有容器都可以彼此通信,但不能與不同主機上的容器通信。通常,這種通信使用端口映射來處理,其中容器端口綁定到主機上的端口,所有通信都通過物理主機上的端口路由。
當有大量主機和容器時,使用此模式,需要手動管理所有端口綁定非常不現實。
為了支持跨集群的容器之間的通信,OpenShift容器平台使用了軟件定義的網絡(SDN)方法。軟件定義的網絡是一種網絡模型,它通過幾個網絡層的抽象來管理網絡服務。SDN將處理流量的軟件(稱為控制平面)和路由流量的底層機制(稱為數據平面)解耦。SDN支持控制平面和數據平面之間的通信。
在OpenShift Container Platform 3.9中(之後簡稱OCP),管理員可以為pod網絡配置三個SDN插件:
- ovs-subnet:默認插件,子網提供了一個flat pod網絡,其中每個pod可以與其他pod和service通信。
- ovs-multitenant:該為pod和服務提供了額外的隔離層。當使用此插件時,每個project接收一個惟一的虛擬網絡ID (VNID),該ID標識來自屬於該project的pod的流量。通過使用VNID,來自不同project的pod不能與其他project的pod和service通信。
- ovs-networkpolicy:此插件允許管理員使用NetworkPolicy對象定義自己的隔離策略。
cluster network由OpenShift SDN建立和維護,它使用Open vSwitch創建overlay網絡,master節點不能通過集群網絡訪問容器,除非master同時也為node節點。
注意:VNID為0的project可以與所有其他pod通信,在OpenShift容器平台中,默認項目的VNID為0。
1.2 Kubernetes SDN Pod
在默認的OpenShift容器平台安裝中,每個pod都有一個惟一的IP地址。pod中的所有容器都對外表現在相同的主機上。給每個pod提供自己的IP地址意味着,在端口分配、網絡、DNS、負載平衡、應用程序配置和遷移方面,pod被視為物理主機或虛擬機的獨立節點(僅從網絡層面看待)。
Kubernetes提供了service的概念,在任何OpenShift應用程序中,service都是必不可少的資源。service充當一個或多個pod前的負載平衡器。該service提供一個固定的IP地址,並且允許與pod通信,而不必跟蹤單獨的pod IP地址。
大多數實際應用程序都不是作為單個pod運行的。它們需要水平伸縮,這樣應用程序就可以在許多pod上運行,以滿足不斷增長的用戶需求。在OpenShift集群中,pod不斷地在集群中的節點之間創建和銷毀。每次創建pod時,它們都會獲得一個不同的IP地址。一個service提供一個單獨的、惟一的IP地址供其他pod使用,而不依賴於pod運行的節點,因此一個pod不必一定需要發現另一個pod的IP地址。客戶端通過service的請求在不同pod之間實現負載均衡。
1.3 Kubernetes SDN Service
service背後運行的一組pod由OpenShift容器平台自動管理。每個service都被分配了一個唯一的IP地址供客戶端連接。這個IP地址也來自OpenShift SDN,它與pod的內部網絡不同,也只在集群中可見。每個與selector匹配的pod都作為endpoint添加到service資源中。當創建和銷毀pods時,service後面的endpoint將自動更新。
service yaml語法:
  1 - apiVersion: v1
  2   kind: Service			#聲明資源類型
  3   metadata:
  4     labels:
  5       app: hello-openshift
  6       name: hello-openshift	#服務的唯一名稱
  7   spec:
  8     ports:,
  9     - name: 8080-tcp
 10       port: 8080		#服務對外公開的端口客戶機連接到服務端口
 11       protocol: TCP
 12       targetPort: 8080		#targetPort屬性必須匹配pod容器定義中的containerPort,服務將數據包轉發到pod中定義的目標端口。
 13     selector:			#該服務使用selector屬性查找要轉發數據包的pod。目標pod的元數據中需要有匹配的標籤。如果服務發現多個具有匹配標籤的pod,它將在它們之間實現負載
 14       app: hello-openshift
 15       deploymentconfig: hello-openshift
1.4 service對外暴露
默認情況下,pod和service IP地址不能從OpenShift集群外部訪問。對於需要從OpenShift集群外部訪問服務的應用程序,可以通過以下三種方式。
HostPort/HostNetwork:在這種方法中,client可以通過主機上的網絡端口直接訪問集群中的應用程序pod。應用程序pod中的端口被綁定到運行該pod的主機上的端口。這種方法在集群中運行大量pod時,存在端口衝突的風險。
NodePort:這是一種較老的基於Kubernetes的方法,通過綁定到node主機上的可用端口,將service公開給外部客戶端,然後node主機代理到service IP地址的連接。使用oc edit svc命令編輯服務屬性,指定NodePort的類型,併為NodePort屬性提供端口值。OpenShift然後通過node主機的公共IP地址和nodePort中設置的端口值代理到服務的連接。這種方法支持非http通信。
OpenShift routes:OpenShift中的推薦方式。它使用唯一的URL公開服務。使用oc expose命令公開用於外部訪問的服務,或者從OpenShift web控制台公開服務。在這種方法中,目前只支持HTTP、HTTPS、TLS whit SNI和WebSockets。
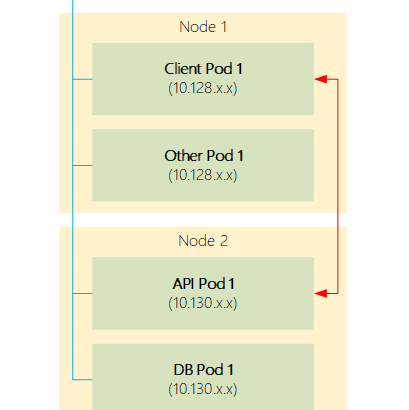
附圖:显示了NodePort服務如何允許外部訪問Kubernetes服務。
service nodeport yaml語法:
  1 apiVersion: v1
  2 kind: Service
  3 metadata:
  4 ...
  5 spec:
  6   ports:
  7   - name: 3306-tcp
  8     port: 3306
  9     protocol: TCP
 10     targetPort: 3306	#pod目標端口,即需要和pod定義的端口匹配
 11     nodePort: 30306	#OpenShift集群中主機上的端口,暴露給外部客戶端
 12   selector:
 13     app: mysqldb
 14     deploymentconfig: mysqldb
 15     sessionAffinity: None
 16   type: NodePort	#服務的類型,如NodePort
 17 ...
OpenShift將服務綁定到服務定義的nodePort屬性中定義的值,併為集群中所有node(包括master)上的流量打開該端口。外部客戶端可以連接到node端口上的任何節點的公共IP地址來訪問服務。請求會在服務後面的各個pod之間實現輪詢的負載平衡。
OpenShift route主要限於HTTP和HTTPS流量,但是節點端口可以處理非HTTP流量,當設置好公開的端口后,客戶機可以使用TCP或UDP的協議連接到該端口。
提示:缺省情況下,NodePort屬性的端口號限制在30000-32767之間,可通過在OpenShift主配置文件中配置範圍。
node port在集群中的所有node上都是打開的,包括master節點。如果沒有提供node端口值,OpenShift將自動在配置範圍內分配一個隨機端口。
1.5 pod訪問外部網絡
pod可以使用其主機的地址與外部網絡通信。只要主機能夠解析pod需要到達的服務器,pod就可以使用網絡地址轉換(network address translation, NAT)機制與目標服務器通信。
二 OpenShift SDN練習
2.1 前置準備
[student@workstation ~]$ lab install-prepare setup
[student@workstation ~]$ cd /home/student/do280-ansible
[student@workstation do280-ansible]$ ./install.sh
提示:以上準備為部署一個正確的OpenShift平台。
2.2 本練習準備
[student@workstation ~]$ lab openshift-network setup #準備本實驗環境
2.3 創建應用
[student@workstation ~]$ oc login -u developer -p redhat https://master.lab.example.com
[student@workstation ~]$ oc new-project network-test #創建project
[student@workstation ~]$ oc new-app –name=hello -i php:7.0 http://registry.lab.example.com/scaling
[student@workstation ~]$ oc get pods
NAME READY STATUS RESTARTS AGE
hello-1-build 1/1 Running 0 8s
2.4 擴展應用
[student@workstation ~]$ oc scale –replicas=2 dc hello
[student@workstation ~]$ oc get pods -o wide
NAME READY STATUS RESTARTS AGE IP NODE
hello-1-kszfh 1/1 Running 0 11m 10.128.0.21 node1.lab.example.com
hello-1-q7wk2 1/1 Running 0 11m 10.129.0.37 node2.lab.example.com
2.5 測試訪問
[student@workstation ~]$ curl http://10.128.0.21:8080
curl: (7) Failed connect to 10.128.0.21:8080; Network is unreachable
[root@node1 ~]# curl http://10.128.0.21:8080
  1 <html>
  2  <head>
  3   <title>PHP Test</title>
  4  </head>
  5  <body>
  6  <br/> Server IP: 10.128.0.21
  7  </body>
  8 </html>
  9 [root@node1 ~]# curl http://10.129.0.37:8080
 10 <html>
 11  <head>
 12   <title>PHP Test</title>
 13  </head>
 14  <body>
 15  <br/> Server IP: 10.129.0.37
 16  </body>
 17 </html>
提示:默認情況下,pod的ip屬於內部,集群內部節點可以使用pod ip訪問,集群外部(如workstation)無法訪問。
[student@workstation ~]$ oc get svc hello
NAME TYPE CLUSTER-IP EXTERNAL-IP PORT(S) AGE
hello ClusterIP 172.30.253.212 <none> 8080/TCP 14m
[student@workstation ~]$ curl http://172.30.253.212:8080
curl: (7) Failed connect to 172.30.253.212:8080; Network is unreachable
[root@node1 ~]# curl http://172.30.253.212:8080 #驗證負載均衡
  1 <html>
  2  <head>
  3   <title>PHP Test</title>
  4  </head>
  5  <body>
  6  <br/> Server IP: 10.128.0.21
  7  </body>
  8 </html>
  9 [root@node1 ~]# curl http://172.30.253.212:8080		#驗證負載均衡
 10 <html>
 11  <head>
 12   <title>PHP Test</title>
 13  </head>
 14  <body>
 15  <br/> Server IP: 10.129.0.37
 16  </body>
 17 </html>
提示:默認情況下,cluster的ip屬於內部,集群內部節點可以使用cluster ip訪問,集群外部(如workstation)無法訪問。
2.6 檢查服務
[student@workstation ~]$ oc describe svc hello
Name: hello
Namespace: network-test
Labels: app=hello
Annotations: openshift.io/generated-by=OpenShiftNewApp
Selector: app=hello,deploymentconfig=hello
Type: ClusterIP
IP: 172.30.253.212
Port: 8080-tcp 8080/TCP
TargetPort: 8080/TCP
Endpoints: 10.128.0.21:8080,10.129.0.37:8080
Session Affinity: None
Events: <none>
解釋:
endpoint:显示請求路由到的pod IP地址列表。當pod有更新后,endpoint將自動更新。
Selector:OpenShift使用為pods定義的選擇器和標籤來使用給定的集群IP,以便實現應用的負載均衡。如上所示為OpenShift將此服務的請求路由到所有標記為app=hello和deploymentconfig=hello的pod。
2.7 檢查pod
[student@workstation ~]$ oc describe pod hello-1-kszfh
2.8 設置外部訪問
使用NodePort方式設置外部訪問。
[student@workstation ~]$ oc edit svc hello
  1 apiVersion: v1
  2 kind: Service
  3 metadata:
  4   annotations:
  5     openshift.io/generated-by: OpenShiftNewApp
  6   creationTimestamp: 2019-07-19T15:50:09Z
  7   labels:
  8     app: hello
  9   name: hello
 10   namespace: network-test
 11   resourceVersion: "24496"
 12   selfLink: /api/v1/namespaces/network-test/services/hello
 13   uid: e348e2a3-aa3c-11e9-b230-52540000fa0a
 14 spec:
 15   clusterIP: 172.30.253.212
 16   ports:
 17   - name: 8080-tcp
 18     port: 8080
 19     protocol: TCP
 20     targetPort: 8080
 21     nodePort: 30800
 22   selector:
 23     app: hello
 24     deploymentconfig: hello
 25   sessionAffinity: None
 26   type: NodePort
 27 status:
[student@workstation ~]$ oc describe svc hello
Name: hello
Namespace: network-test
Labels: app=hello
Annotations: openshift.io/generated-by=OpenShiftNewApp
Selector: app=hello,deploymentconfig=hello
Type: NodePort #驗證是否為NodePort
IP: 172.30.253.212
Port: 8080-tcp 8080/TCP
TargetPort: 8080/TCP
NodePort: 8080-tcp 30800/TCP
Endpoints: 10.128.0.21:8080,10.129.0.37:8080
Session Affinity: None
External Traffic Policy: Cluster
Events: <none>
2.9 驗證外部訪問
[student@workstation ~]$ curl http://node1.lab.example.com:30800
  1 <html>
  2  <head>
  3   <title>PHP Test</title>
  4  </head>
  5  <body>
  6  <br/> Server IP: 10.128.0.21
  7  </body>
  8 </html>
[student@workstation ~]$ curl http://node2.lab.example.com:30800
  1 <html>
  2  <head>
  3   <title>PHP Test</title>
  4  </head>
  5  <body>
  6  <br/> Server IP: 10.129.0.37
  7  </body>
  8 </html>
2.10 使用pod shell
[student@workstation ~]$ oc rsh hello-1-kszfh #使用pod的shell
sh-4.2$ curl http://services.lab.example.com
三 OpenShift router
3.1 OpenShift route概述
OpenShift service允許在OpenShift中的pod之間進行網絡訪問;
OpenShift routes允許從OpenShift外部對pods進行網絡訪問。
路由概念上是通過連接公網IP和DNS主機名訪問內網service IP。在實踐中,為了提高性能和減少延遲,OpenShift route通過OpenShift創建的網絡直接連接到pod,使用該服務只查找endpoint,service只是協助查詢Pod地址。
OpenShift 路由功能由router service提供,該服務在OpenShift實例中作為一個pod運行,可以像任何其他常規pod一樣伸縮和複製。router service基於開源軟件HAProxy實現。
OpenShift route配置的公共DNS主機名需要指向運行router的節點的公共IP地址。route pod與常規應用程序pod不同,它綁定到節點的公共IP地址,而不是內部pod網絡。這通常使用DNS通配符配置。
  1 - apiVersion: v1
  2   kind: Route				#聲明為route類型
  3   metadata:
  4     creationTimestamp: null
  5     labels:
  6       app: quoteapp
  7     name: quoteapp				#路由器名字
  8   spec:
  9     host: quoteapp.apps.lab.example.com	#與route關聯的FQDN,必須預先配置,以解析到OpenShift route pod運行的節點的IP地址
 10     port:
 11       targetPort: 8080-tcp
 12   to:					#一個對象,該對象聲明此route指向的資源類型(在本例中是OpenShift service),以及該資源的名稱(quoteapp)
 13     kind: Service
 14     name: quoteapp
提示:不同資源類型可以使用相同的名稱,如一個名為quoteapp的route可以指向一個名為quoteapp的service。
service通過selector與pod的label進行匹配,router通過name與service的name匹配。
3.2 創建route
創建route最簡單和推薦的方法是使用oc expose命令,將service資源名稱作為輸入參數。–name選項可用於控制route資源的名稱,–hostname選項可用於為route提供自定義主機名。
示例:
[user@demo ~]$ oc expose service quote \
–name quote –hostname=quoteapp.apps.lab.example.com
從模板或不帶–hostname參數的oc expose命令創建的路由,命名方式為:
<route-name>-<project-name>.<default-domain>
解釋
route-name:route的名稱,或原始資源的名稱;
project-name:包含資源的項目的名稱;
default-domain:該值是在OpenShift master上配置的,它對應於作為安裝OpenShift先決條件列出的通配符DNS域。
例如,在OpenShift集群中名為test的project中創建一條名為quote的路由,其中子域為apps.example.com,則FQDN為quote-test.apps.example.com
注意:承載通配符域的DNS服務器不知道任何route的主機名,它只將任何名稱解析為已配置的ip。只有OpenShift route知道route主機名,將每個主機都當作HTTP虛擬主機。無效的通配符域主機名,即不與任何route對應的主機名,將被OpenShift路由器阻塞。
通過向oc create提供JSON或YAML資源定義文件,也可以像其他OpenShift資源一樣創建route資源。
oc new-app命令在從容器映像、Dockerfiles或應用程序源代碼構建pod時不創建route資源。
oc new-app命令不知道pod是否打算從OpenShift實例外部訪問。當oc new-app命令從模板創建一組pod時,沒有什麼可以阻止模板將路由資源包含到應用程序中。
3.3 查找默認subdomain
默認路由子域是在OpenShift配置文件master-config.yaml中的routingConfig字段中定義,使用關鍵字subdomain。
routingConfig:
subdomain: apps.example.com
默認情況下,OpenShift HAProxy route綁定到主機端口80 (HTTP)和443 (HTTPS)。route必須放置在這些端口不使用的節點上。或者,可以通過設置ROUTER_SERVICE_HTTP_PORT和ROUTER_SERVICE_HTTPS_PORT環境變量來配置路由器監聽其他端口.
路由器支持以下協議:
- HTTP
- HTTPS with SNI
- WebSockets
- TLS with SNI
3.4 routing類型和選項
路由可以是安全的,也可以是非安全的。安全route提供了使用幾種類型的TLS方式來向客戶端提供證書的能力。不安全路由是最容易配置的,因為它們不需要密鑰或證書,但是安全路由會加密進出pod的流量。
在創建安全路由之前,需要生成TLS證書。
示例:如下步驟創建名為test.example.com的路由創建一個簡單的自簽名證書。
- 使用openssl命令創建私鑰:
[user@demo ~]$ openssl genrsa -out example.key 2048
- 使用生成的私鑰創建證書籤名請求(CSR):
[user@demo ~]$ openssl req -new -key example.key -out example.csr -subj “/C=US/ST=CA/L=Los Angeles/O=Example/OU=IT/CN=test.example.com”
- 使用密鑰和CSR生成證書
[user@demo ~]$ openssl x509 -req -days 366 -in example.csr -signkey example.key -out example.crt
- 當證書準備好時,創建一個edge-terminated的路由
[user@demo ~]$ oc create route edge –service=test \
–hostname=test.example.com \
–key=example.key –cert=example.crt
3.5 通配符子域
wildcard policy允許用戶定義domain中所有主機的route。route可以使用wildcardPolicy字段將wildcard policy指定為其配置的一部分。OpenShift路由器支持通配符路由,通過設置路由器部署配置中的ROUTER_ALLOW_WILDCARD_ROUTES環境變量為true,從而可將wildcardPolicy屬性設置為子域的任何route都由路由器提供服務。路由器根據route的通配符策略暴露相關的service。
示例:如下下示例表示對於三個不同的路由,a.lab.example.com、b.lab.example.com和c.lab.example.com,它們應該路由到一個名為test的OpenShift服務,可以使用通配符策略配置路由。
- 將路由器作為集群管理用戶處理通配符路由
[user@demo ~]$ oc scale dc/router –replicas=0
[user@demo ~]$ oc set env dc/router ROUTER_ALLOW_WILDCARD_ROUTES=true
[user@demo ~]$ oc scale dc/router –replicas=1
- 使用通配符策略創建新路由
[user@demo ~]$ oc expose svc test –wildcard-policy=Subdomain \
–hostname=’www.lab.example.com’
3.6 管理route
在master節點上,在default中查找router
[root@master]# oc project default
[root@master]# oc get pods
在master節點上,檢查路由器環境變量,以找到運行在pod中的HAProxy進程的連接參數
[root@master]# oc env pod router-1-32toa –list | tail -n 6
提示:當創建路由器時,STATS_PASSWORD變量中的密碼是隨機生成的。STATS_USERNAME和STATS_PORT變量有固定的默認值,但是它們都可以在路由器創建時更改。
在router運行的節點上,配置firewall-cmd以打開STATS_PORT變量指定的端口。
[root@node ~]# firewall-cmd –permanent –zone=public –add-port=1936
[root@node ~]# firewall-cmd –reload
打開web瀏覽器並訪問HAProxy statistics URL 為 http://nodeIP:STATS_PORT/。
在User Name字段中輸入STATS_USERNAME的值,在Password字段中輸入STATS_PASSWORD的值,然後單擊OK。則會显示的HAProxy metrics頁面。
四 創建Route練習
4.1 前置準備
準備完整的OpenShift集群,參考《003.OpenShift網絡》2.1。
4.2 本練習準備
[student@workstation ~]$ lab secure-route setup #準備本實驗環境
4.3 創建應用
[student@workstation ~]$ oc login -u developer -p redhat https://master.lab.example.com
[student@workstation ~]$ oc new-project secure-route #創建project
[student@workstation ~]$ oc new-app –docker-image=registry.lab.example.com/openshift/hello-openshift –name=hello
[student@workstation ~]$ oc get pods -o wide
NAME READY STATUS RESTARTS AGE IP NODE
hello-1-wwgkr 1/1 Running 0 20s 10.129.0.38 node2.lab.example.com
4.4 創建TLS證書
[student@workstation ~]$ cd /home/student/DO280/labs/secure-route/ #使用環境中的腳本快速創建TLS自簽名證書
[student@workstation secure-route]$ ./create-cert.sh
4.5 創建route
[student@workstation secure-route]$ ll
-rw-r–r–. 1 student student 550 Aug 7 2018 commands.txt
-rwxr-xr-x. 1 student student 506 Jul 19 2018 create-cert.sh
-rw-rw-r–. 1 student student 1224 Jul 20 10:43 hello.apps.lab.example.com.crt
-rw-rw-r–. 1 student student 1017 Jul 20 10:43 hello.apps.lab.example.com.csr
-rw-rw-r–. 1 student student 1679 Jul 20 10:43 hello.apps.lab.example.com.key
[student@workstation secure-route]$ oc create route edge \
> –service=hello –hostname=hello.apps.lab.example.com \
> –key=hello.apps.lab.example.com.key \
> –cert=hello.apps.lab.example.com.crt
4.6 確認驗證
[student@workstation secure-route]$ oc get route
NAME HOST/PORT PATH SERVICES PORT TERMINATION WILDCARD
hello hello.apps.lab.example.com hello 8080-tcp edge None
[student@workstation secure-route]$ oc get route hello -o yaml #以yaml格式查看route
4.7 測試訪問
[student@workstation ~]$ curl http://hello.apps.lab.example.com #以http形式訪問會無法轉發至後端任何pod
  1 ……
  2       <h1>Application is not available</h1>
  3       <p>The application is currently not serving requests at this endpoint. It may not have been started or is still starting.</p>
  4 ……
[student@workstation ~]$ curl -k -vvv https://hello.apps.lab.example.com #以https形式訪問
  1 ……
  2 Hello OpenShift!
  3 * Connection #0 to host hello.apps.lab.example.com left intact
  4 ……
4.8 非安全形式訪問
由於加密的通信在路由器上終止,並且請求使用不安全的HTTP轉發到pods,所以可以使用pod IP地址通過普通HTTP訪問應用程序。為此,請使用oc get pods -o命令中指定的IP地址。
[student@workstation secure-route]$ oc get pod -o wide
NAME READY STATUS RESTARTS AGE IP NODE
hello-1-wwgkr 1/1 Running 0 21m 10.129.0.38 node2.lab.example.com
[root@node1 ~]# curl -vvv http://10.129.0.38:8080
五 OpenShift網絡綜合實驗
5.1 前置準備
準備完整的OpenShift集群,參考《003.OpenShift網絡》2.1。
5.2 本練習準備
[student@workstation ~]$ lab network-review setup
5.3 驗證所需資源
[student@workstation ~]$ oc login -u developer -p redhat \
https://master.lab.example.com
[student@workstation ~]$ oc get pod -o wide
NAME READY STATUS RESTARTS AGE IP NODE
hello-openshift-1-6ls8z 1/1 Running 0 2m 10.128.0.23 node1.lab.example.com
[student@workstation ~]$ oc get svc
NAME TYPE CLUSTER-IP EXTERNAL-IP PORT(S) AGE
hello-openshift ClusterIP 172.30.124.237 <none> 8080/TCP,8888/TCP 2m
[student@workstation ~]$ oc get route
NAME HOST/PORT PATH SERVICES PORT TERMINATION WILDCARD
hello-openshift hello.apps.lab.example.com hello-opensift 8080-tcp None
5.4 測試訪問
[student@workstation ~]$ curl http://hello.apps.lab.example.com #測試http訪問
  1 ……
  2       <h1>Application is not available</h1>
  3       <p>The application is currently not serving requests at this endpoint. It may not have been started or is still starting.</p>
  4 ……
[root@node1 ~]# curl http://10.128.0.23:8080 #測試使用pod ip訪問
Hello OpenShift!
[root@node1 ~]# curl http://172.30.124.237:8080 #測試使用cluster ip訪問
curl: (7) Failed connect to 172.30.124.237:8080; Connection refused
5.5 TS cluster故障
[student@workstation ~]$ oc describe svc hello-openshift -n network-review
提示:由上可知,沒有endpoint,endpoint是使用selector對pod的label進行匹配。
[student@workstation ~]$ oc describe pod hello-openshift-1-6ls8z #查看pod詳情
故障點:由上可知,Selector的label不一致,則沒有標記為hello_openshift的pod能進行匹配。
[student@workstation ~]$ oc edit svc hello-openshift
  1 ……
  2   selector:
  3     app: hello-openshift
  4     deploymentconfig: hello-openshift
  5   sessionAffinity: None
  6 ……
5.6 測試訪問
[root@node1 ~]# curl http://10.128.0.23:8080 #測試使用pod ip訪問
Hello OpenShift!
[root@node1 ~]# curl http://172.30.124.237:8080 #再次測試
Hello OpenShift!
[student@workstation ~]$ curl http://hello.apps.lab.example.com #測試http訪問
  1 ……
  2       <h1>Application is not available</h1>
  3       <p>The application is currently not serving requests at this endpoint. It may not have been started or is still starting.</p>
  4 ……
5.7 TS route故障
[student@workstation ~]$ oc describe route hello-openshift
故障點:由上可知,此路由沒有endpoint。即對route的URL請求沒有後端endpoint進行響應。路由器查詢service的endpoint,並註冊有效的endpoint來實現負載平衡。同時發現service名稱中有一個拼寫錯誤,它應該是hello-openshift。
[student@workstation ~]$ oc edit route hello-openshift
  1 ……
  2 spec:
  3   host: hello.apps.lab.example.com
  4   port:
  5     targetPort: 8080-tcp
  6   to:
  7     kind: Service
  8     name: hello-openshift
  9     weight: 100
 10   wildcardPolicy: None
 11 ……
[root@node1 ~]# curl http://hello.apps.lab.example.com #再次測試
Hello OpenShift!
5.8 確認驗證
[student@workstation ~]$ lab network-review grade #使用腳本判斷 本站聲明:網站內容來源於博客園,如有侵權,請聯繫我們,我們將及時處理
【其他文章推薦】
※帶您來了解什麼是 USB CONNECTOR ?
※自行創業缺乏曝光? 網頁設計幫您第一時間規劃公司的形象門面
※如何讓商品強力曝光呢? 網頁設計公司幫您建置最吸引人的網站,提高曝光率!
※綠能、環保無空污,成為電動車最新代名詞,目前市場使用率逐漸普及化
※廣告預算用在刀口上,台北網頁設計公司幫您達到更多曝光效益
※教你寫出一流的銷售文案?
※聚甘新